Printed in Poland Wydrukowano w Polsce Készült Lengyelországban Vytištěno v Polsku Vytlačené v Poľsku Надруковано в Польщі Trükitud Poolas Iespiests Polijā Išspausdinta Lenkijoje Τυπώθηκε στην Πολωνία Polonya’da basılmıştır PIN ENGLISH POLSKI ČESKY УКРАЇНСЬКА SLOVENSKY EESTI http://www.sharp-eu.
46o/40o/36o () [] [[ ]] LC-46LE600E LC-40LE600E LC-32LE600E ( 470.0 ) / [ 420.0 ] / [[ 390.0 ]] ( 470,0 ) / [ 420,0 ] / [[ 390,0 ]] ( 123.2 ) [ 99.0 ] [[ 83.
ENGLISH ENGLISH OPERATION MANUAL • The illustrations and the OSD in this operation manual are for explanation purposes and may vary slightly from the actual operations. • The examples used throughout this manual are based on the LC-46LE600E model. • LC-32LE600E, LC-40LE600E and LC-46LE600E models are compatible with H.264 (MPEG4 H.264, MPEG4 AVC, MPEG4 AVC/H.264) compressed broadcasts. Dear SHARP customer Thank you for your purchase of the SHARP LCD colour TV product.
Introduction Important Safety Precautions • Cleaning—Unplug the AC cord from the AC outlet before cleaning the product. Use a damp cloth to clean the product. Do not use liquid cleaners or aerosol cleaners. • Use a soft damp cloth to gently wipe the panel when it is dirty. To protect the panel, do not use a chemical cloth to clean it. Chemicals may cause damage or cracks in the cabinet of the TV.
Introduction Remote control unit 1 2 B (Standby/On) (Page 10) Buttons for useful operations 1 2 m (Teletext) ATV: Display analogue teletext (Page 12). DTV: Select MHEG-5 and teletext for DTV (Page 12). 3 k (Reveal hidden Teletext) (Page 12) [ (Subtitle) Switch subtitle languages on/off (Pages 12 and 22). 3 (Freeze/Hold) Press to freeze a moving image on the screen. Teletext: Stop updating teletext pages automatically or release the hold mode. E END Exit the “MENU” screen.
Introduction TV (Front view) 1 2 3 4 5 6 7 8 5 1 2 3 4 6 7 8 9 9 B (Standby/On indicator) OPC indicator Remote control sensor OPC sensor a (Power button) @ (Menu button) b (Input source button) :r/s (Programme [channel] buttons) i+/- (Volume buttons) TV (Rear view) 1 2 6 1 *1 7 8 9 10 2 11 3 4 5 6 7 8 9 10 11 12 13 14 15 3 *2 12 13 4 16 17 18 COMMON INTERFACE slot SERVICE terminal (USB terminal for service personnel only) HDMI 3 (HDMI) terminal EXT 8 terminals Headphones AC INPUT termi
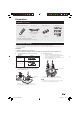
Preparation Supplied accessories Remote control unit ( x 1) AC cord ( x 1) Cable clamp ( x 1) Stand unit ( x 1) For 32 inch models For 40/46 inch models Product shape varies in some countries. Pages 3 and 6 Page 8 Page 8 Page 5 • Operation manual (This publication) • “AAA” size zinc-carbon battery ( x 2) ... Page 6 Attaching the stand unit • Before attaching (or detaching) the stand, unplug the AC cord from the AC INPUT terminal.
Preparation Inserting the batteries Before using the TV for the first time, insert two supplied “AAA” size zinc-carbon batteries. When the batteries become depleted and the remote control unit fails to operate, replace the batteries with new “AAA” size batteries. 1 2 Open the battery cover. Insert two supplied “AAA” size batteries. • Place batteries with their terminals corresponding to the (e) and (f) indications in the battery compartment. 3 Close the battery cover.
Quick guide Initial installation overview Follow the steps below one by one when using the TV for the first time. Some steps may not be necessary depending on your TV installation and connection. Run the initial settings Preparation Connect an antenna cable to the antenna terminal (Page 8). Turn on (;) the MAIN POWER switch on the left side of the TV (Page 4). Turn on the power using a on the TV (Page 10). Congratulations! Now you can watch TV.
Quick guide Before turning on the power 1 * 2 Cable clamp (Bundle the cables with the clamp) Standard DIN45325 plug (IEC 169-2) 75 q coaxial cable Turn on (;) the MAIN POWER switch on the left side of the TV. AC cord (Product shape varies in some countries) * Place the TV close to the AC outlet, and keep the power plug within reach. The AC cord is supplied either with a ferrite core or without a ferrite core. Neither type causes unnecessary electrical wave emissions or interference.
Quick guide 5 Initial auto installation Start When the TV is powered on for the first time after purchase, the initial auto installation wizard appears. Follow the menus and make the necessary settings one after another. Skip Press a/b to select “Start” or “Skip”, and then press ;. • If you want to search for more broadcasts, execute “Additional Search” from the “Programme Setup” menu (Page 21).
Watching TV Daily operation Changing channels With :r/s: Switching on/off With 0_9: Turning on/off the power 1 Turn on (;) the MAIN POWER switch on the left side of the TV (Page 4). 2 Press a on the TV. Switch it off by pressing a on the TV. • When turning off the power using a on the TV, EPG data will be lost. Standby mode E To standby mode If the TV is switched on, you can switch it to standby by pressing B on the remote control unit.
Watching TV EPG EPG is a programme list that is displayed on the screen. With the EPG, you can check the schedule of DTV/RADIO, view detailed information about them, tune to an event currently on-air. Basic Operation The illustrations on this page are explained using three digit channels. [DTV-TV] Filter [Mon] [Mon] All types Prev Next Programme Info. Filter E Display/Close the EPG screen Select Enter Back Exit Prev Next Programme Info. Filter Press EPG.
Watching TV Buttons for teletext operations Teletext Buttons What is Teletext? Teletext broadcasts pages of information and entertainment to specially equipped TV. Your TV receives teletext signals broadcast by a TV network, and decodes them into graphical format for viewing. News, weather and sports information, stock exchange prices and programme previews are among the many services available. Turning Teletext on/off 1 Select a TV channel or external source providing a teletext programme.
Connecting external devices E Before connecting ... • Be sure to turn off the TV and any devices before making any connections. • Firmly connect a cable to a terminal or terminals. • Carefully read the operation manual of each external device for possible connection types. This also helps you get the best possible audiovisual quality to maximise the potential of the TV and the connected device. • Refer to page 25 for connecting a PC to the TV.
Connecting external devices Y PB PR (CB) (CR) Component connection SCART connection Example of connectable devices Example of connectable devices E VCR E DVD player/recorder E Decoder You will enjoy accurate colour reproduction and high quality images through the EXT 3 terminal when connecting a DVD player/recorder or other device.
Connecting external devices Audio connections Speaker/amplifier connection Connect an amplifier with external speakers as shown below.
Menu operation What is the MENU? • You need to call up the OSD to perform settings for the TV. The OSD for the settings is called “MENU”. • The “MENU” enables various settings and adjustments. Basic Operation Display the MENU Screen Press @ and the “MENU” screen displays. Picture DYNAMIC OPC [Off] Select an item Press a/b/c/d to select/adjust the desired menu, and adjust the item to the desired level, and then press ;. Press 6 to return to the previous “MENU” page.
Basic adjustment Picture Settings Picture Advanced Picture DYNAMIC OPC [Off] This TV provides various advanced functions for optimising the picture quality. Backlight Picture Contrast Brightness DYNAMIC Colour Colour Temp. Tint Film Mode Sharpness Active Contrast Advanced DNR Reset OPC Max. High [On] [On] [Middle] OPC Min. Picture OPC Colour Temp. Automatically adjusts the brightness of the screen. Adjusts the colour temperature to give the best white image.
Basic adjustment Audio Settings Range of OPC The brightness level range of the OPC sensor’s automatic adjustments can be set according to your preferences. The adjustment range of the OPC sensor can be set to a maximum of e 16 and a minimum of f 16. Audio DYNAMIC Treble NOTE Bass • This function is available only when the “OPC” setting is set to “On” or “On:Display”. • The maximum setting cannot be set to a smaller number than the minimum setting.
Basic adjustment Outputting audio only Audio Audio Description Option Available only when you set “Audio Description” in the “Type” menu above. Item Speaker When set to “On”, audio for the visually impaired is output from the TV speakers. Headphone When set to “On”, audio for the visually impaired is output from the headphone terminal. Volume Adjust the volume of the speakers or headphones. Audio Only When listening to music from a music programme, you can set the TV off and enjoy audio only.
Basic adjustment Power Save Settings ECO No Signal Off ECO ECO picture control [On] Energy Save [Standard] No Signal Off [Disable] No Operation Off [Disable] When set to “Enable”, the TV will automatically enter standby mode if there is no signal input for 15 minutes. ECO No Operation Off ECO ECO picture control This function automatically detects the image source and decreases the power consumption while keeping the brightness of the image unchanged.
Basic adjustment Additional Search Use this menu to add new channels automatically after auto installation has been completed. Manual Search Channel Skip Channels with a ✔ mark are passed over when pressing :r/s on the TV or remote control unit. 1 Press a/b to select the desired channel. 2 Press ; to set a ✔ mark at the channel that you want to skip. Add new services within a specified channel bandwidth.
Basic adjustment Password/Parental lock settings Digital Setup Subtitle Setup Child Lock Allows you to use a PIN to protect certain settings from being accidentally changed. NOTE • PIN input is required when executing “Child Lock”. The default PIN is “1234”. To clear the PIN setting (PIN input will no longer be needed), refer to CLEARING THE PIN (Page 24). Change PIN Register a four-digit password number to use the “Child Lock” function.
Useful viewing functions Selecting the picture size You can select the picture size. Selectable picture size varies with the type of signal received. 1 • The “WIDE MODE” menu displays. • The menu lists the “WIDE MODE” options selectable for the type of video signal currently received. 2 Item (for SD [Standard-Definition] signals) Auto This mode allows the TV to switch automatically among the different picture sizes. Normal Keeps the original aspect ratio in a full screen display.
Other useful features Setting when using external devices Reset Setup Input source settings Reset Setup If complex adjustments are made so that the settings cannot be restored to normal, you can reset the settings to the factory preset values. Input Label 1 2 You can label each input source with a custom description. 1 2 3 Press b to select the desired input source. CLEAR BACK Press c/d to select “Yes”, and then press ;.
Connecting a PC Connecting a PC Adjusting the PC image automatically HDMI Connection PC HDMI 1, 2 or 3 This function enables the screen to be automatically adjusted to its best possible condition when the analogue terminals of the TV and PC are connected with a commercially available DVI/RGB conversion cable, etc. Setup HDMI-certified cable Auto Sync. PC HDMI 2* NOTE DVI/HDMI cable ø 3.5 mm stereo • “Auto Sync.
Connecting a PC Parameter RS-232C port specifications PC Control of the TV • When a programme is set, the TV can be controlled from the PC using the RS-232C terminal. The input signal (PC/video) can be selected, the volume can be adjusted and various other adjustments and settings can be made, enabling automatic programmed playing. • Use an RS-232C serial control cable (cross type) (commercially available) for the connections.
Connecting a PC PC compatibility chart Resolution Horizontal Frequency Vertical Frequency Analogue (DSub) Digital (HDMI) VESA Standard VGA 640 x 480 31.5 kHz 60 Hz ✔ ✔ ✔ SVGA 800 x 600 37.9 kHz 60 Hz ✔ ✔ ✔ XGA 1,024 x 768 48.4 kHz 60 Hz ✔ ✔ WXGA 1,280 x 768 47.7 kHz 60 Hz ✔ WXGA 1,360 x 768 47.7 kHz 60 Hz ✔ ✔ ✔ SXGA 1,280 x 1,024 64.0 kHz 60 Hz ✔ ✔ SXGA+ 1,400 x 1,050 65.
Appendix Troubleshooting Problem • No power. Possible Solution • • • • Turn on (;) the MAIN POWER switch on the left side of the TV (Page 4). Check if you pressed B on the remote control unit. If the indicator on the TV lights up red, press B. Is the AC cord disconnected? Check if you pressed a on the TV. • The TV cannot be operated. • External influences such as lightning, static electricity, etc., may cause improper operation.
Appendix Specifications Item LCD COLOUR TV (32 o), LC-32LE600E LCD COLOUR TV (40 o), LC-40LE600E LCD COLOUR TV (46 o), LC-46LE600E LCD panel Advanced Super View & BLACK TFT LCD (32 o) Advanced Super View & BLACK TFT LCD (40 o) Advanced Super View & BLACK TFT LCD (46 o) Resolution 2,073,600 pixels (1,920 x 1,080) Video Colour System TV-Standard TV Function Receiving Channel PAL/SECAM/NTSC 3.58/NTSC 4.
Appendix Optional accessory The listed optional accessory is available for this LCD colour TV. Please purchase them at your nearest shop. • Additional optional accessories may be available in the near future. When purchasing, please read the newest catalogue for compatibility and check the availability. No.
Appendix End of life disposal A. Information on Disposal for Users (private households) 1. In the European Union Attention: If you want to dispose of this equipment, please do not use the ordinary dust bin! Used electrical and electronic equipment must be treated separately and in accordance with legislation that requires proper treatment, recovery and recycling of used electrical and electronic equipment.
Appendix Rating table for Child Lock Broadcasted rating User-adjusted rating AGE 4 5 6 7 8 9 10 11 12 13 14 15 16 17 18 Universal viewing ✔ — — — — — — — — — — — — — — Parental approval pref. ✔ ✔ ✔ ✔ ✔ — — — — — — — — — — X-rated ✔ ✔ ✔ ✔ ✔ ✔ ✔ ✔ ✔ ✔ ✔ ✔ ✔ ✔ ✔ Broadcasted rating User-adjusted rating Universal viewing Parental approval pref. X-rated Universal viewing — — — Parental approval pref.