
User Guide


6-5
CHAPTER6
PART NAMES AND FUNCTIONS
OUTPUT
2-SIDED
COPY
SPECIAL
MODES
INFORMATION
CUSTOM
SETTINGS
ORIGINAL
8
11
1
2
8
11R
1
2
1.
8
11
1
2
2.
1711
3.
8
14
1
2
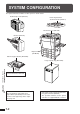
READY TO COPY.
AUTO
EXPOSURE PAPER SELECT
100%
COPY RATIO
8/ 11AUTO
1
2
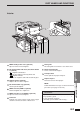
INFORMATION key (p. 1-7)
Press for operation guidance on use of various
features of this copier.
Press for guidance when a misfeed occurs, when
adding toner, or when used toner must be
disposed of.
CUSTOM SETTINGS key
Press to set key operator programs or adjust the
contrast of the touch panel.
2-SIDED COPY key
Press to select the 1-sided to 1-sided, 1-sided to
2-sided*, 2-sided to 2-sided* or 2-sided to
1-sided* copy mode.
* To select the 1-sided to 2-sided or 2-sided to
2-sided copy mode, an optional duplex module
(AR-DU2N) must be installed. To select the
2-sided to 1-sided or 2-sided to 2-sided copy
mode, an optional RADF must be installed.
OUTPUT key
Press to select the sorter mode when an optional
staple sorter (AR-SS2) is installed.
EXPOSURE display
Indicates the selected exposure mode.
EXPOSURE key (p. 2-16)
Press to select the exposure mode: AUTO or
MANUAL and TEXT/PRTD. PHOTO, TEXT/
PHOTO, TEXT, PHOTO, PRINTED PHOTO or
MAP. The COPY OF COPY and COLOR TONE
ENHANCEMENT modes can also be selected
with this key.
PAPER SELECT display
Displays the selected paper size. When “AUTO”
is displayed, paper size matching the original and
copy ratio will be automatically selected.
PAPER SELECT key
Press to select the desired paper tray.
COPY RATIO display
Displays the copy ratios for reductions or
enlargements.
COPY RATIO key
Press to select a reduction or enlargement copy
ratio or select the automatic copy ratio selection
mode.
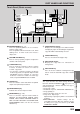
Initial settings
The copier assumes the initial settings when it is
turned on, when the CLEAR ALL (
CA
) key is pressed,
and approximately 1 minute after the last copy is
made in any mode.
●
Copy ratio: 100%
●
Automatic exposure, TEXT/PRTD. PHOTO mode
●
Copy quantity: 0
●
All special copier modes are set to off.
●
Tray select: Paper tray 1.
Optional large capacity tray will be selected when
installed.
★ KEY OPERATOR Initial settings can be
programmed as desired. The auto clear time can also
be changed. See pages 21 and 25 of the KEY
OPERATOR’S GUIDE.
GENERAL INFORMATION
Part names and functions
Touch Panel (Basic screen)