INSTALLATION GUIDE (for printer) MODEL AR-C260 AR-C260M DIGITAL FULL COLOUR COPIER/PRINTER (AR-C260) DIGITAL FULL COLOUR MULTIFUNCTIONAL SYSTEM (AR-C260M) Page • INTRODUCTION 1 • ABOUT THE CD-ROMS 2 • INSTALLING THE PRINTER DRIVER AND UTILITIES (SOFTWARE INSTALLATION) 3 • UNINSTALLING PRINTER DRIVERS AND PRINTER UTILITIES 15 • INSTALLING PRINTER DRIVERS USING THE "ADD PRINTER WIZARD" 16 • CONNECTING THE MACHINE TO YOUR COMPUTER 18 Be sure to become thoroughly familiar with this manual to gain the maximu
The CE mark logo label is affixed on an equipment in case that the directives described in the above sentence are applicable to the product. (This sentence is not applicable in any country where the above directives are not required.) Warning: This is a Class A product. In a domestic environment this product may cause radio interference in which case the user may be required to take adequate measures.
INTRODUCTION Thank you for purchasing this product. This manual explains how to install the printer driver and utilities required for the printer function. To use the printer function, please read the following manuals. Installation guide (for printer) (this manual) This explains the contents of the accompanying CD-ROMs (2) and the procedure for installing the software. Manuals for use of the printer function ● Operation manual (for printer) This manual can be found in the "PRINTER UTILITIES" CD-ROM.
ABOUT THE CD-ROMS This product comes with two CD-ROMs: the "PRINTER UTILITIES" CD-ROM and the "User Software" CD-ROM. These two CD-ROMs contain the following software: 1. "PRINTER UTILITIES" CD-ROM This CD-ROM contains a wizard-type installer for installation of the following utilities, and online manuals. ● PCL5c Printer Driver: The printer driver that is required for use of this product.
INSTALLING THE PRINTER DRIVER AND UTILITIES (SOFTWARE INSTALLATION) The procedures for installing the printer driver and utilities (hereafter called "software") required for use of the machine as a printer are explained in this section. There are two ways of installing the printer driver: using the installer in the "PRINTER UTILITIES" CD-ROM, and using the "Add printer wizard". To print from a Macintosh environment, the optional PS3 Expansion Kit is required. 1.
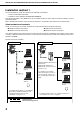
INSTALLING THE PRINTER DRIVER AND UTILITIES (SOFTWARE INSTALLATION) Installation method 1 Use this procedure to install the software in the following environments: 1. Printer connected by LAN cable 2. Windows version: Windows 95/98/Me/NT4.0/2000/XP The following procedure uses Windows XP as an example. Follow the same steps to install the software on other operating systems. Before installing the software, make sure that the machine is connected to the network with a network cable.
INSTALLING THE PRINTER DRIVER AND UTILITIES (SOFTWARE INSTALLATION) ■ Set the IP address of the machine Before installing the printer driver, set the IP address of the machine using the appropriate key operator program. For this procedure, see Key Operator Programs (page 6-6) in the "Operation manual (for printer)" (in PDF format) in the "PRINTER UTILITIES" CD-ROM. The factory default setting for the IP address is "DHCP", which means that the IP address is set automatically.
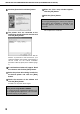
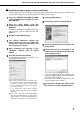
INSTALLING THE PRINTER DRIVER AND UTILITIES (SOFTWARE INSTALLATION) 8 Click the [Standard installation] button. the finish setup window appears, 13 When click the [OK] button. 14 Click the [Close] button. NOTE A message prompting you to restart your computer may appear after installation is finished. If this message appears, click [Yes] to restart your computer. This completes the installation. 9 The printers that are connected to the network are found. Select the machine and click the [Next] button.
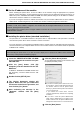
INSTALLING THE PRINTER DRIVER AND UTILITIES (SOFTWARE INSTALLATION) ■ Installing the printer driver (custom installaton) The procedure for a custom installation of the printer driver is explained here. Select [Custom installaton] if you wish to install a display font or directly specify the IP address of the machine. the "PRINTER UTILITIES" CD-ROM 1 Insert that accompanied the machine into your CD-ROM drive.
INSTALLING THE PRINTER DRIVER AND UTILITIES (SOFTWARE INSTALLATION) the printer driver being installed as 12Select the default printer and click the [Next] button. the printer name window appears, 13When click the [Next] button. If you wish to change the printer name, enter the desired name. you are asked if you wish to install 14When the display font, select an answer and click the [Next] button. the contents of the window and 15 Check click the [Next] button. Installation of the printer driver begins.
INSTALLING THE PRINTER DRIVER AND UTILITIES (SOFTWARE INSTALLATION) ■ Using the machine as a shared printer via a server If the printer server in a Windows NT server environment, NetWare server environment, or other environment is configured to share the printer (the machine), follow the steps below to install the printer driver in each client computer. Ask your network administrator for the server name and printer name of the machine on the network.
INSTALLING THE PRINTER DRIVER AND UTILITIES (SOFTWARE INSTALLATION) Installation method 2 Use this procedure to install the software in the following environments: 1. The printer is connected by USB cable or parallel cable. 2. Windows version: Windows XP NOTE To install this software, you must have administrator's rights. Installing the software in Windows XP (USB/parallel interface) Install the software as follows.
INSTALLING THE PRINTER DRIVER AND UTILITIES (SOFTWARE INSTALLATION) the on-screen 11 Follow install the printer driver. instructions to the machine to your computer an 14 Connect interface cable (page 18). If a warning message regarding the Windows logo test appears while the printer driver files are being copied (the warning message may appear several times), be sure to click the [Continue Anyway] button.
INSTALLING THE PRINTER DRIVER AND UTILITIES (SOFTWARE INSTALLATION) Installation method 3 Use this procedure to install the software in the following environments: 1. The printer is connected by USB cable. 2. Windows version: Windows 98/Me/2000*1 NOTE *1 To install the software using the installer, you must have administrator's rights. Installing the software in Windows 98/Me or Windows 2000 (USB/interface) Install the software as follows.
INSTALLING THE PRINTER DRIVER AND UTILITIES (SOFTWARE INSTALLATION) you are asked if you wish to install 12 When the display font, select an answer and click the [Next] button. the finish installation window 15 When appears, click the [Close] button. When the message "Now connect the interface cable to the PC. This will finalize the driver's installation and settings." appears, click the [OK] button. NOTE A message prompting you to restart your computer may appear after installation is finished.
INSTALLING THE PRINTER DRIVER AND UTILITIES (SOFTWARE INSTALLATION) Installation method 4 Use this procedure to install the software in the following environments: 1. The printer is connected by parallel cable. 2. Windows version: Windows 95/98/Me/NT 4.0*1/2000*1 NOTE *1 To install the software using the installer, you must have administrator's rights. Installing the software in Windows 95/98/Me or Windows NT 4.0/2000 (Parallel interface) Install the software as follows.
UNINSTALLING PRINTER DRIVERS AND PRINTER UTILITIES you are asked to select the model 12 When name, select the model that you are using the on-screen 17 Follow install the printer driver. instructions to and click the [Next] button. 13 Check the contents of the window and click the [Next] button. Installation of the printer driver begins.
INSTALLING PRINTER DRIVERS USING THE "ADD PRINTER WIZARD" Before installation Before installing the printer drivers, check the following items. ● Ensure that your computer system meets the following requirements. Computer type: IBM PC/AT or compatible computer Hardware requirements of the operating system must be satisfied. Operating system: Microsoft Windows 95 Microsoft Windows 98 Microsoft Windows Me Microsoft Windows 2000 Microsoft Windows NT 4.
INSTALLING PRINTER DRIVERS USING THE "ADD PRINTER WIZARD" ■ Example of installation of a printer driver using the "Add Printer Wizard" in Windows XP The method for installing a printer driver using the "Add Printer Wizard" in Windows XP is shown below. The installation example assumes that the printer is connected as a local printer (see "CONNECTING THE MACHINE TO YOUR COMPUTER" on page 18) and that the CD-ROM drive is drive "R". The procedure may differ depending on the system environment.
CONNECTING THE MACHINE TO YOUR COMPUTER ■ Connection with a network connector If the machine is going to be used as a network printer, see the operation manual for the Print Server Card. Use a network cable that is shielded. ■ Connection with a USB cable Please purchase a USB cable (shielded) that complies with the following standard. The USB interface on the machine complies with the USB1.1 standards.
➣➢➣➢➣➢➣➢➣➢➣➢➣➢➣➢➣➢➣➢➣➢➣➢➣➢➣➢➣➢➣➢➣➢➣➢➣➢➣➢➣➢➣➢➣➢➣➢➣ Required in IEC-950 (EN 60 950) - Europe • The equipment should be installed near an accessible socket outlet for easy disconnection. Required in Appendix ZB of BS 7002 (En 60 950) — United Kingdom MAINS PLUG WIRING INSTRUCTIONS The mains lead of this equipment is already fitted with a mains plug which is either a non-rewireable (moulded) or a rewireable type.
INSTALLATION GUIDE (for printer) PRINTED IN CHINA 2004A KS1 TINSE2381FCZ1