APAN DSC1 5QSZZ AR-F14.
AR-F14.book 1 ページ 2004年1月15日 木曜日 午後6時10分 For users in the USA This device complies with Part 15 of the FCC rules. Operation is subject to the following two conditions: (1) This device may not cause harmful interference, and (2) this device must accept any interference received, including interference that may cause undesired operation.
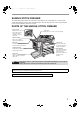
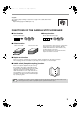
AR-F14.book 1 ページ 2004年1月15日 木曜日 午後6時10分 SADDLE STITCH FINISHER The saddle stitch finisher features the offset function, which makes it easy to distinguish sets of output, and the saddle stitch (pamphlet) function, which automatically staples and folds output down the center. An optional punch unit can also be installed to punch holes in output. PARTS OF THE SADDLE STITCH FINISHER Staple section Open the front cover and pull out this section to replace the staple cartridge or remove a staple jam.
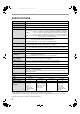
AR-F14.book 2 ページ 2004年1月15日 木曜日 午後6時10分 SPECIFICATIONS Name Saddle Stitch Finisher Number of trays 2 Paper output Face down (when using the offset tray) Tray types Upper tray: Offset tray Tray capacity Upper tray: Without stapling 8-1/2" x 11" / A4 size or less (21 lbs.(80 g/m2)): 1000 sheets maximum 8-1/2" x 13" / B4 size or greater (21 lbs.(80 g/m2)): 500 sheets maximum Stapling 8-1/2" x 11" / A4 size or less (21 lbs.
AR-F14.book 3 ページ 2004年1月15日 木曜日 午後6時10分 Supplies The following staple cartridge is required as a supply for the saddle stitch finisher: ● AR-SC2 Staple Cartridge (approx.
AR-F14.book 4 ページ 2004年1月15日 木曜日 午後6時10分 ■ Punch function (only when a punch unit is installed) When an optional punch unit is installed on the saddle stitch finisher, holes can be punched in the output. Punched output is delivered to the offset tray. The punch function cannot be used in combination with the saddle stitch (pamphlet stapling) function. For paper sizes that can be punched, see the specifications on page 2.
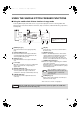
AR-F14.book 5 ページ 2004年1月15日 木曜日 午後6時10分 USING THE SADDLE STITCH FINISHER FUNCTIONS ■ Using the saddle stitch finisher functions in copy mode Touch the [OUTPUT] key in the main screen of copy mode to display the screen for selecting saddle stitch finisher functions. Selections include the sort function, staple sort function, saddle stitch function, group function, and output tray.
AR-F14.book 6 ページ 2004年1月15日 木曜日 午後6時10分 ■ Using the saddle stitch finisher functions in printer mode To use the staple function in printer mode, select "Properties" in the Print window. In the "Finishing" field of the "Main" tab, select "Left", "Right", or "Top " for "Binding Edge", and "1 Staple" or "2 Staples" for "Staple". To use the pamphlet function, select the "Pamphlet Style" radio button in the "Document Style" field and then select "Actual size" or "2-UP".
AR-F14.book 7 ページ 2004年1月15日 木曜日 午後6時10分 The procedure for using the staple sort function is explained below. 1 Place the original (p.6). 2 Touch the [OUTPUT] key. 7 Using the RSPF 8 Using the document glass Copying begins after all pages are scanned. Place the next page on the document glass and press the [START] key ( ). Repeat until all pages have been scanned and then touch the [READ END] key on the panel. 2-SIDED COPY OUTPUT PLACE NEXT ORIGINAL. PRESS [START].
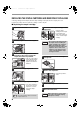
honbun.fm 8 ページ 2004年1月15日 木曜日 午後8時33分 REPLACING THE STAPLE CARTRIDGE AND REMOVING STAPLE JAMS A message will appear in the display when the staple cartridge needs replacement or a staple jam occurs. Follow the procedures below to replace the cartridge or remove the jam. ■ Replacing the staple cartridge 1 Open the front cover. 6 Install the new staple cartridge in the staple box.
AR-F14.book 9 ページ 2004年1月15日 木曜日 午後6時10分 ■ Removing a staple jam 1 Press the detach button and separate the saddle stitch finisher from the machine. 6 Remove any misfed paper. Remove the paper gently without tearing it. Caution 2 3 The saddle stitch finisher and the machine are connected at the rear. Exercise caution when pulling them apart. 7 Close the saddle stitch section cover. 8 Pull the stapler section forward.
AR-F14.book 10 ページ 11 2004年1月15日 木曜日 午後6時10分 Raise the lever on the front edge of the staple box. 13 Push in the staple box. Push the staple box all the way in until you hear a "click". If the leading staple is bent, be sure to cut it off. If a bent staple is used for stapling, a staple jam will result. 12 Replace the front edge lever. 14 Push in the staple unit. 15 Close the front cover. 16 Push the saddle stitch finisher back onto the machine.
AR-F14.book 11 ページ 2004年1月15日 木曜日 午後6時10分 REMOVING PAPER MISFEEDS When a paper misfeed occurs during copying, a message and picture will appear in the display of the operation panel as shown below and copying will automatically stop. Follow the procedures below to remove the misfeed. A MISFEED HAS OCCURRED. INFORMATION Note When a misfeed occurs, you can touch the [INFORMATION] key to display brief instructions for removing the misfeed.
AR-F14.book 12 ページ 2004年1月15日 木曜日 午後6時10分 ■ Misfeed in the saddle stitch finisher 1 Press the detach button and separate the saddle stitch finisher from the machine. Caution 2 3 The saddle stitch finisher and the machine are connected at the rear. Exercise caution when pulling them apart. Remove the misfed paper. Remove the paper gently, taking care not to tear it. 6 Close the top cover. 7 Remove any misfed paper from the stapler compiler. Remove any misfed paper from the machine.
AR-F14.book 13 ページ 2004年1月15日 木曜日 午後6時10分 10 Open the front cover. 11 Rotate roller rotating knob D in the direction of the arrow. 15 Push the saddle stitch finisher back onto the machine. Roller rotating knob D 12 Remove any misfed paper from the saddle stitch tray. Remove the paper gently, taking care not to tear it. 13 Close the cover of the saddle stitch section. 14 Close the front cover.
AR-F14.book 14 ページ 2004年1月15日 木曜日 午後6時10分 TROUBLESHOOTING (RELATED TO SADDLE STITCH FINISHER) If you experience difficulty with the saddle stitch finisher, check the following troubleshooting guide before calling for service. Many problems can be resolved by the user.
AR-F14.book 15 ページ 2004年1月15日 木曜日 午後6時10分 USING THE KEY OPERATOR PROGRAMS When the saddle stitch finisher is installed on the multifunction machine, the key operator programs indicated below are added or changed. For information on "USING THE KEY OPERATOR PROGRAMS", see page 2 of the "Key operator's guide" that comes with the machine.
Cover4.