
User`s guide

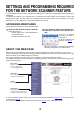
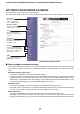
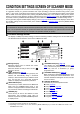
Table Of Contents
- INTRODUCTION
- TABLE OF CONTENTS
- ABOUT THE NETWORK SCANNER FUNCTION
- SETTINGS AND PROGRAMMING REQUIRED FOR THE NETWORK SCANNER FEATURE
- CONDITION SETTINGS SCREEN OF SCANNER MODE
- SENDING AN IMAGE
- SCANNING SETTINGS (ORIGINAL SIZE, EXPOSURE, RESOLUTION, AND FILE FORMAT)
- SPECIAL FUNCTIONS
- ERASING EDGE SHADOWS (ERASE)
- TRANSMITTING A DIVIDED ORIGINAL (DUAL PAGE SCAN)
- AUTOMATIC TRANSMISSION AT A SPECIFIED TIME (TIMER TRANSMISSION)
- TRANSMITTING TWO ORIGINAL PAGES AS A SINGLE PAGE (2IN1)
- TRANSMITTING THE FRONT AND BACK SIDES OF A CARD ON ONE SHEET OF PAPER (CARD SHOT)
- TRANSMITTING A LARGE NUMBER OF PAGES (JOB BUILD)
- PRINTING A TRANSACTION REPORT (TRANSACTION REPORT)
- PROGRAMMING FREQUENTLY USED OPERATIONS (PROGRAM)
- PRIORITY TRANSMISSION OF A STORED JOB
- CANCELING AN E-MAIL/FTP TRANSMISSION
- INTERNET FAX RECEPTION
- TRANSFERRING RECEIVED INTERNET-FAXES TO ANOTHER MACHINE WHEN PRINTING IS NOT POSSIBLE (FORWARDING FUNCTION)
- STORING, EDITING, AND DELETING FROM THE TOUCH PANEL
- STORING ONE-TOUCH KEYS (only addresses for Scan to E-mail and Internet-Fax)
- EDITING AND DELETING ONE-TOUCH KEYS
- PROGRAMMING A GROUP KEY
- EDITING AND DELETING GROUP KEYS
- STORING SENDER INFORMATION
- EDITING AND DELETING SENDER INFORMATION
- STORING A GROUP INDEX
- PRINTING PROGRAMMED INFORMATION
- STORING A PROGRAM
- EDITING AND DELETING PROGRAMS
- TROUBLESHOOTING
- KEY OPERATOR PROGRAMS
- KEY OPERATOR PROGRAM LIST
- USING THE KEY OPERATOR PROGRAMS
- SETTING PROGRAMS
- Operation settings
- Default display settings
- The number of direct address/sender keys displayed setting
- Must input next address key at broadcast setting
- The number of file name/subject keys displayed setting
- Initial resolution setting
- Scan complete sound setting
- Default exposure settings
- Default sender set
- Compression mode at broadcasting
- Initial file format setting
- Maximum size of e-mail attachments
- BCC setting
- Set I-Fax own name and address
- I-Fax speaker volume settings
- Auto wake up print
- Original print on transaction report
- Transaction report print select setting
- Activity report print select setting
- Body text print select setting
- I-Fax reception report on/off setting
- I-Fax reception report request timeout setting
- Rotation sending setting
- Printing page number at receiver
- Maximum size of e-mail attachments
- Number of resend times at reception error
- Auto receive reduce setting
- Reception check interval setting
- Duplex reception setting
- Print style setting
- Set address for data forwarding
- POP3 communication timeout setting
- I-Fax output tray setting
- Anti junk mail/domain name setting
- Entering anti junk mail/domain name
- Deleting an anti junk mail/domain name
- PRINTING OUT SETTINGS
- SPECIFICATIONS

9
CONDITION SETTINGS SCREEN OF SCANNER MODE
The condition settings screen of scanner mode is displayed by pressing the [IMAGE SEND] key (refer to page 1-12
of "Operation manual (for general information and copier operation)") while the document filing mode*
1
(print
mode*
2
), copy mode, or job status screen appears in the touch panel*
3
. In the explanations that follow, it is assumed
that the initial screen that appears after pressing the [IMAGE SEND] key is the condition setting screen (shown
below). If you have set the display to show the address book screen (following page
) when the [IMAGE SEND] key
is pressed, touch the [CONDITION SETTINGS] key in the address book to display the condition setting screen.
The key operator program "Default display settings" (refer to page 55
) can be used to set the display to show either
the condition setting screen (shown below) or the Address book screen (following page
) when the [IMAGE SEND]
key is pressed.
Q Condition settings screen
The display is initially set (factory setting) to show the following condition setting screen as the initial screen.
The illustration below shows the screen in the E-MAIL/FTP mode.
Message display
Messages appear here to indicate the current
status of the machine.
When the machine is ready to send, an icon
appears to the left.
[ ] (Quick) key (page 17
)
When you add a one-touch key or a group key, the
machine will automatically assign a shortened
number (in this manual, this key is called the Quick
key). Use this key for a three-digit shortened
number to simplify the transmission procedure.
[MODE SWITCH] key
Touch this key to switch between the E-MAIL/FTP
mode and the INTERNET-FAX mode. If the
machine is equipped with the facsimile feature, this
key can also be used for selecting the FAX mode.
[RESEND] key
Touch this key to send to the address to which
transmission was previously made. After an
address is specified, the [NEXT ADDRESS] button
is displayed here.
[ADDRESS BOOK] key (page 14
)
This displays the Address Book screen (next
page). Touch this key when you wish to use a one-
touch key that has a destination (or group)
programmed in it.
[ADDRESS REVIEW] key (page 18
)
When performing a broadcast transmission, touch
this key to check your selected destinations. Your
selected destinations will appear as a list, and the
list can be edited.
[SPECIAL MODES] key
Touch this key to set the special modes.
O Erase (page 25
)
O Dual page scan (page 26
)
O Timer (page 27
)
O 2 in 1 (page 28
)
O Card shot (page 29
)
O Job build (page 31
)
O Transaction report (page 32
)
O Program (page 33
)
*1 If the model of the main unit is AR-M355N or AR-M455N, or if the document filing functions are expanded.
*2 If the document filing functions are not expanded.
*3 Depending on the feature to be used, touch the [MODE SWITCH] key to select the E-MAIL/FTP mode or the
INTERNET-FAX mode.
NOTE
For information on the parts of the unit and the operation panel that are used for network scanning, refer to pages
1-9 to 1-12 of Operation manual (for general information and copier operation). For parts that are used for both
network scanning and printing, refer to chapter 4 of Operation manual (for printer).
ADDRESS BOOK
AUTO
READY TO SEND
.
ORIGINAL
300
x
300dpi
RESOLUTION
PDF MMR(G4)
FILE FORMAT
AUTO
E-MAIL/FTP
EXPOSURE
SPECIAL MODES
ADDRESS REVIEW
RESEND
FILE
ADDRESS ENTRY
MODE SWITCH
QUICK FILE
SEND SETTINGS