
User`s guide

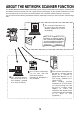
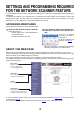
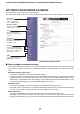
Table Of Contents
- INTRODUCTION
- TABLE OF CONTENTS
- ABOUT THE NETWORK SCANNER FUNCTION
- SETTINGS AND PROGRAMMING REQUIRED FOR THE NETWORK SCANNER FEATURE
- CONDITION SETTINGS SCREEN OF SCANNER MODE
- SENDING AN IMAGE
- SCANNING SETTINGS (ORIGINAL SIZE, EXPOSURE, RESOLUTION, AND FILE FORMAT)
- SPECIAL FUNCTIONS
- ERASING EDGE SHADOWS (ERASE)
- TRANSMITTING A DIVIDED ORIGINAL (DUAL PAGE SCAN)
- AUTOMATIC TRANSMISSION AT A SPECIFIED TIME (TIMER TRANSMISSION)
- TRANSMITTING TWO ORIGINAL PAGES AS A SINGLE PAGE (2IN1)
- TRANSMITTING THE FRONT AND BACK SIDES OF A CARD ON ONE SHEET OF PAPER (CARD SHOT)
- TRANSMITTING A LARGE NUMBER OF PAGES (JOB BUILD)
- PRINTING A TRANSACTION REPORT (TRANSACTION REPORT)
- PROGRAMMING FREQUENTLY USED OPERATIONS (PROGRAM)
- PRIORITY TRANSMISSION OF A STORED JOB
- CANCELING AN E-MAIL/FTP TRANSMISSION
- INTERNET FAX RECEPTION
- TRANSFERRING RECEIVED INTERNET-FAXES TO ANOTHER MACHINE WHEN PRINTING IS NOT POSSIBLE (FORWARDING FUNCTION)
- STORING, EDITING, AND DELETING FROM THE TOUCH PANEL
- STORING ONE-TOUCH KEYS (only addresses for Scan to E-mail and Internet-Fax)
- EDITING AND DELETING ONE-TOUCH KEYS
- PROGRAMMING A GROUP KEY
- EDITING AND DELETING GROUP KEYS
- STORING SENDER INFORMATION
- EDITING AND DELETING SENDER INFORMATION
- STORING A GROUP INDEX
- PRINTING PROGRAMMED INFORMATION
- STORING A PROGRAM
- EDITING AND DELETING PROGRAMS
- TROUBLESHOOTING
- KEY OPERATOR PROGRAMS
- KEY OPERATOR PROGRAM LIST
- USING THE KEY OPERATOR PROGRAMS
- SETTING PROGRAMS
- Operation settings
- Default display settings
- The number of direct address/sender keys displayed setting
- Must input next address key at broadcast setting
- The number of file name/subject keys displayed setting
- Initial resolution setting
- Scan complete sound setting
- Default exposure settings
- Default sender set
- Compression mode at broadcasting
- Initial file format setting
- Maximum size of e-mail attachments
- BCC setting
- Set I-Fax own name and address
- I-Fax speaker volume settings
- Auto wake up print
- Original print on transaction report
- Transaction report print select setting
- Activity report print select setting
- Body text print select setting
- I-Fax reception report on/off setting
- I-Fax reception report request timeout setting
- Rotation sending setting
- Printing page number at receiver
- Maximum size of e-mail attachments
- Number of resend times at reception error
- Auto receive reduce setting
- Reception check interval setting
- Duplex reception setting
- Print style setting
- Set address for data forwarding
- POP3 communication timeout setting
- I-Fax output tray setting
- Anti junk mail/domain name setting
- Entering anti junk mail/domain name
- Deleting an anti junk mail/domain name
- PRINTING OUT SETTINGS
- SPECIFICATIONS

SETTINGS AND PROGRAMMING REQUIRED FOR THE NETWORK SCANNER FEATURE
5
SETTING UP DESTINATION INFORMATION
Click "Destination" in the Web page menu frame to display the Destination Management screen. If you are prompted
to enter the password, enter it to display the screen. This screen allows you to store the name and address of a
destination in a one-touch key. The Destination Management screen can also be used to edit or clear stored
destinations.
A total of 999*
1
(500*
2
) destinations can be stored, including E-mail, FTP, Desktop, Internet-Fax, and Group
destinations. Among these, a combined total of 200*
1
(100*
2
) Scan to FTP and Desktop destinations can be stored.
The stored destinations appear as one-touch keys in the touch panel of the machine when you send an image,
allowing you to select the destination.
For detailed information on setting up, editing, and deleting destinations, refer to "General" under "Help".
Storing destinations for Scan to E-mail
Click "E-mail" in the Destination Management screen. Use this screen to enter the e-mail addresses of
destinations for Scan to E-mail.
When you have completed all of the entries, click "Submit". The entries will be stored.
Scan to E-mail destinations can also be stored, edited, and cleared from the touch panel of the machine. (pages 38 - 41)
To perform Scan to E-mail, the SMTP server settings must first be established. (Refer to page 8.)
Storing destinations for Scan to FTP
Click "FTP" in the Destination Management screen. Use this screen to enter the destination addresses for
Scan to FTP.
If you select the "Enable Hyperlink to FTP server to be e-mailed" checkbox, you can send an e-mail message
to a "Destination" selected from "E-mail Destination" (stored as destinations in the Web page menu "E-mail"),
to notify that person of the location of the scanned image data and its file format. (Scan to FTP (Hyperlink))
The e-mail includes a link to the location of the scanned image data, and if the FTP server does not require a
user name or password (anonymous server), the recipient can display the image by simply clicking on the
address.
To perform Scan to FTP (Hyperlink), you must set the SMTP server. If you entered a host name in "Hostname
or IP Address", you will need to enter the DNS server or WINS server settings. (Refer to page 8
.)
Storing destinations for Scan to Desktop
Click "Desktop" in the Destination Management screen. Use this screen to enter the destination addresses for
Scan to Desktop.
Scan to Desktop can only be used if Network Scanner Tool is installed in your computer (Network Scanner
Tool is included on the CD-ROM that accompanies the Network Scanner Expansion Kit.)
You can store a Scan to Desktop destination in the Web page, or in Network Scanner Tool. We recommend
that you normally use Network Scanner Tool, which automatically establishes settings. The Web page is
primarily used when the same settings are to be established in multiple units, or when the network
administrator performs maintenance. If the information set here differs from the information set in the host
computer, transmission and reception will not take place normally. For details, refer to the User's Guide for
Network Scanner Tool in the CD-ROM that accompanies the Network Scanner Expansion Kit.
If you entered a host name in "Hostname or IP Address", you will need to enter the DNS server or WINS server
settings. (Refer to page 8
.)
Storing destinations for Internet-Fax
Click "I-Fax" in the Destination Management screen. Use this screen to enter the destination e-mail addresses
for Internet-Fax.
The destinations can also be stored, edited, and cleared from the touch panel of the machine. (Refer to pages
38 - 41.)
To perform Internet-Fax transmission, you must set the SMTP server. (Refer to page 8
.)
*1 If the model of the main unit is AR-M355N or AR-M455N, or if the document filing functions are expanded.
*2 If the document filing functions are not expanded.