
User`s guide

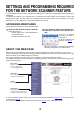
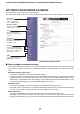
Table Of Contents
- INTRODUCTION
- TABLE OF CONTENTS
- ABOUT THE NETWORK SCANNER FUNCTION
- SETTINGS AND PROGRAMMING REQUIRED FOR THE NETWORK SCANNER FEATURE
- CONDITION SETTINGS SCREEN OF SCANNER MODE
- SENDING AN IMAGE
- SCANNING SETTINGS (ORIGINAL SIZE, EXPOSURE, RESOLUTION, AND FILE FORMAT)
- SPECIAL FUNCTIONS
- ERASING EDGE SHADOWS (ERASE)
- TRANSMITTING A DIVIDED ORIGINAL (DUAL PAGE SCAN)
- AUTOMATIC TRANSMISSION AT A SPECIFIED TIME (TIMER TRANSMISSION)
- TRANSMITTING TWO ORIGINAL PAGES AS A SINGLE PAGE (2IN1)
- TRANSMITTING THE FRONT AND BACK SIDES OF A CARD ON ONE SHEET OF PAPER (CARD SHOT)
- TRANSMITTING A LARGE NUMBER OF PAGES (JOB BUILD)
- PRINTING A TRANSACTION REPORT (TRANSACTION REPORT)
- PROGRAMMING FREQUENTLY USED OPERATIONS (PROGRAM)
- PRIORITY TRANSMISSION OF A STORED JOB
- CANCELING AN E-MAIL/FTP TRANSMISSION
- INTERNET FAX RECEPTION
- TRANSFERRING RECEIVED INTERNET-FAXES TO ANOTHER MACHINE WHEN PRINTING IS NOT POSSIBLE (FORWARDING FUNCTION)
- STORING, EDITING, AND DELETING FROM THE TOUCH PANEL
- STORING ONE-TOUCH KEYS (only addresses for Scan to E-mail and Internet-Fax)
- EDITING AND DELETING ONE-TOUCH KEYS
- PROGRAMMING A GROUP KEY
- EDITING AND DELETING GROUP KEYS
- STORING SENDER INFORMATION
- EDITING AND DELETING SENDER INFORMATION
- STORING A GROUP INDEX
- PRINTING PROGRAMMED INFORMATION
- STORING A PROGRAM
- EDITING AND DELETING PROGRAMS
- TROUBLESHOOTING
- KEY OPERATOR PROGRAMS
- KEY OPERATOR PROGRAM LIST
- USING THE KEY OPERATOR PROGRAMS
- SETTING PROGRAMS
- Operation settings
- Default display settings
- The number of direct address/sender keys displayed setting
- Must input next address key at broadcast setting
- The number of file name/subject keys displayed setting
- Initial resolution setting
- Scan complete sound setting
- Default exposure settings
- Default sender set
- Compression mode at broadcasting
- Initial file format setting
- Maximum size of e-mail attachments
- BCC setting
- Set I-Fax own name and address
- I-Fax speaker volume settings
- Auto wake up print
- Original print on transaction report
- Transaction report print select setting
- Activity report print select setting
- Body text print select setting
- I-Fax reception report on/off setting
- I-Fax reception report request timeout setting
- Rotation sending setting
- Printing page number at receiver
- Maximum size of e-mail attachments
- Number of resend times at reception error
- Auto receive reduce setting
- Reception check interval setting
- Duplex reception setting
- Print style setting
- Set address for data forwarding
- POP3 communication timeout setting
- I-Fax output tray setting
- Anti junk mail/domain name setting
- Entering anti junk mail/domain name
- Deleting an anti junk mail/domain name
- PRINTING OUT SETTINGS
- SPECIFICATIONS

SETTINGS AND PROGRAMMING REQUIRED FOR THE NETWORK SCANNER FEATURE
8
Change custom index name screen
This screen is displayed when you click "Custom Index" in the network scanning setup screen.
Programmed destinations appear as one-touch keys in the Address book screen of the touch panel, and are
normally included in the ABC index. Two types of indexes are available: the ABC index and group indexes
(custom directories). Group indexes allow you to assign any index name to the destination for easy searching.
Six group indexes are available, and a name up to six characters long can be assigned to each.
Group index names can be programmed and edited in this screen. Enter names for indexes 1 through 6 and
then click "Submit". If you wish to change a previously programmed name, enter the new name after deleting
the previous name and save it.
For information on grouping destinations in a group index, refer to page 6
. For information on switching
between the ABC index and group indexes, refer to page 11
.
The custom index can also be changed from the touch panel of the machine. (Refer to page 46
.)
Setting up internet-fax parameters
Various parameters concerning Internet-Fax transmission and reception must be set. These parameters are
used when you use the Internet-Fax feature.
Click "i-Fax" in the menu frame to display the i-Fax Setup screen.
If you use the Internet-Fax reception feature, you need to enter the settings for the POP3 server.
After setting the parameters, click "Submit" to store them.
Setting up servers
E-mail sent by Scan to E-mail, Internet-Fax transmission or Scan to FTP (Hyperlink) uses SMTP. To use any of
these transmission methods, you must enter the settings for the SMTP server.
If you use the global address search feature, you also need to enter the settings for the LDAP server.
If you entered a host name when storing a destination for Scan to FTP (Scan to FTP (hyperlink)) or Scan to
Desktop, you will need to enter the settings for the DNS or WINS server.
To set frequently used items for the SMTP server, DNS server, and LDAP server, click "Quick Setup" in the menu
frame to display the setting screen. Enter required parameters.
To set items that are not included in the quick setup screen, click “Services” or "LDAP" in the menu frame to
display the relevant setting screen. Enter required parameters.
PROTECTING INFORMATION PROGRAMMED IN THE WEB
PAGE ("Passwords")
Passwords can be set to restrict Web page access and protect settings. The administrator must change the
password from the factory default setting. Also the administrator must remember the new password. The password
is required to operate the settings on the password-protected screen.
A password can be set for the administrator and passwords can be set for each user. If you use a user password,
you will not be able to establish settings that are included only in the administrator screen.
The passwords for "user" and "admin" are both initially set to "Sharp". If you wish to change the passwords when first
establishing the settings, enter "Sharp" in "Admin Password" before you establish the settings. A password must
consist of alphanumeric characters and be no more than seven characters long. Passwords are case sensitive. After
entering a password, click "Submit" to set it. After setting the password, turn the machine power off and then back on.
When you are prompted for the password, enter "user" for accessing as a user or “admin” for accessing as an
administrator at the "User name". Then, enter the relevant password. For detailed information on setting passwords,
refer to "General" under "Help".