
Owner's Manual


Table Of Contents
- Part 1: General Information
- PRODUCT CONFIGURATIONS
- OPERATION MANUALS
- INSTALLATION REQUIREMENTS
- CAUTIONS
- CONTENTS
- INTRODUCTION
- MAIN FEATURES
- PART NAMES AND FUNCTIONS
- TURNING THE POWER ON AND OFF
- AUDITING MODE
- LOADING PAPER
- Identifying the trays
- Loading paper in paper tray 1 - tray 2
- Loading paper in paper tray 3
- Changing the paper size in paper tray 3
- Changing the paper size in paper tray 4
- Loading paper in paper tray 5 (optional large capacity tray)
- Specifications (optional large capacity tray)
- Loading paper in the bypass tray
- Specifications of paper trays (Types and sizes of paper that can be used in the trays)
- Setting the paper type and paper size
- Setting the paper size when a special size is loaded
- CUSTOM SETTINGS
- REPLACING THE TONER CARTRIDGES
- STORAGE OF SUPPLIES
- MISFEED REMOVAL
- REMOVING AN ORIGINAL MISFEED
- TROUBLESHOOTING
- FINISHER AND SADDLE STITCH FINISHER
- INSERTER
- Part 2: Copier Operation
- AUTOMATIC DOCUMENT FEEDER
- PLACING ORIGINALS
- CHECKING THE SIZE OF A PLACED ORIGINAL
- STORING, DELETING, AND USING ORIGINAL SIZES
- NORMAL COPYING
- ADJUSTING THE EXPOSURE
- REDUCTION/ENLARGEMENT/ZOOM
- SPECIAL PAPERS
- SPECIAL MODES
- General procedure for using special functions
- Margin shift
- Erase
- Dual page copy
- Pamphlet copy
- Job build
- Tandem copy
- Covers/inserts
- About the explanations of covers and inserts
- Preparations for using covers and inserts
- Procedure for inserting front and back cover paper
- Procedure for adding inserts
- Checking, editing, and deleting cover/insert pages
- Examples of covers and inserts
- Symbols used for covers and inserts
- Covers (One-sided copying of one-sided originals)
- Covers (Two-sided copying of one-sided originals)
- Covers (One-sided copying of Two-sided originals)
- Covers (Two-sided copying of two-sided originals)
- Inserts (One-sided copying of one-sided originals)
- Inserts (One-sided copying of two-sided originals)
- Transparency film with insert sheets
- Multi shot
- Book copy
- Tab copy
- Card shot
- Mirror image
- B/W reverse
- STORING, USING AND DELETING JOB PROGRAMS
- INTERRUPTING A COPY RUN
- USER MAINTENANCE
- TROUBLESHOOTING
- OVERVIEW
- TO USE THE DOCUMENT FILING FUNCTION
- SAVING A DOCUMENT IMAGE FILE
- CALLING UP AND USING A FILE
- CUSTOM SETTINGS
- ENTERING CHARACTERS
- TROUBLESHOOTING
- SPECIFICATIONS
- INDEX
SPECIAL MODES
5-14
8
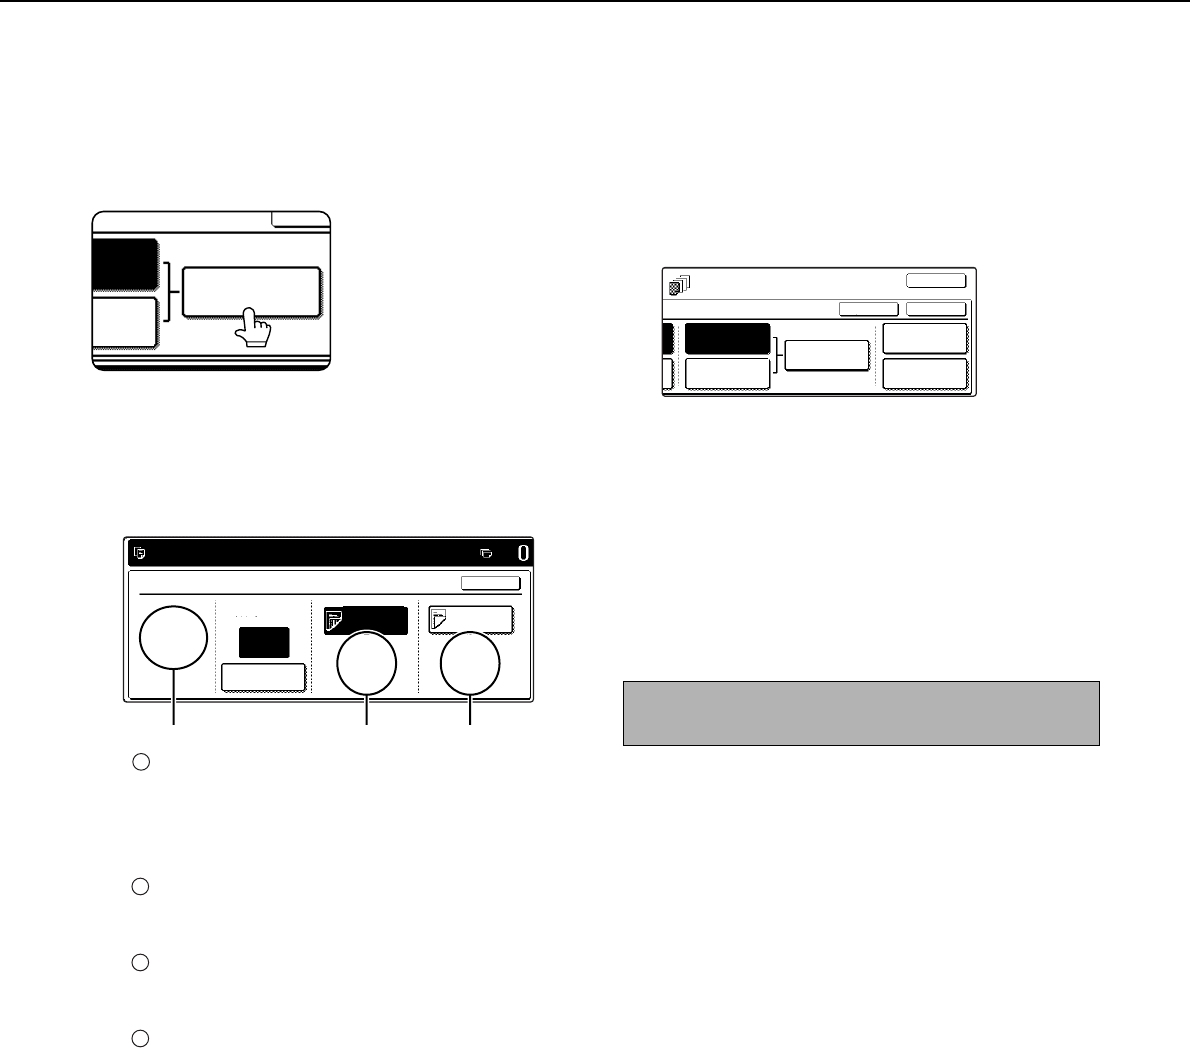
Touch the [INSERTION SETTINGS] key to
specify the pages where you wish to insert
the insert papers of [INSERTION TYPE A
SETTING] and [INSERTION TYPE B
SETTING].
9
Touch the [INSERTION TYPE A] key or the
[INSERTION TYPE B] key, enter the page
number where you wish to insert the insert
paper with the numeric keys, and then
touch the [ENTER] key.
(X) shows the total number of inserts. Up to 100
inserts can be added. When inserting multiple
inserts, touch the [ENTER] key after each entry
of an insertion page number (insertion position)
with the numeric keys.
(Y) shows the tray selected in step 3 for
[INSERTION TYPE A SETTING] and the paper
size and type.
(Z) shows the tray selected in step 3 for
[INSERTION TYPE B SETTING] and the paper
size and type.
When the [INSERTION TYPE A] key is
highlighted, the insert settings apply to
[INSERTION TYPE A SETTING]. When the
[INSERTION TYPE B] key is highlighted, the
insert settings apply to [INSERTION TYPE B
SETTING].
10
Touch the [OK] key in the screen of step 9.
You will return to the screen of step 2.
When you return to the screen of step 2, the
[INSERTION TYPE A SETTING] key will be
highlighted.
11
If you wish to insert a different paper with
the [INSERTION TYPE B SETTING] key,
repeat steps 2 through 6. Use the
[INSERTION TYPE B SETTING] key instead
of the [INSERTION TYPE A SETTING] key,
and the [INSERTION TYPE B] key instead
of the [INSERTION TYPE A] key.
12
Touch the [PAGE LAYOUT] key in the
screen of step 11 to display a list of the
selected settings (page 5-15).
To edit or delete a cover/insert, follow
steps 1 and 2 on page 5-15. To exit the
cover/insert settings, touch the upper
[OK] key in the screen of step 11.
13
Press the [START] key.
INSERTION
SETTINGS
RTION
SETTING
TION
SETTING
CANCE
INSERTION SETTINGS
INPUT THE PAGE NUMBER AND
PRESS [ENTER]. USE [C] KEY TO AMEND.
INSERTION
TOTAL:0
ENTER
8 x11
PLAIN
1
/
2
INSERTION PAGE
BYPASS
TRAY
BYPASS
TRAY
8 x11
PLAIN
1
/
2
8 x11
PLAIN
1
/
2
INSERTION
TYPE A
3
INSERTION
TYPE B
OK
(X) (Y) (Z)
1
2
3
4
To cancel covers/inserts settings...
Touch the [CANCEL] key in the screen of step 2.
TS
INSERTION
TYPE A SETTING
PAPER TRAY
SETTINGS
PAGE LAYOUT
INSERTION
SETTINGS
INSERTION
TYPE B SETTING
OK
OK
CANCEL