
Service manual


AR-NB2N UNPACKING AND INSTALLATION
3 – 1
[ 3 ] UNPACKING AND INSTALLATION
1. UNPACKING
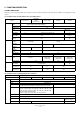
2. PACKAGED GOODS
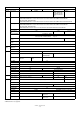
3. INSTALLATION PROCEDURE
This installation procedure is provided for AR-M160/AR-M205/AR-5220
series, AR-168S/168D, AR-M150/M155.
For Installation to other models, see the operation manual of the main
unit or the service manual.
A. FOR AR-168S/168D, AR-M150/M155
Turn off the main switch of the main unit and remove the power
plug of the copier from the outlet.
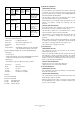
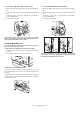
1. Cut the rear cabinet.
1) Remove the SPF from the main unit and gently place it on the docu-
ment glass as shown in the illustration.
2) Cut out two cut-out portions from the rear cabinet using a cutter or
the like.
3) Use a Phillips screwdriver or the like to open a hole.
4) Remove the screw and then remove the rear cabinet cover.
5) Cut out a part of the rear cabinet cover with nippers or the like as
shown in illustration.
(Be careful about the orientation of the nippers so that the cross
section is flat.)
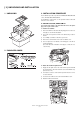
2. Attach the network expansion kit.
1) Engage the two pawls on the rear of the network expansion kit with
the cutout portions of the main unit and secure the kit with the sup-
plied screw (3 x 14).
2) Connect the connector of the network expansion kit to the connec-
tor of the main unit.
3) Secure the rear cabinet cover to the main unit with the screw.
4) Attach the SPF to the main unit.