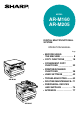
MODEL AR-M160 AR-M205 DIGITAL MULTIFUNCTIONAL SYSTEM OPERATION MANUAL Page • BEFORE USING THE MACHINE • COPY FUNCTIONS • CONVENIENT COPY FUNCTIONS • PRINTER/SCANNER FUNCTIONS • USER SETTINGS • TROUBLESHOOTING • ROUTINE MAINTENANCE • PERIPHERAL DEVICES AND SUPPLIES • APPENDIX AR-M160 AR-M205 8 18 32 38 42 52 71 74 77
➢➣➢➣➢➣➢➣➢➣➢➣➢➣➢➣➢➣➢➣ FOR YOUR RECORDS ... To protect against loss or theft, record and retain for reference the copier’s serial number located on the back of the unit. Model Number Serial Number Date of Purchase Place of Purchase Authorized Sharp Copier Service Department Number ➢➣➢➣➢➣➢➣➢➣➢➣➢➣➢➣➢➣➢➣ ➢➣➢➣➢➣➢➣➢➣➢➣➢➣➢➣➢➣➢➣➢➣➢➣➢➣➢➣➢➣➢➣➢➣ ➢➣➢➣➢➣➢➣➢➣➢➣➢➣➢➣➢➣➢➣➢➣➢➣➢➣➢➣➢➣➢➣➢➣ This operation manual is also used for the AR-M160 J / AR-M205 J.
CONTENTS CAUTIONS................................................................................................................................................. 3 ● ● ● ● CAUTIONS ON USING..................................................................................................................................... 3 IMPORTANT POINTS WHEN SELECTING AN INSTALLATION SITE ........................................................... 3 CAUTIONS ON HANDLING .................................................
5 USER SETTINGS ADJUSTING THE AUTOMATIC EXPOSURE LEVEL .............................................................. 42 ENABLING TONER SAVE MODE................... 43 CUSTOMIZING SETTINGS ............................. 44 ● USER PROGRAMS ........................................44 ● SELECTING A SETTING FOR A USER PROGRAM .....................................................47 SETTINGS FOR AUDITING MODE................. 48 ● AUDITING MODE ...........................................
CAUTIONS Follow the cautions below when using this machine. CAUTIONS ON USING Warning: • The fusing area is hot. Exercise care in this area when removing misfed paper. • Do not look directly at the light source. Doing so may damage your eyes. Caution: • Do not switch the machine rapidly on and off. After turning the machine off, wait 10 to 15 seconds before turning it back on. • Machine power must be turned off before installing any supplies. • Place the machine on a firm, level surface.
The machine should be installed near an accessible power outlet for easy connection and disconnection. Be sure to connect the power cord only to a power outlet that meets the specified voltage and current requirements. Also make certain the outlet is properly grounded. Note Connect the machine to a power outlet which is not used for other electric appliances. If a lighting fixture is connected to the same outlet, the light may flicker.
ENVIRONMENTAL INFORMATION As an ENERGY STAR® Partner, SHARP has determined that this product meets the ENERGY STAR® guidelines for energy efficiency. USB 2.0 compatible (dual function board) When connecting the machine by USB 2.0 (Hi-Speed mode), be sure to read "System requirements for USB 2.0 (Hi-Speed mode)" (p.38) to verify that your system and the machine settings are configured appropriately.
CONVENTIONS USED IN THIS MANUAL Warning Warns the user that injury may result if the contents of the warning are not properly followed. Caution Cautions the user that damage to the machine or one of its components may result if the contents of the caution are not properly followed. Notes provide information relevant to the machine regarding specifications, functions, performance, operation and such, that may be useful to the user.
MAIN FEATURES High-speed laser copying • First-copy time*1 at 300 dpi*2 is only 7.2 seconds. • Copying speed is 20/16 copies per minute at 600 dpi, This is ideal for business use and provides a big boost to workplace productivity. *1 First-Copy time may vary depending on the power-supply voltage, ambient temperature, and other operating conditions. *2 "dpi" ("dots per inch") are units that are used to measure resolution. Resolution indicates how much detail can be reproduced in a printed or scanned image.
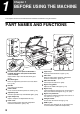
Chapter 1 1 BEFORE USING THE MACHINE This chapter contains basic information that should be read before using the machine. PART NAMES AND FUNCTIONS 1 17 1 15 2 16 3 6 5 3 9 4 7 10 14 8 1 2 3 4 5 6 7 8 Document feeder cover (when the SPF/RSPF is installed) /document cover (when the document cover is installed) Open to make copies from the document glass. (p.18) Document glass Place an original that you wish to scan face down here. (p.18) Handles Use to move the machine.
BEFORE USING THE MACHINE 18 19 20 21 22 1 23 24 26 28 27 29 25 16 17 18 19 20 21 22 23 24 Parallel port Connect to your computer to use the printer function. (Software Setup Guide) USB 2.0 port (when the dual function board is installed) Connect to your computer to use the printer and scanner functions. (Software Setup Guide) Document feeder tray (when the SPF/RSPF is installed) Place the original(s) that you wish to scan face up here. Holds up to 40 originals.
BEFORE USING THE MACHINE OPERATION PANEL 4 (AR-M205 only) 1 2 SCAN 1 1 2 3 4 5 6 3 ON LINE 5 ORIGINAL TO COPY 6 XYZOOM 2 DUAL PAGE COPY AR-M160 26 1 2 3 4 5 6 7 29 SCAN MENU key Use to scan by means of the provided Button Manager software. (p.41) SCAN key/indicator Press to switch the machine to scanner mode and scan by means of the provided Button Manager software.(p.40) The indicator blinks during scanning and transmission of the scanned data.
BEFORE USING THE MACHINE 7 8 9 10 11 12 13 ORIGINAL DATA SORT GROUP EDGE ERASE CENTER 2 IN 1 4 IN 1 MARGIN SHIFT 14 AUDIT CLEAR AUTO TEXT PHOTO 15 AUTO PAPER SELECT 16 POWER SAVE ORIGINAL PAPER SIZE SIZE 11X17 8½X14 8½X11 8½X5½ 8½X11 EXTRA 19 20 21 ZOOM 25 400% INTERRUPT CLEAR 200% 141 129 121 100% 95 77 64 50% 1 3 5 ORIGINAL SIZE ENTER 18 17 CLEAR ALL 1 START AUTO TRAY SELECT IMAGE PRESET RATIO READ-END 22 16 17 18 19 20 21 22 23 24 25 26 23 24 25 26 27 28 POWER
POWER ON AND OFF The power switch is located on the left side of the machine. POWER ON POWER OFF Turn the power switch to the "ON" position Make sure that the machine is not in operation and then turn the power switch to the "OFF" position. It will take about 45 seconds for the machine to warm up. While the machine is warming up, the POWER SAVE indicator will blink. (The POWER SAVE indicator will go off when the machine is ready to copy.
LOADING PAPER The paper required indicator ( ) will light up when there is no copy paper in the selected paper feed station, or when the selected paper tray is not installed or is improperly installed. PAPER For best results, use only SHARP recommended paper. Paper tray type Paper type Size Weight 1 Capacity Paper tray Standard paper 250-sheet paper Recycled paper feed unit 2x250-sheet paper feed unit 5-1/2" x 8-1/2" * (Invoice) 8-1/2" x 11" (Letter) 8-1/2" x 14" (Legal) 11" x 17" (Ledger) 15 lbs.
BEFORE USING THE MACHINE LOADING PAPER Make sure that the machine is not copying or printing, and then follow these steps to load paper. Loading the paper tray 1 Gently lift and pull out the paper tray until it stops. 2 Push the pressure plate down until it locks in place. Push the center of the pressure plate down until it locks into place. 3 Fan the paper. If the paper is not fanned, double-feeds or misfeeds may occur. 4 Load paper into the tray.
BEFORE USING THE MACHINE Loading the bypass tray 1 Unfold the bypass tray. 3 Insert the paper (print face down) all the way into the bypass tray. To prevent a misfeed, verify once more that the paper guides are adjusted to the width of the paper. When feeding large paper such as 8-1/2" x 14" and 11" x 17", pull out the bypass tray extension. 2 Note If you loaded paper in the bypass tray, press the [TRAY SELECT] key ( ) to select the bypass tray. The bypass tray will not be selected automatically.
BEFORE USING THE MACHINE Envelopes Do not use the following envelopes, as misfeeds will occur. • Envelopes with metal tabs, clasps, strings, holes, or windows. • Envelopes with rough fibers, carbon paper, or glossy surfaces. • Envelopes with two or more flaps. • Envelopes with tape, film, or paper attached to the flap. • Envelopes with a fold in the flap. • Envelopes with glue on the flap to be moistened for sealing. • Envelopes with labels or stamps. • Envelopes that are slightly inflated with air.
BEFORE USING THE MACHINE 4 Squeeze the lock lever of the front guide and slide the front guide to match the width of the paper, and move the left guide to the appropriate slot as marked on the tray. Left guide Front guide Important points when using the printer mode • Make sure that the tray's paper size setting is the same as the tray's paper size setting in the printer driver. For example, if the tray's paper size setting is 8-1/2" x 11"R, set "Setting Paper Size" to "Letter-R".
2 Chapter 2 COPY FUNCTIONS This chapter explains basic copying functions such as normal copying, reduction or enlargement, and exposure adjustment. NORMAL COPYING This section explains how to make a regular copy. If "Auditing mode" has been enabled (p.51), enter your 3-digit account number. Copying from the document glass 1 Open the document cover/SPF/RSPF, and place the original. 3 Press the [ORIGINAL SIZE ENTER] key and select the original size.
COPY FUNCTIONS Copying from the SPF/RSPF 1 2 Make sure that an original has not been left on the document glass. Close the SPF/RSPF. Adjust the original guides to the size of the original(s). 5 Press the [START] key ( copying. START Note 3 Set the original(s) face up in the document feeder tray. ) to begin The copy is delivered to the paper output tray. • The paper output tray can hold up to 250 sheets of paper.
COPY FUNCTIONS Auto paper select mode When the AUTO PAPER SELECT indicator lights up, "Auto paper select mode" is enable. This function automatically selects the paper that is the same size as the original (5-1/2" x 8-1/2", 8-1/2" x 11", 8-1/2" x 11"R, "8-1/2" x 14" and 11" x 17" paper). "Auto paper select mode" can be disabled in the user programs. (p.44) • If a zoom setting is selected after placing the original, the paper size that is appropriate for the zoom setting will be automatically selected.
COPY FUNCTIONS MAKING A COPY DARKER OR LIGHTER Automatic exposure adjustment is initially enabled. This function automatically adjusts the copy image according to the original being copied. If you wish to select the exposure level yourself, follow the steps below. (Select from two original types and five exposure levels for each original type.) The exposure level used in automatic exposure adjustment can also be changed. ("ADJUSTING THE AUTOMATIC EXPOSURE LEVEL" (p.42)) Original types ● AUTO ......
COPY FUNCTIONS SETTING THE NUMBER OF COPIES Press the numeric keys to set the number of copies. Important note when making a large number of copies READ END ● The set number of copies appears in the display. A maximum of 999 copies (factory default setting) can be set. ● If you wish to make only a single copy, copying is possible with the display showing "0". Note The maximum number of copies can be changed in the user programs. (p.
COPY FUNCTIONS 4 5 Press the [AUTO IMAGE] key. The AUTO IMAGE indicator lights up and the appropriate ratio for the original size and paper size is selected. (The indicator of the selected ratio will light up.) AUTO IMAGE Set the number of copies and other copy settings, and then press the [START] key ( ). The copy will be delivered to the paper output tray. Note To cancel automatic ratio selection, press the [AUTO IMAGE] key again.
COPY FUNCTIONS SELECTING THE VERTICAL AND HORIZONTAL COPY RATIOS SEPARATELY (XY ZOOM copying) The XY ZOOM feature allows the horizontal and vertical copy ratios to be changed independently. Example: Reduction only in the horizontal direction. Original Note Copy • This feature cannot be used with the 2 IN 1 or 4 IN 1 feature. (p.34) • To use the XY ZOOM feature with the DUAL PAGE COPY feature, set the DUAL PAGE COPY feature first and then the XY ZOOM feature.
COPY FUNCTIONS 6 Use the [PRESET RATIO] selector keys ( , ) and [Zoom] keys ( , to change the copy ratio in the horizontal direction. ) Press the [PRESET RATIO] selector keys ( , ) to select a ratio close to the desired ratio, and then press the [Zoom] keys ( , ) to adjust the ratio in increments of 1%. The ratio appears in the display. 7 Press the [Copy ratio display] key ( ). The selected ratio for the horizontal direction will be entered and the display will change to the number of copies display.
TWO-SIDED COPYING USING THE BYPASS TRAY To perform manual two-sided copying, follow these steps. Example: Copying originals A and B onto each side of one sheet of paper 1 2 1 Copy Original A Original B 1 3 Copy original A. Turn the copy of original A over, and without changing the position of the edge closest to you, insert it in the bypass tray. Insert the paper all the way in.
AUTOMATIC TWO-SIDED COPYING (AR-M205 only) On models that support automatic two-sided copying, two originals placed on the document glass can be copied onto each side of a single sheet of paper. In addition, an RSPF can be used to copy two originals onto one sheet of paper, or one two-sided original onto two sheets of paper, or one two-sided original onto each side of one sheet of paper.
COPY FUNCTIONS Using the document glass 1 Place the original that you wish to copy onto the front side of the paper on the document glass and close the document cover. 2 Select the original size. (p.18) 3 Press the [ORIGINAL TO COPY] key, and make sure that the indicator is lit. Using the RSPF 1 Place originals in the RSPF. (p.19) If you place an odd number of originals for one-sided to two-sided copying, the last page will be one-sided.
COPY FUNCTIONS IMAGE ROTATION IN DUPLEX COPYING This function is used to invert the top and bottom of the image on the front side of the paper during two-sided copying. 1 Hold down the [ORIGINAL TO COPY] key until the indicator blinks. ORIGINAL TO COPY 2 The currently set setting code blinks in the first digit of the number of copies display. 2 Press a numeric key to enter the setting code. To enable the setting, press [1] key. To disable the setting, press [0] key.
DUAL PAGE COPYING A dual page original can be automatically separated into two pages during copying. This feature is convenient for making copies of books and other dual page originals on individual sheets of paper. Original Note 1 • • • • • • 8-1/2" x 11" paper is used for dual page copying. When rotation copy is enabled (the dual function board must be installed) 8-1/2" x 11"R paper can also be used. Dual page copying can be enabled when two-sided copying is enabled.
INTERRUPTING A COPY RUN (Interrupt copying) A copy run can be temporarily interrupted to allow another copy job to be performed. When the other job is finished, the copy run will resume using the original copy settings. Note 1 Interrupt copying is not possible when the user programs are being configured, or when automatic two-sided copying, sort/group copying, or 2 IN 1 / 4 IN 1 copying is being performed. Press the [INTERRUPT] key ( interrupt the copy run.
3 Chapter 3 CONVENIENT COPY FUNCTIONS This chapter explains convenient copy functions that can be used when the dual function board (AR-EB7) is installed. ROTATING THE IMAGE 90 DEGREES (Rotation copy) When "Auto paper select mode" or "automatic ratio selection" are in operation and the original is placed in a different orientation (vertical or horizontal) than the paper, the original image will be automatically rotated 90 degrees to enable correct copying onto the paper.
CONVENIENT COPY FUNCTIONS Using the document glass Using the SPF/RSPF 1 Place the first original. (p.18) 1 Place the originals. (p.19) 2 Select the original size. (p.18) 2 Press the [SORT/GROUP] key to select the desired mode. If the original size is not selected, 11" x 17" is automatically used. 3 SORT GROUP Press the [SORT/GROUP] key to select the desired mode. SORT GROUP The modes are selected in the order "SORT", "GROUP", "Off".
COPYING MULTIPLE ORIGINALS ONTO A SINGLE SHEET OF PAPER (2 IN 1 / 4 IN 1 copy) Multiple originals can be copied onto a single sheet of paper in a selected layout pattern. This function is convenient for compiling multi-page reference materials into a compact format, or for providing an overview of all pages of a document on a single page.
CONVENIENT COPY FUNCTIONS Using the SPF/RSPF 1 Place the originals. (p.19) 2 Press the [2 IN 1 / 4 IN 1] key to select the mode. Note 2 IN 1 4 IN 1 3 2 IN 1 4 IN 1 The mode is selected in the order "2 IN 1", "4 IN 1", "Off". Set the number of copies and other settings, and press the [START] key ( ). The copy is delivered to the paper output tray. • To cancel 2 IN 1 / 4 IN 1 copying, press the [CLEAR] key ( ).
CREATING MARGINS WHEN COPYING (Margin shift) The MARGIN SHIFT feature, in its initial setting, automatically shifts the text or image to increase the margin by approximately 1/2". The location of the margin to be increased can be select to be either at the left edge or the top of the page (AR-M205 only). Example: Model that supports automatic two-sided copying Margin A Margin Original Place the original(s).
ERASING SHADOWS AROUND THE EDGES OF A COPY (Erase copy) ● This feature is used to erase shadows that appear around the edges of copies of books and other thick originals. (EDGE ERASE) ● The feature can also erase the shadow that appears down the center of books and other originals that open up. (CENTER ERASE) ● The factory default setting for the width of the erasure is approximately 1/2". The width can be changed in the user programs. (p.
4 Chapter 4 PRINTER/SCANNER FUNCTIONS The machine includes a USB 1.1 port and a parallel port as standard equipment. A computer can be connected to these ports to use the machine as a printer or a scanner. When the dual function board is used, the following functions can be used in addition to the standard printer/scanner functions. • High-speed data transfer (when connected to a USB 2.
USING THE PRINTER MODE The procedure for loading paper is the same as for loading copy paper. See "LOADING PAPER". (p.13) Note • Print jobs received while the machine is copying or being used in scanner mode will be stored in memory. When the copy job is finished or scanner mode is exited, the print jobs will begin printing.
USING THE SCANNER MODE The procedure for placing the original is the same as for copying. See "NORMAL COPYING". (p.18) Note Scanner mode cannot be used at the following times: • A misfeed has occurred (paper misfeed or original misfeed in the SPF/RSPF). • The user programs are being used. • The tray paper size is being set. • Automatic exposure adjustment is in progress. • When the toner save mode setting is being changed. • The machine is being used in copy mode. • The front or side cover is open.
PRINTER/SCANNER FUNCTIONS [SCAN MENU] keys and the Button Manager scan menu The six [SCAN MENU] keys can be configured separately in Button Manager for the computer connected to the USB 1.1 port and the computer connected to the USB 2.0 port. The factory default settings for the [SCAN MENU] keys and Button Manager are as follows. For information on Button Manager settings, see the Button Manager help file.
5 Chapter 5 USER SETTINGS This chapter explains how to set the automatic exposure level, toner save mode, and the user programs, which are custom settings that control fine points of the machine’s operation. ADJUSTING THE AUTOMATIC EXPOSURE LEVEL The exposure level used in automatic exposure adjustment, which automatically adjusts the copy exposure according to the original, can be adjusted.
ENABLING TONER SAVE MODE Toner save mode can be enabled to reduce toner consumption by about 10%. 1 Press the [AUTO/TEXT/PHOTO] key to select "TEXT". 2 Hold down the [AUTO/TEXT/PHOTO] key until the PHOTO indicator blinks. AUTO TEXT PHOTO 3 1 3 5 The exposure level indicators show the current setting. To enable toner save mode, press the [Light] key ( ). To disable toner save mode, press the [Dark] key ( ). 1 3 5 When enabling toner save mode, make sure the "1" light blinks.
CUSTOMIZING SETTINGS (User programs) The user programs allow you to customize the machine to match your needs. USER PROGRAMS Program number 1 Program name Auto clear time Preheat mode 1: 1 min. 2: 5 min. 3: 30 min. 4: 60 min. 5: 120 min. 6: 240 min. 3 Auto power shut-off timer 1: 5 min. 2: 30 min. 3: 60 min. 4: 120 min. 5: 240 min.
USER SETTINGS Program number Setting codes (factory default setting appears in bold) Program name 7 Rotation copy*2 0: OFF 1: ON 8 Auto paper select mode 0: OFF 1: ON 9 Auto tray switching 0: OFF 1: ON 10 to 15 16 17 Auditing mode – 1: 0" 2: 1/4" 3: 1/2" 4: 3/4" 5: 1" Erase width adjustment*2 *2 1: Pattern 1 2: Pattern 2 copy*2 1: Pattern 1 2: Pattern 2 3: Pattern 3 4: Pattern 4 Layout in 2 IN 1 copy 18 Layout in 4 IN 1 19 Offset of paper output tray 0: OFF 1: ON 20 Image rotat
USER SETTINGS Program number 24 25 26 27 28 29 30 31 32 33 Program name Memory allocated to printer mode Key auto repeat Setting codes (factory default setting appears in bold) 1: 30% 2: 40% 3: 50% 4: 60% 5: 70% 0: OFF 1: ON 1: Minimum (current response speed) 2: 0.5 sec. Key press time 3: 1.0 sec. 4: 1.5 sec. 5: 2.0 sec.
USER SETTINGS SELECTING A SETTING FOR A USER PROGRAM 1 Hold down the [Light] key ( the alarm indicators ( , , ) blink. ) until , , 4 Enter the desired setting code by pressing a numeric key. • For the setting codes, see "USER PROGRAMS". (p.44 to p.46) • The selected setting code blinks. • To select 90 seconds, press the [5] key. The display shows "- -" with the left hyphen blinking. 1 3 5 2 READ END Note 3 Note Enter the program number with the numeric keys. • See "USER PROGRAMS" (p.44 to p.
SETTINGS FOR AUDITING MODE AUDITING MODE When "Auditing mode" is enabled, a count is kept of the number of copies made by each account (up to 20 accounts can be established), and the counts can be displayed and totaled as necessary. In "Auditing mode", the display shows "- - -", and this indicates that a 3-digit account number must be entered in order to use the machine for copying. Note The administrator of the machine should complete the following settings: • Enable "Auditing mode" (p.
USER SETTINGS SELECTING AUDITING MODE SETTINGS 1 Hold down the [Light] key ( the alarm indicators ( , , ) blink. ) until , , The display shows "- -" with the left hyphen blinking. 5 Press the [Light] key ( the settings. ) to complete The alarm indicators ( , , , , ) go off and the display returns to the number of copies display. 1 3 5 2 Enter the program number with the numeric keys. READ END Note 3 If you enter the wrong number, press the [CLEAR] key ( ) and then enter the correct number.
USER SETTINGS Auditing mode Account number deletion (program No.10) (program No.13) 1 Press the [1] key to enable "Auditing mode" or the [0] key to disable it, and then press the [START] key ( ). Use this procedure to delete account numbers. A single account number can be deleted, or all account numbers at once. If no account numbers have been established, the error code "13E" will appear in the display.
USER SETTINGS Resetting account (program No.15) The copy count of a single account or all accounts can be reset to 0. If no account numbers have been established, the error code "15E" will appear in the display. Copying when "Auditing mode" is enabled When "Auditing mode" is enabled, "- - -" appears in the display. [Resetting all accounts] Press the [1] key and then press the [START] key ( ). The copy counts of all accounts will be deleted. [Resetting a single account] 1 Press the [0] key.
6 Chapter 6 TROUBLESHOOTING This chapter describes troubleshooting and misfeed removal. TROUBLESHOOTING If you experience difficulty using the machine, check the following troubleshooting guide before calling for service. Many problems can be easily resolved by the user. If you are unable to solve the problem using the troubleshooting guide, turn off the power switch and unplug the machine, and contact your SHARP service center. MACHINE/COPYING PROBLEMS The machine does not operate. ...................
TROUBLESHOOTING MACHINE/COPYING PROBLEMS The following problems are related to the general operation of the machine and copying. Problem Cause and solution The machine is not plugged into a power outlet. → Plug the machine into a grounded outlet. Power switch OFF. → Turn the power switch ON. Page – 12 The POWER SAVE indicator is blinking. → Indicates that the machine is warming up. Copies cannot be made until the machine has finished warming up.
TROUBLESHOOTING Problem Cause and solution Misfeed occur. → To remove the misfeed, see "MISFEED REMOVAL". The paper is outside of the specified size and weight range. Page 63 13 → Use copy paper within the specified range. Paper curled or damp. → Do not use curled or crimped paper. Replace with dry copy paper. During periods when the machine is not used for a long time, remove the paper from the tray and store it in a dark place in a bag to prevent moisture absorption. Paper is not loaded properly.
TROUBLESHOOTING Problem Cause and solution Copying or printing is performed. → Set the paper size after copying or printing is complete. The machine has stopped temporarily due to running out of paper or a misfeed. Paper size for a paper tray cannot be set. Page – 14, 63 → Load paper or remove the misfeed, and then set the paper size. An interrupt copy job is in progress. → Set the paper size after the interrupt copy job is finished. 31 The display or the ORIGINAL DATA indicator is blinking.
TROUBLESHOOTING PRINTING AND SCANNING PROBLEMS In addition to this section, troubleshooting information can also be found in the README files for each of the software programs. To view a README file, see the "Software Setup Guide". Problem Cause and solution The machine is set to ONLINE mode. → Press the [ON LINE] key to turn on the ON LINE indicator. Page 39 The machine is not correctly connected with your computer. The machine does not print. (ON LINE indicator does not blink.
TROUBLESHOOTING Problem Cause and solution Page You are using paper that is outside the specified size and weight range. 13 → Use copy paper within the specified range. Paper curled or damp. The printed image is dirty. → Do not use curled or crimped paper. Replace with dry copy paper. During periods when the machine is not used for a long time, remove the paper from the tray and store it in a dark place in a bag to prevent moisture absorption.
TROUBLESHOOTING Problem Cause and solution Page The printer driver settings are not appropriate for both the paper and the print job. Lines in tables are not aligned correctly and gaps appear. → "Draft", "Normal" or "Photo" can be selected for the print quality in the "Advanced" tab of the printer driver setup screen. When "Photo" is selected, you can click the "Image Adjustment" button and adjust the brightness and contrast in the dialog box that appears.
TROUBLESHOOTING Problem Cause and solution The document glass or the underside of the document cover/SPF/RSPF is dirty. Page 72 → Clean regularly. Original smudged or blotchy. → Use a clean original. – You have not specified a suitable resolution. → Make sure that the resolution setting in the scanner driver is appropriate for the original. – You are scanning a large area (for example an entire 11" x 17") at high resolution.
TROUBLESHOOTING Problem Cause and solution Page If scanning is not possible, shut down your computer, turn off the machine’s power switch, and unplug the machine’s power cord. Next, start your computer, restore power to the machine, and try scanning again. If scanning is still not possible, check the following items. – Your application is not TWAIN/WIA compliant. → If your application is not TWAIN/WIA compliant, scanning will not be possible. Make sure your application is TWAIN/WIA compliant.
TROUBLESHOOTING Notice page printed If you find that a notice page has been printed at the end of a print job, the print data received from the computer has not been printed as specified. Fix the problem as explained below and then try printing again.
INDICATORS AND DISPLAY MESSAGES If one of the following indicators lights up or one of the following messages appears in the display, check the meaning of the indicator or message in the following table and take appropriate action.
MISFEED REMOVAL When a misfeed occurs, the misfeed indicator ( ) and a misfeed location indicator ( ) will blink and the machine will automatically stop. Check the blinking misfeed location indicator to identify the location of the misfeed and remove it. Note The paper may tear when you remove a misfeed. In this event, be sure to remove all torn pieces of paper from the machine, taking care not to touch the photoconductive drum (the green part).
TROUBLESHOOTING Section C Remove the misfed original from the exit area. 2 Open and close the SPF/RSPF to make the misfeed location indicator stop blinking. You can also make the misfeed indicator stop blinking by opening and closing the feeding roller cover or the right side cover. If the misfed original cannot be easily removed from the exit area, open the moveable part of the document feeder tray and remove the original.
TROUBLESHOOTING MISFEED IN THE MACHINE 1 Open the bypass tray and the side cover. 2 Check the misfeed location. Remove the misfed paper following the instructions for each location in the illustration below. If paper is misfed here, go to "B. Misfeed in the fusing area". If the misfed paper is visible side here, go to "C. Misfeed in the transport area". If paper is misfed here, go to "A. Misfeed in the paper feed area". A.
TROUBLESHOOTING B. Misfeed in the fusing area 1 Push gently on both ends of the front cover. 4 Lift the fusing unit release lever. 2 Turn the roller rotating knob in the direction of the arrow. 5 Close the front cover and side cover. The misfeed indicator ( ) will go out. Roller rotating knob 3 Carefully remove the misfed paper. Lower the fusing unit release levers to allow easier removal. Return the release levers to their operating positions.
TROUBLESHOOTING C. Misfeed in the transport area 1 Open the fusing paper guide by pressing down the projection on either side of the guide and remove the misfed paper. Be careful not to tear the misfed paper during removal. The fusing unit is hot. Do not touch Warning the fusing unit when removing misfed paper. Doing so may cause a burn or injury.
TROUBLESHOOTING MISFEED IN THE UPPER PAPER TRAY Note 1 Make sure that there is no misfed paper in the tray before pulling it out. (p.65) Lift and pull out the upper paper tray and remove the misfed paper. Be careful not to tear the misfed paper during removal. 2 Open and close the side cover. The misfeed indicator ( ) will go out. Note 3 • When closing the side cover, press on the handle. • If the misfeed indicator ( ) does not stop blinking, check for torn pieces of paper in the machine.
TROUBLESHOOTING MISFEED IN THE LOWER PAPER TRAY (AR-M205 only) Note 1 • Make sure that there is no misfed paper in the tray before pulling it out. (p.65) • Use the following procedure to remove misfeeds that occur in the 250-sheet paper feed unit/2 x 250-sheet paper feed unit. Open the lower side cover. 5 Close the lower paper tray. Grasp the handle to open the lower side cover. 2 Remove the misfed paper. Be careful not to tear the misfed paper during removal.
REPLACING THE TONER CARTRIDGE When the toner cartridge replacement required indicator ( ) lights up, the toner cartridge will need replacement soon. Obtain a new cartridge. When the toner cartridge replacement required indicator ( ) blinks, the toner cartridge must be replaced before copying can be resumed. Replace the toner cartridge by following the procedure below. Note 1 When the toner cartridge replacement indicator ( Push on both ends of the front cover and open it.
7 Chapter 7 ROUTINE MAINTENANCE This chapter explains how to keep the machine operating smoothly, including viewing copy count, and scan count, the toner level indicator, and cleaning the machine. CHECKING THE TOTAL OUTPUT COUNT AND TONER LEVEL CHECKING THE TOTAL OUTPUT COUNT From the "0" display, you can check the total output count, total copy count, and total scan count as explained below. The total output count is all pages (for both printing and copying) printed by the machine.
ROUTINE MAINTENANCE CHECKING THE TONER LEVEL The toner level is indicated by a 6-level display. Use it as a guideline for replacing the toner cartridge. 1 Hold down the [Light] key ( the alarm indicators ( , , blink. ) until , , ) 2 The display will show "- -". Hold down the [Copy ratio display] key ( ) for more than 5 seconds. ZOOM 1 3 5 3 The approximate quantity of toner remaining will be indicated in the display as a percentage. ("100", "75", "50", "25", "10" is displayed.
ROUTINE MAINTENANCE CLEANING THE BYPASS TRAY PAPER FEED ROLLER If misfeeds occur frequently when feeding envelopes, thick paper, etc. through the bypass tray, wipe the paper feed roller at the feed slot of the bypass tray with a soft, clean cloth dampened with alcohol or water. Paper feed roller CLEANING THE TRANSFER CHARGER If copies start becoming streaky or blotchy, the transfer charger may be dirty. Clean the charger using the following procedure. 1 Turn the power switch off.
8 Chapter 8 PERIPHERAL DEVICES AND SUPPLIES PERIPHERAL DEVICES Optional equipment and supplies are explained in this chapter. To purchase optional equipment and supplies, contact SHARP service. Note AR-M205 As a part of our policy of continuous improvement, SHARP reserves the right to make design and specification changes for product improvement without prior notice. The performance specification figures indicated are nominal values of production units.
PERIPHERAL DEVICES AND SUPPLIES SINGLE PASS FEEDER/ REVERSING SINGLE PASS FEEDER For the names of the parts of the SPF/RSPF, see "PART NAMES AND FUNCTIONS". (p.8) Specifications AR-SP6 AR-RP6 2 2 Weight 15 lbs. to 24 lbs. (56 g/m to 90 g/m ) Size 5-1/2" x 8-1/2" to 11" x 17" Capacity Up to 40 sheets (Thickness 5/32" (4mm) and below) Acceptable original Detectable original sizes 5-1/2" x 8-1/2", 8-1/2" x 11", 8-1/2" x 11"R, 8-1/2" x 14", 11" x 17" Weight 11.1 lbs. (5.0 kg) 12.0 lbs. (5.
PERIPHERAL DEVICES AND SUPPLIES DUAL FUNCTION BOARD A dual function board can be installed to add a variety of copy functions and enable use of the printer driver for the dual function board, which features a faster printing speed than the standard printer driver. For copy functions that can be used, see "Convenient Copy Functions". (p.32) Specification AR-EB7 Added functions Sort copy, group copy, 2 IN 1 / 4 IN 1 copying, rotation copy, border erase copying, center erase copying, margin copying, USB 2.
9 Chapter 9 APPENDIX SPECIFICATIONS Model AR-M160 AR-M205 Type Digital Multifunction System, Desktop Photoconductive type OPC drum Document glass type Fixed Reproduction method Laser electrostatic reproduction Originals Sheets, bound documents Originals size Max. 11" x 17" Copy size Max. 11" x 17" Min. 5-1/2" x 8-1/2" Image loss: Max. 5/32" (4 mm) (leading and trailing edges) Max.
APPENDIX Dimensions 23-15/64" (W) x 22-23/32" (D) x 18-33/64" (H) 23-15/64" (W) x 22-23/32" (D) x 21-55/64" (H) (590 mm (W) x 577 mm (D) x 470 mm (H)) (590 mm (W) x 577mm (D) x 555mm (H)) Operating conditions Temperature: 59°F to 86°F (15°C to 30°C), Humidity: 20% to 85% Noise level Sound Power Level LwA(1B=10dB) Copying: 6.2[B] Standby: 3.
APPENDIX Scanner Function Type Flatbed scanner Scanning method Document glass / SPF/RSPF Light source Cold cathode fluorescent lamp Resolution* Basic: 600 dpi x 600 dpi Setting range: 50dpi - 9600dpi Original types Sheet media, books Effective scanning area 11-45/64" (297 mm) (Lengthwise) x 16-63/64" (431 mm) (Width) Scanning speed 2.
SOFTWARE LICENSE PLEASE READ THIS LICENSE CAREFULLY BEFORE USING THE SOFTWARE. BY USING THE SOFTWARE, YOU ARE AGREEING TO BE BOUND BY THE TERMS OF THIS LICENSE. 1. License. The application, demonstration, system and other software accompanying this License, whether on disk, in read only memory, or on any other media (the "Software") and related documentation are licensed to you by SHARP.
6. Limited Warranty on Media. SHARP warrants the disks on which the Software is recorded to be free from defects in materials and workmanship under normal use for a period of ninety (90) days from the date of purchase as evidenced by a copy of the receipt. The entire liability of SHARP and/or its Licensors and your exclusive remedy will be replacement of the disk which fails to meet the limited warranty provided by this Clause 6.
MATERIAL SAFETY DATA SHEET Page: 1/4 Data Issued: Jun. 1. 2003 MSDS No. F-01211 1. PRODUCT AND COMPANY IDENTIFICATION Product Name : AR-202NT / AR-202T / AR-202ST / AR-202FT / AR-202ST-C/ AR-203ST-C/ AR-016T/AR-016RT (Black Toner) Supplier Identification : Sharp Corporation 22-22 Nagaike-cho, Abeno-ku, Osaka, Japan Local suppliers are listed below. Please contact the nearest supplier for additional information. Area North America Oceania Europe Middle East (Country) U.S.A.
MATERIAL SAFETY DATA SHEET Page: 2/4 Data Issued: Jun. 1. 2003 MSDS No. F-01211 3. HAZARDS IDENTIFICATION Most Important Hazards and Effects of the Products Human Health Effects : There are no anticipated carcinogenic effects from exposure based on animal tests performed using toner. When used as intended according to instructions, studies do not indicate any symptoms of fibrosis will occur. Environmental Effects : No data are available.
MATERIAL SAFETY DATA SHEET Page: 3/4 Data Issued: Jun. 1. 2003 MSDS No. F-01211 Exposure limit values OSHA-PEL (USA) ACGIH-TLV (USA) Personal Protective Equipment Respiratory Protection Hand Protection Eye Protection Skin Protection Other Protective Equipment : 15mg/m3 (Total Dust) , 5mg/m3 (Respirable Dust) : 10mg/m3 (Total Dust) , 3mg/m3 (Respirable Dust) : : : : : Not required under intended use. Not required under intended use. Not required under intended use. Not required under intended use.
MATERIAL SAFETY DATA SHEET Page: 4/4 Data Issued: Jun. 1. 2003 MSDS No.
MATERIAL SAFETY DATA SHEET Page: 1/4 Data Issued: Jun. 1. 2003 MSDS No. F-01211 1. PRODUCT AND COMPANY IDENTIFICATION Product Name : AR-202ND / AR-202DV / AR-202SD / AR-202SD-C (Black Developer) Supplier Identification : Sharp Corporation 22-22 Nagaike-cho, Abeno-ku, Osaka, Japan Local suppliers are listed below. Please contact the nearest supplier for additional information. Area North America Oceania Europe Middle East (Country) U.S.A.
MATERIAL SAFETY DATA SHEET Page: 2/4 Data Issued: Jun. 1. 2003 MSDS No. F-31211 3. HAZARDS IDENTIFICATION Most Important Hazards and Effects of the Products Human Health Effects : There are no anticipated carcinogenic effects from exposure based on animal tests performed using toner. When used as intended according to instructions, studies do not indicate any symptoms of fibrosis will occur. Environmental Effects : No data are available.
MATERIAL SAFETY DATA SHEET Page: 3/4 Data Issued: Jun. 1. 2003 MSDS No. F-01211 Exposure limit values OSHA-PEL (USA) ACGIH-TLV (USA) Personal Protective Equipment Respiratory Protection Hand Protection Eye Protection Skin Protection Other Protective Equipment : 15mg/m3 (Total Dust) , 5mg/m3 (Respirable Dust) : 10mg/m3 (Total Dust) , 3mg/m3 (Respirable Dust) : : : : : Not required under intended use. Not required under intended use. Not required under intended use. Not required under intended use.
MATERIAL SAFETY DATA SHEET Page: 4/4 Data Issued: Jun. 1. 2003 MSDS No.
INDEX 2 2 IN 1 / 4 IN 1 copy ..................................... 34, 44, 45 2 IN 1 / 4 IN 1 indicator ..................................... 10, 34 2 IN 1 / 4 IN 1 key ............................................. 10, 34 2 x 250-sheet paper feed unit ................................. 75 250-sheet paper feed unit ....................................... 75 A About the operation manuals .................................... 5 - Online Manual ....................................................
M Main features ............................................................ 7 Maintenance indicator ....................................... 10, 62 Making a copy darker or lighter............................... 21 Margin shift.............................................................. 36 MARGIN SHIFT indicator.................................. 10, 36 MARGIN SHIFT key.......................................... 10, 36 Margin width......................................................
T Toner cartridge.................................................... 9, 70 Toner cartridge lock release lever....................... 9, 70 Toner cartridge replacement required indicator.. 10, 62, 70 Total copy count...................................................... 71 Total output count ................................................... 71 Total scan count...................................................... 71 Transfer charger......................................................
This device complies with Part 15 of the FCC rules. Operation is subject to the following two conditions: (1) This device may not cause harmful interference, and (2) this device must accept any interference received, including interference that may cause undesired operation. WARNING: FCC Regulations state that any unauthorized changes or modifications to this equipment not expressly approved by the manufacturer could void the user's authority to operate this equipment.
AR-M160/AR-M205 SHARP ELECTRONICS CORPORATION Sharp Plaza, Mahwah, New Jersey 07430-2135. www.sharp-usa.