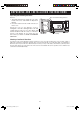
® AX-1100S/1100R Steam oven with microwave and grill function OPERATION MANUAL WITH COOKBOOK Read all instructions carefully before using the oven ® SHARP ELECTRONICS CORPORATION Sharp Plaza, Mahwah, NJ 07495-1163 SEC AX1100S_en.indd 1 TINSEB302WRRZ-D01 Printed in Thailand 10.12.
CONTENTS For Customer Assistance ................................................................................................ 1 Precautions to Avoid Possible Exposure to Excessive Microwave Energy ............... 1 Limited Warranty .............................................................................................................. 2 Product Information Card ................................................................................................ 2 Important Safety Instructions..........
F O R C U S T O M E R A S S I S TA N C E To aid in reporting this Steam Oven in case of loss or theft, please record below the model number and serial number located on the unit. We also suggest you record all the information listed and retain for future reference.
LIMITED WARRANTY SHARP ELECTRONICS CORPORATION warrants to the first consumer purchaser that this Sharp brand product (the Product), when shipped in its original container, will be free from defective workmanship and materials, and agrees that it will, at its option, either repair the defect or replace the defective Product or part thereof with a new or remanufactured equivalent at no charge to the purchaser for parts or labor for the period(s) set forth below.
I M P O RTA N T S A F E T Y I N S T R U C T I O N S When using electrical appliances basic safety precautions should be followed, including the following: WARNING - To reduce the risk of burns, electric shock, fire, injury to persons or exposure to excessive microwave energy: 14. Do not let cord hang over edge of table or counter. 15. See door surface cleaning instructions on page 32. 16. To reduce the risk of fire in the oven cavity: a. Do not overcook food.
U N PA C K I N G A N D I N S TA L L AT I O N I N S T R U C T I O N S Unpacking and Examining Your Oven Door seals and sealing surfaces Remove: 1. all packing materials from inside the oven cavity. Read enclosures and SAVE the Operation Manual. 2. the feature sticker from the outside of the door, if there is one.
GROUNDING INSTRUCTIONS This appliance must be grounded. This oven is equipped with a cord having a grounding wire with a grounding plug. It must be plugged into a wall receptacle that is properly installed and grounded in accordance with the National Electrical Code and local codes and ordinances. In the event of an electrical short circuit, grounding reduces the risk of electric shock by providing an escape wire for the electric current.
I N F O R M AT I O N Y O U N E E D T O K N O W POINTS TO REMEMBER • Please make reading the Operation Manual your very first step in working with your new oven. This important booklet explains exactly how the oven works and what you need to know to operate it successfully. • Use the information in the charts and recipes to help adapt your own favorite recipes or convenience foods for preparation in the oven.
INFORMATION YOU NEED TO KNOW ABOUT UTENSILS AND COVERINGS The chart below will help you decide what utensils and coverings should be used in each mode. Utensils Coverings Cooking Mode Steam Grill YES YES Aluminium Foil Grill Mix Microwave YES YES Small flat pieces of aluminum foil placed smoothly on food can be used to shield areas from cooking or defrosting too quickly. Keep foil at least 1 inch (2.54 cm) from walls of oven.
INFORMATION YOU NEED TO KNOW Utensils should be checked to ensure that they are suitable for use in each cooking mode. When heating food in plastic containers, pay special attention to the melting temperature of the containers. Never heat the plastic containers at over their melting temperature. Keep an eye on the oven due to the possibility of melting and ignition. DISH CHECK.
INFORMATION YOU NEED TO KNOW FOR STEAM COOKING Food Characteristics Density Food density will affect the amount of cooking time. Cut the food into thinner parts, if possible, and arrange in single layer. Quantity The cooking time must be increased as the amount increases. Size Small foods and small pieces cook faster than large ones, as heat can penetrate from all sides to the center. For even cooking make all the pieces the same size.
INFORMATION YOU NEED TO KNOW ABOUT FOOD WHEN USING THE MICROWAVE MODE DO DON’T Eggs, sausages, nuts, seeds, fruits & vegetables * Puncture egg yolks before cooking to prevent “ explosion”. * Pierce skins of potatoes, apples, squash, hot dogs and sausages so that steam escapes. * Cook eggs in shells. * Reheat whole eggs. * Dry nuts or seeds in shells. Popcorn * Use specially bagged popcorn for the microwave oven.
INFORMATION YOU NEED TO KNOW • To test for doneness, insert a meat thermometer in a thick or dense area away from fat or bone. NEVER leave the thermometer in the food during cooking, unless it is approved for microwave oven use. • Accessible parts (e.g. oven door, oven cavity, dishes, accessories and especially the grill heating element) may become hot during use.
PART NAMES 1 Ventilation openings Be aware that hot steam or air comes out during steam or grill mix cooking, and keep children away from the oven. 2 Door open handle 3 LCD display 4 Control panel 5 Oven lamp 6 Upper position (position 3) 7 Lower position (position 2) 8 Water tank (See page 14.) 9 Door seals and sealing surfaces 10 Latch 11 Oven floor (position 1) 12 Door hinges 13 Steam outlets 14 Drip tray (See page 14.
CONTROL PANEL DISPLAY INFORMATION The display shows useful information including cooking time and cooking mode. 1. Cooking mode & START indicators The indicator will flash or light up during the operation. You can press a concerned key when the indicators are flashing. When the indicators light up on the display, they mean that each cooking mode is selected or the oven is operating in each cooking mode. AUTO: Automatic cooking is selected or in progress. SENSOR: Sensor cooking is selected or in progress.
I M P O RTA N T I N S T R U C T I O N S READ CAREFULLY BEFORE COOKING WITH STEAM NOTES: 1. Do not use any other liquids like distilled water, R.O water, mineral water and etc. 2. An insufficient amount of water in the water tank may cause an undesired result. 3. We recommend that you empty the water tank every time after cooking. Do not leave the water tank filled with water in the oven over a day. 4.
IMPORTANT INSTRUCTIONS STEAM IN AUTOMATIC AND MANUAL COOKING Before cooking 1. Make sure the water tank is filled with fresh cold tap water and is installed. (See page 14.) 2. Make sure the empty drip tray is installed. (See page 14.) 3. Place food in the oven. Make sure to place the glass tray in lower position (position 2) for cooking with steam mode. After Cooking 1. After the oven has cooled, remove and empty the water tank, wipe oven cavity.
IMPORTANT INSTRUCTIONS DRAIN WATER FUNCTION 2 Press Info/Timer and number 2 to select “In F2”. 3 Place the glass tray in lower position (position 2). Slide tray toward back wall of oven until it stops. 4 Do not place any food in the oven. Close the door firmly. Press Minute Plus/START to begin descaling. (about 30 min.) 5 When the oven has stopped and is cool, remove water tank, empty, rinse and refill with fresh cold tap water to the MAX mark. Replace the water tank.
B E F O R E O P E R AT I N G CLEAN THE OVEN BEFORE FIRST USE • Before operating your oven, make sure you read and understand this operation manual completely. • Before the oven can be used, follow these procedures: 1. Place the drip tray correctly. See page 14. 2. See below for getting started. 3. Follow directions on the right side for clean the oven before first use.
A U T O M AT I C C O O K I N G Automatic Operation is cooked with steam, grill and microwave function. Refer to each function for the details. HEALTHY COOKING WARNING for stacking the steam tray and glass tray: After cooking, take out the steam tray first. See Figure 2 on page 12. Be aware of excess water from the steam tray, we recommend you place it directly on a flat dish or tray to avoid spillages. Before taking out the glass tray, make sure that it is cool.
AUTOMATIC COOKING HEALTHY COOKING CHART FOOD PROCEDURE AMOUNT FOOD POSITON Vegetables 1. Quick cooking Asparagus spears (medium) Broccoli florets Cauliflower florets Zucchini (1/4-inch thick slices) 2. Med. cooking Carrots (Sliced: 1/4-inch thick slices) Green beans (Cut into 2-inch pieces) 3. Long cooking Carrots (Baby) Corn on the cob Acorn squash (Small, Cut into halves) Place vegetables in the steam tray on the glass tray.
AUTOMATIC COOKING For Category 6 (Auto Grill): Auto Grill has 3 menus. 1 Hamburgers 2 Boneless poultry 3 Chicken pieces Refer to the AUTO GRILL CHART below for details. NOTES: 1. Enter the weight of the food only. Do not include the weight of the container. 2. For foods weighing more or less than weights given in the cooking charts, cook manually. 3. Always follow the instructions in the cooking chart. 4. All selections can be programmed with More or Less Time Adjustment. See page 29. 5.
AUTOMATIC COOKING SENSOR COOK SENSOR POPCORN Sharp's Sensor is a semi-conductor device that detects the vapor (moisture and humidity) emitted from the food as it heats. The sensor adjusts the cooking times and power level for various foods and quantities. Using Sensor Settings: 1. Be sure the exterior of the cooking container and the interior of the oven are dry. Wipe off any moisture with a dry cloth or paper towel. 2. The oven works with foods at normal storage temperature.
AUTOMATIC COOKING MICRO REHEAT/COOK MICRO REHEAT/COOK has 9 menus and allows you to heat many of your favorite foods. 1 Sensor reheat* 2 Frozen entrees* 3 Fresh vegetables: quick cooking* 4 Fresh vegetables: longer cooking* 5 Frozen vegetables* 6 Baked potatoes* 7 Beverage 8 Fresh roll, muffin 9 Frozen roll, muffin * These menus are sensor cooking. Read carefully the instructions for Sensor Cook on page 21 before the cooking. 3 4 * Suppose you want to reheat 6 fresh muffins with Standard time.
AUTOMATIC COOKING MICRO REHEAT/COOK CHART FOOD AMOUNT PROCEDURE 1. Sensor reheat 4 - 36 oz Place in dish or casserole slightly larger than amount to be reheated. Flatten, if possible. Cover with lid, plastic wrap or wax paper. Use covers such as plastic wrap or lids with larger quantities of more dense foods such as stews. After reheating, stir well, if possible. Re-cover and allow to stand 2 to 3 minutes. Foods should be very hot. If not, continue to heat with variable power and time. 2.
AUTOMATIC COOKING NOTES: 1. Enter the weight of the food only. Do not include the weight of the container. 2. Any selection can be programmed with More or Less Time Adjustment. See page 29. 3. To defrost other foods or foods above or below the weights allowed on Micro Defrost Chart, use time and 30% microwave power. See MANUAL DEFROST below. 4. After cooking, the oven will automatically cool and you will hear the sound of the cooling fan.
MANUAL COOKING Manual Cooking is an option in Steam Cook, Grill, Grill Mix and Microwave. Refer to the “Manual Cooking Chart” and “Food and Utensil Position Chart”. The charts give information on each setting. MANUAL COOKING CHART Cooking mode Steam Cook High Low Grill High Grill Mix Low Temp/power range Time range Water tank 212 °F 160 - 200 °F * Grill: 50% power Microwave: 50% power 0 - 35 min. 0 - 60 min. 0 - 99 min. 99 sec. YES YES NO 0 - 99 min. 99 sec.
MANUAL COOKING STEAM COOK Manual Steam Cook has 2 options, Steam Cook High and Steam Cook Low. Always cook food using steam tray and glass tray. See page 25 for the details. And see the important instructions on page 14-15. Cooking mode STEAM COOK LOW * Suppose you want to cook for 20 minutes on Steam Cook Low (175°F). PROCEDURE Temperature Steam Cook High 1 212 °F Steam Cook Low 160 - 200 °F Use Steam Cook High to steam foods such as chicken or vegetables.
MANUAL COOKING GRILL GRILL MIX The grill heating element at the top of the oven cavity has one power setting only. This mode does not use steam. This mode can be programmed for up to 99 minutes 99 seconds. 1 layer cooking only. Place the food onto the rack on glass tray and select desired position depending on the food size. Grill Mix combines microwave power with grill. Grill Mix has 2 options; Grill Mix High and Grill Mix Low. This mode does not use steam.
MANUAL COOKING MICROWAVE Microwave is fast and convenient for cooking, reheating and defrosting. First enter the cooking time then select the power level. This mode does not use steam. This mode can be programmed for up to 99 minutes 99 seconds. There are 11 different power levels. To change the microwave power level, press Micro until the desired power level is displayed. * Suppose you want to defrost for 5 minutes on 30%.
O T H E R C O N V E N I E N T F E AT U R E S MORE OR LESS TIME ADJUSTMENT MULTIPLE SEQUENCE COOKING To use with automatic cooking: This function allows you to cook using up to 3 manual cooking programs; combinations of Microwave, Grill and Grill Mix. You can adjust cooking results as you like. Should you discover that you like any automatic settings slightly more done, press Micro once after entering weight and before pressing Minute Plus/ START.
OTHER CONVENIENT FEATURES KITCHEN TIMER INFO Use the Kitchen Timer as a minute timer or to monitor the standing time for cooked/defrosted food. Info key provides 8 features. In F1: Drain In F5: Child lock In F2: Descale In F6: Sound on/off In F3: Water hardness In F7: Clock In F4: Demo In F8: Energy save mode • Suppose you want to set the kitchen timer for 5 minutes. 1 Enter the desired time. The number from “In F1” to “In F8” will be displayed when you select the feature.
OTHER CONVENIENT FEATURES DEMONSTRATION MODE SOUND ON/OFF This feature is mainly for use by retail outlets, and also allows you to practice the key operation. To demonstrate, press Info/Timer and number 4 (In F4) and then press Minute Plus/START. “dISP” will appear in the display. Cooking operations can now be demonstrated with no power in the oven. The display will count down to zero at ten times the speed faster than normal.
CLEANING AND CARE Oven interior Key Point for Cleaning - Immediately and frequently! The food splashes and oily meat juice, remaining on the oven interior walls will get stuck and hard to remove if it is not cleaned immediately and after each use. The usage of the steam function will assist in this cleaning process. They will be also perishable by the influence of steam.
TROUBLESHOOTING CHART If EE is displayed or you think the oven is not working properly, check the chart below before consulting a Sharp Authorized Servicer. This will help to prevent unnecessary service calls. WARNING: Never adjust, repair or modify the oven by yourself. It is hazardous for anyone other than a qualified service technician trained by SHARP to carry out any service or repair operation. This is important as it may involve the removal of covers that provide protection against electrical parts.
TROUBLESHOOTING CHART The following situations are normal and are not signs that the oven is malfunctioning. QUESTION / SITUATION Control panel / power supply The display is black / blank. ANSWER * Open the door and close. * Check the power plug is properly connected to a suitable wall outlet. * Check that fuse or circuit breaker is functioning properly. * Disconnect the power cord, wait for a minute. Then reconnect, open and close the door. The display is fine but Minute * Open the door and close.
TROUBLESHOOTING CHART The following situations are normal and are not signs that the oven is malfunctioning. ANSWER QUESTION / SITUATION Steam Water is found inside the oven Steam has condensed inside the oven. Wipe dry with a soft cloth or a sponge after cooling. when the door is opened. Steam comes out from the The air ventilation openings are at the oven bottom (left side). It is normal for used steam to come from the air bottom of the oven. ventilation openings.
SERVICE CALL CHECK Please check the following before calling for service: 1. Place one cup of water in a glass measuring cup in the oven and close the door securely. Operate the oven for one minute on Microwave, HIGH 100% power. A. Does the oven light come on? YES _______ NO _______ B. Does the cooling fan work? YES _______ NO _______ You will hear the fan sound. C. Does the Microwave indicator appear in the display? YES _______ NO _______ D. After 1 minute does the signal sound? YES _______ NO _______ E.
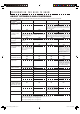
CHART Grilling chart Use rack and glass tray. Turn food over halfway through grilling. FOOD Beef Flank steak, 3/4 inch thick AMOUNT OVEN SETTING 1.0 - 1.5 lb FOOD POSITION 12 - 14 Med. 160°F 3 Grill with preheat 12 - 14 Med.Rare 145°F 3 0.25 lb. each Auto Grill, Hamburgers Preset 160°F 3 0.5 - 2.
RECIPES Basil Chicken Kabobs Steamed Moneybags ½ pound boneless chicken breast, cut into 12 cubes 12 large fresh basil leaves 1 yellow pepper, cut into 12 (1-inch) squares 6 medium white or brown mushrooms, stemmed 6 (4-inch) wooden skewers 6 cherry tomatoes ¼ cup orange juice 1 tablespoon walnut oil 1 tablespoon balsamic vinegar 1 tablespoon honey ½ teaspoon prepared mustard freshly ground pepper Makes 6 kabobs ½ 8 1 1 1 1 ½ ½ 1 2 2 2 16 pound lean ground pork large raw shrimp (about 2 ½ ounces) egg wh
RECIPES Pork Dumplings with Dipping Sauce Chicken & Bacon Dumplings 6 ¼ ¼ 1 1 10 1 1 1 1½ 1 36 36 / pound ground lean pork / cup finely chopped button mushrooms (about 1 ounce) 3 scallions, chopped ½ small carrot, peeled and finely chopped 1 celery rib, finely chopped 2 tablespoons soy sauce 1 teaspoon sesame oil 36 potsticker or Hong Kong dumpling wrappers* 2 tablespoons soy sauce 1 medium green chile pepper, chopped ½ teaspoon dark sesame oil 2 teaspoons brown sugar 1 tablespoon sherry Makes 36 dumpling
RECIPES Mussels with Herb Butter Sauce 2 ¼ 1 1 1 ½ Italian Stuffed Peppers 3 1 1 ½ 1 ½ ½ ¼ 1/8 pounds fresh mussels cup butter, softened clove garlic, minced tablespoon chopped fresh parsley tablespoon chopped fresh chives or basil teaspoon grated lime or lemon zest freshly cracked black pepper to taste Makes 6 servings Scrub mussels under cold, running water with a nylon pad or stiff brush. Remove hair-like “beards”, if present. Discard mussels that are cracked or do not close when tapped.
RECIPES Corn on the Cob with a Twist Green Beans Almondine 1 ¼ 2 ¼ ¼ ¼ 1 1 ½ 1 4 tablespoon light soy sauce tablespoon olive oil teaspoon sesame oil clove garlic, minced ears fresh corn, husks and silk removed Makes 4 servings In resealable plastic bag, combine first four ingredients. Add corn ears. Turn to coat corn. Seal. Refrigerate for several hours or overnight, turning corn ears occasionally. Lift corn out of bag. Discard marinade. Wrap each ear in parchment paper, twisting the ends to seal.
RECIPES Ginger Pork Kabobs 1 ½ ¼ 2 1 1 1 1 ½ 2 1 Steak Kabobs egg, beaten cup crushed chow mein noodles cup apple juice tablespoons soy sauce tablespoon grated gingerroot pound ground pork can (8 ounces) pineapple chunks (juice pack), drained large red pepper, cut into ¾-inch chunks cup apple juice tablespoons cider vinegar teaspoon cornstarch Makes 4 servings ¼ ¼ ¼ 1 1 ¼ 2 cup sugar cup soy sauce cup white wine tablespoon vegetable oil teaspoon ground ginger teaspoon salt pounds lean top beef round ste
RECIPES Grilled Salmon with Basil Sauce 2 1 ¼ 2 1 ¼ ½ 4 Spicy Shrimp ¼ ¼ 3 2 1 2 1/8 cup white wine cup water tablespoons soy sauce tablespoons sugar tablespoon vegetable oil teaspoons dried parsley flakes to ¼ teaspoon ground ginger Dash of hot pepper sauce 1 pound jumbo raw shrimp, shelled and deveined Makes 4 servings tablespoons olive oil clove garlic, minced cup white wine tablespoons lemon juice cup fresh basil* cup grated Parmesan cheese teaspoon Dijon-style mustard salmon steaks (1¼ to 1½ pounds)
44 SEC AX1100S_en.indd Sec1:44 10.12.2 0:48:12 PM pressing number or ehter the quantity by pressing the same number key that you pressed at 1 . 2 Enter the weight by following the directions in the Cooking Guide or indicator(s) in the display. 3 Place food in the oven 1: Regular 2: Regular light 3: Mini Sensor Popcorn 1: Ground meat 2: Chicken bone-in 3: Chicken boneless 4: Steaks, Chops Micro Defrost Minute Plus/ START.
® AX-1100S/1100R Horno de vapor con función de microondas y parrilla MANUAL DE OPERACIÓN CON LIBRO DE COCINA Lea con detenimiento todas las instrucciones antes de utilizar el horno ® SHARP ELECTRONICS CORPORATION Sharp Plaza, Mahwah, NJ 07495-1163 SEC AX1100S_sp.indd 1 TINSEB302WRRZ-D01 Impreso en Tailandia 10.12.
CONTENIDO Para asistencia al consumidore ...................................................................................... 1 Precauciones para evitar posibles exposiciones al exceso de energía del microondas ..... 1 Garantía limitada .............................................................................................................. 2 Tarjeta de información del producto .............................................................................. 2 Instrucciones de seguridad importantes ....
PARA ASISTENCIA AL CONSUMIDORE Para poder describir este Horno de vapor en caso de pérdida o robo, registre a continuación el número del modelo y el número de serie que se encuentra en la unidad. También le sugerimos que registre toda la información incluida y la conserve para posteriores consultas.
GARANTÍA LIMITADA SHARP ELECTRONICS CORPORATION garantiza al primer usuario o comprador que este producto Sharp (el "Producto") no tendrá ninguna falla de mano de obra ni materiales cuando haya sido despachado en su empaque original, y acepta, a su elección, reparar o reemplazar el Producto o el componente con uno nuevo o equivalente remanufacturado sin cargo de los componentes o de mano de obra al consumidor final por el período que se indica a continuación.
I N S T R U C C I O N E S D E S E G U R I D A D I M P O RTA N T E S Al usar artefactos eléctricos deben tomarse precauciones de seguridad básicas, incluyendo las siguientes: ADVERTENCIA - Para reducir el riesgo de quemaduras, choque eléctrico, incendios, lesiones a personas o exposición al exceso de energía del microondas: 14. No deje que el cable cuelgue sobre el borde de la mesa o mostrador. 15. Vea las instrucciones para limpiar la superficie de la puerta en la página 32. 16.
I N S T R U C C I O N E S PA R A D E S E M B A L A J E E I N S TA L A C I Ó N Desembalaje y verificación de su horno Sellos de la puerta y superficies de sellado Retire: 1. Todos los materiales de embalaje de la cavidad del horno. Lea los anexos y GUARDE el Manual de uso y cuidado. 2. La etiqueta adhesiva en la parte exterior de la puerta, si hubiera una.
INSTRUCCIONES PARA CONEXIÓN A TIERRA Este artefacto debe ser conectado a tierra. Este horno está equipado con un cable que tiene un alambre a tierra y un enchufe con conexión a tierra. Debe conectarlo en un tomacorriente de pared instalado y conectado a tierra apropiadamente de acuerdo con el Código eléctrico nacional y los códigos y reglamentos locales.
INFORMACIÓN QUE DEBE CONOCER PUNTOS A RECORDAR • Haga de la lectura del Manual de operación el primer paso a la hora de trabajar con su nuevo horno. Este importante folleto explica exactamente cómo funciona el horno y qué necesitará saber para utilizarlo satisfactoriamente. • Utilice la información contenida en las tablas y recetas para ayudarle a adaptar la preparación de sus recetas favoritas o de sus alimentos precocinados en el horno.
INFORMACIÓN QUE DEBE CONOCER SOBRE LOS UTENSILIOS Y ENVOLTURAS El cuadro siguiente le ayudará a decidir qué utensilios y envolturas debe usar en cada modo. Utensilios Envolturas Modo de cocción Papel aluminio Metal, recipientes de aluminio Vapor Parrilla SÍ SÍ SÍ SÍ SÍ SÍ horno. No use el recipiente si tiene un desperfecto.
INFORMACIÓN QUE DEBE CONOCER Deberá comprobar que los utensilios sean adecuados para su uso en cada modo de cocción. Al calentar alimentos en contenedores de plástico, ponga especial atención a la temperatura en la cual se derriten los contenedores. Nunca caliente los contenedores de plástico por encima de la temperatura en la cual se derriten. Vigile el horno ya que existe la posibilidad de ignición o de objetos derritiéndose. PROBAR EL PLATO.
INFORMACIÓN QUE DEBE CONOCER PARA COCCIÓN AL VAPOR Características de los alimentos Densidad La densidad de los alimentos afectará la duración del tiempo de cocción. Corte los alimentos en porciones más delgadas, de ser posible dispóngalos en una sola capa. Cantidad El tiempo de cocción debe aumentar en la misma proporción al aumento de la cantidad de alimentos.
INFORMACIÓN QUE DEBE CONOCER SOBRE LOS ALIMENTOS AL USAR EL MODO MICROONDAS NO SÍ Huevos, salchichas, frutos secos, semillas, frutas y vegetales * Perfore las yemas del huevo antes de cocinarlo para evitar una “explosión”. * Haga pequeños agujeros en la piel de las papas, manzanas, zapallos, hot dogs y salchichas para liberar el vapor. * Cocinar los huevos con cáscara. * Recaliente los huevos enteros. * Deshidrate nueces o semillas con cáscara.
INFORMACIÓN QUE DEBE CONOCER • Para verificar la cocción, introduzca un termómetro para carne en un área gruesa o densa lejos de la grasa y el hueso. NUNCA deje el termómetro en los alimentos durante la cocción, a menos que sea aprobado para uso en horno microondas. • Las partes accesibles (ej. puerta del horno, cavidad del horno, platos, accesorios y especialmente el elemento calefactor de la parrilla) pueden calentarse durante el uso.
NOMBRE DE LAS PARTES 3 4 2 18 1 14 9 17 13 5 ACCESORIOS 19 Estante Para Parrilla y Parrilla mixta. 6 No utilizar al Vapor ni Microondas. Colocar siempre sobre la bandeja de cristal. 7 20 Bandeja de cristal 8 21 Bandeja de vapor x2 Al Vapor únicamente. Colocar siempre sobre/en la bandeja de cristal. No utilizar para Microondas, Parrilla y Parrilla mixta. 12 10 19 16 15 14 20 11 21 NOTA: Coloque el estante en la bandeja de cristal tal y como se muestra en la Figula 1.
PANEL DE CONTROL INFORMACIÓN EN PANTALLA La pantalla muestra información útil incluyendo tiempos y modos de cocción. 1. Modo de cocción e Indicadores para COMENZAR El indicador parpadeará o se iluminará durante el funcionamiento. Podrá pulsar la tecla correspondiente cuando los indicadores parpadeen. Si los indicadores se iluminan en la pantalla, indican el modo de cocción seleccionado o el modo de cocción de funcionamiento del horno.
I N S T R U C C I O N E S I M P O RTA N T E S LEA DETENIDAMENTE ANTES DE COCINAR CON VAPOR NOTAS: 1. N o u t i l i c e n i n g ú n o t r o l í q u i d o c o m o a g u a destilada, ósmosis, agua mineral, etc. 2. Una cantidad insuficiente de agua en el depósito de agua puede causar un resultado no deseado. 3. Recomendamos que vacíe el depósito de agua después de cada cocción. No deje el depósito de agua lleno con agua en el horno hasta el día siguiente. 4.
INSTRUCCIONES IMPORTANTES VAPOR DURANTE LA COCCIÓN AUTOMÁTICA Y MANUAL Antes de la cocción 1. Verifique que el depósito de agua esté lleno con agua fresca del grifo y que esté instalado. (Vea la página 14.) 2. Asegúrese de que esté instalada la bandeja de goteo vacía. (Vea la página 14.) 3. Coloque los alimentos en el horno. Asegúrese de colocar la bandeja de cristal en la posición inferior (posición 2) al cocinar en el modo vapor. Luego de la cocción 1.
INSTRUCCIONES IMPORTANTES FUNCIÓN DRENAR EL AGUA 2 Pulse Info/Temporizador y el número 2 para seleccionar “In F2”. 3 Coloque la bandeja de cristal en la posición inferior (posición 2). Deslice la bandeja hacia la pared posterior del horno hasta que se detenga. 4 No coloque ningún alimento en el horno. Cierre la puerta firmemente. Pulse Minuto extra/ COMENZAR para empezar a decapar.
ANTES DE OPERAR LIMPIE EL HORNO ANTES DEL PRIMER USO • Antes de utilizar su horno, asegúrese de haber leído y entendido todo el manual de operación. • Antes de usar el horno, siga estos procedimientos: 1. Coloque la bandeja de goteo correctamente. Vea la página 14. 2. Consulte a continuación para obtener información sobre los primeros pasos. 3. Siga las instrucciones al lado derecho para limpiar el horno antes del primer uso.
COCCIÓN AUTOMÁTICA La operación automática está disponible con la Vapor, Parrilla y Microondas. Consulte cada función para más detalles. COCCIÓN SANA AVISO al colocar la bandeja de vapor y la bandeja de cristal: Tras la cocción, extraiga primero la bandeja de vapor. Consulte la Figula 2 en la página 12. Tenga cuidado con el exceso de agua en la bandeja de vapor, se recomienda que la coloque directamente sobre un plato plano o bandeja para evitar salpicaduras.
COCCIÓN AUTOMÁTICA TABLA DE COCCIÓN SANA ALIMENTO Vegetales 1. Cocción rápida Espárragos (medio) Brócoli Coliflor Calabacín (rodajas de ¼ pulgadas de grosor) 2. Cocción media Zanahorias (Cortadas: rodajas de ¼ pulgadas de grosor) Judías verdes (Cortadas en trozos de 2 pulgadas) 3. Cocción larga Zanahorias (pequeñas) Mazorca de maíz Calabaza de bellota (pequeña, cortada a la mitad) PROCEDIMIENTO CANTIDAD Pescado 1. Carne de pescado (¼-½ pulgadas de grosor) 0,3 - 2 lb 2.
COCCIÓN AUTOMÁTICA Para la categoría 6 (Parrilla automática): Parrilla automática tiene 3 menús. 1 Hamburguesas 2 Aves de corral sin hueso 3 Trozos de pollo Para más detalles, consulte la siguiente TABLA DE PARRILLA AUTOMÁTICA. NOTAS: 1. Sólo ingrese el peso del alimento. No incluya el peso del recipiente. 2. Para alimentos que pesen más o menos que los pesos indicados en las tablas de cocción, cocine en el modo manual. 3. Siempre siga las instrucciones en la tabla de cocción. 4.
COCCIÓN AUTOMÁTICA SENSOR DE COCCIÓN SENSOR DE PALOMITAS El Sensor de Sharp es un dispositivo semiconductor que detecta el vapor (humedad) emitido por los alimentos mientras se calientan. El sensor ajusta los tiempos de cocción y el nivel de potencia para varios alimentos y cantidades. Uso de los ajustes del sensor: 1. Asegúrese de que el exterior del recipiente de cocción y el interior del horno estén secos. Remueva cualquier rastro de humedad con un paño seco o toalla de papel. 2.
COCCIÓN AUTOMÁTICA RECALENTAR/COCINAR POR MICRO RECALENTAR/COCINAR POR MICRO tiene 9 menús y le permite calentar la mayoría de sus alimentos favoritos. 1 Sensor de recalentamiento* 2 Entrantes congelados* 3 Vegetales frescos: cocción rápida* 4 Vegetales frescos: cocción larga* 5 Vegetales congelados* 6 Patatas al horno* 7 Bebidas 8 Panecillo fresco, mollete 9 Panecillo congelado, mollete * Estos menús son cocinados por sensor.
COCCIÓN AUTOMÁTICA TABLA RECALENTAR/COCINAR POR MICRO ALIMENTO CANTIDAD PROCEDIMIENTO 1. Sensor de recalentamiento 4 - 36 oz Coloque en un plato o cacerola ligeramente más grande que la cantidad que va a recalentar. Aplane, si es posible. Recubra con una tapa, película plástica o papel encerado. Use envolturas como películas plásticas o tapas para grandes cantidades de alimentos con mayor densidad como estofados. Después de recalentar, revuelva bien, si es posible.
COCCIÓN AUTOMÁTICA NOTAS: 1. Sólo ingrese el peso del alimento. No incluya el peso del recipiente. 2. Usted puede programar las selecciones con más o menos tiempo de ajuste. Vea la página 29. 3. Para descongelar otros alimentos o alimentos por encima o debajo de los pesos permitidos en la TABLA DE DESCONGELACIÓN CON MICRO a continuación, use el botón time (tiempo) y la potencia al 30%. Vea DESCONGELAMIENTO MANUAL de abajo. 4.
COCCIÓN MANUAL Cocción manual es una opción para la Cocción al vapor, Parrilla, Parrilla mixta y Microondas. Consulte la “Tabla de cocción manual” y la “Tabla de colocación de los alimentos y utensilios”. Las tablas proporcionan información sobre cada ajuste.
COCCIÓN MANUAL COCCIÓN AL VAPOR La Cocción con vapor manual tiene 2 opciones, Cocción con vapor alto y Cocción con vapor bajo. Cocine alimentos utilizando siempre la bandeja de vapor y la bandeja de cristal. Consulte la página 25 para más detalles. Y consulte las instrucciones importantes en las páginas 14-15. Modo de cocción COCCIÓN CON VAPOR BAJO * Supongamos que desea cocinar durante 20 minutos en Cocción con vapor bajo 79°C (175°F).
COCCIÓN MANUAL PARRILLA PARRILLA MIXTA El elemento calefactor de la parrilla en la parte superior de la cavidad del horno tiene únicamente un ajuste de potencia. Este modo no utiliza vapor. Este modo puede programarse hasta un máximo de 99 minutos y 99 segundos. 1 estrato de cocción únicamente. Coloque los alimentos en el estante en la bandeja de cristal y seleccione la posición deseada dependiendo del tamaño de los alimentos.
COCCIÓN MANUAL MICROONDAS El microondas es rápido y útil para la cocción, recalentamiento y descongelación. Primero, introduzca el tiempo de cocción, a continuación seleccione el nivel de potencia. Este modo no utiliza vapor. Este modo puede programarse hasta un máximo de 99 minutos y 99 segundos. Hay 11 niveles de potencia diferentes. Pantalla Nivel de potencia Para cambiar el nivel de potencia del microondas, pulse Micro hasta que aparezca en pantalla el nivel de potencia deseado.
OTRAS FUNCIONES CONVENIENTES MAYOR O MENOR AJUSTE DE TIEMPO COCCIÓN EN SECUENCIAS MÚLTIPLES Para su uso en cocción automática: Esta función le permite cocinar utilizando hasta 3 programas de cocción manual; combinaciones de microondas, Parrilla y Parrilla mixta. Puede ajustar los resultados de la cocción según su preferencia. Si descubre que le gustan algunos de los ajustes automáticos un poquito más hechos, pulse una vez Micro tras introducir el peso y antes de pulsar Minuto extra/COMENZAR.
OTRAS FUNCIONES CONVENIENTES TEMPORIZADOR DE COCINA INFO Utilice el Temporizador de cocina como minutero o para monitorear el tiempo de reposo de los alimentos cocinados/descongelados. Tecla Info proporciona 8 funciones. In F1: Drenaje In F2: Desincrustar In F3: Dureza del agua In F4: Demostración In F5: Bloqueo infantil In F6: Silencio activado/desactivado In F7: Reloj In F8: Modo de Ahorro de energía • Supongamos que desea ajustar el temporizador de cocina a 5 minutos.
OTRAS FUNCIONES CONVENIENTES MODO DE DEMOSTRACIÓN SILENCIO ACTIVADO/DESACTIVADO Esta función es utilizada principalmente en comercios, y también le permite practicar la operación de tecla. Para demostrarlo, pulse Info/Temporizador y el número 4 (In F4) y a continuación pulse Minuto extra/COMENZAR. “dISP” aparecerá en la pantalla. Las operaciones de cocción ahora pueden demostrarse sin que el horno reciba alimentación. La pantalla realizará la cuenta atrás a una velocidad 10 veces superior a la normal.
LIMPIEZA Y CUIDADO Interior del horno Punto importante para la limpieza - ¡Inmediata y frecuentemente! La comida salpica, y los jugos aceitosos de la carne permanecen en el interior de las paredes del horno, se secarán y será muy difícil extraerlos si no se limpian inmediatamente y después de cada uso. El uso de la función al vapor le ayudará en el proceso de limpieza. También perecerán por la influencia del vapor.
CUADRO DE LOCALIZACIÓN DE FALLAS Si aparece EE o usted considera que el horno no está funcionando apropiadamente, revise la tabla a continuación antes de consultar al Personal de servicio autorizado Sharp. Así evitará hacer llamadas innecesarias. ADVERTENCIA: Nunca ajustar, reparar ni modificar el horno por su cuenta. Es peligroso que alguien que no sea un técnico de servicio cualificado por SHARP intente llevar a cabo las tareas de reparación o servicio.
CUADRO DE LOCALIZACIÓN DE FALLAS Las siguientes situaciones son normales y no son señales de que el horno tenga fallas. PREGUNTA / SITUACIÓN RESPUESTA Panel de control / La pantalla está negra / vacía. fuente de alimentación * Abra la puerta y cierre. * Ve r i f i q u e q u e e l h o r n o e s t é c o n e c t a d o a u n tomacorriente de pared adecuado. * Revise que el fusible o interruptor automático funcionen apropiadamente. * Desconecte el cable de alimentación, y espere un minuto.
CUADRO DE LOCALIZACIÓN DE FALLAS Las siguientes situaciones son normales y no son señales de que el horno tenga fallas. RESPUESTA PREGUNTA / SITUACIÓN Al vapor Hay agua dentro del horno al Se ha condensado humo dentro del horno. Seque con un paño o esponja suave y seco tras el enfriamiento. abrir la puerta. Fugas de vapor desde la parte Los orificios de ventilación de aire están en la parte inferior inferior del horno. del horno (lateral izquierdo).
REVISIÓN PARA SOLICITUD DE SERVICIO Revise lo siguiente antes de llamar para solicitar servicio: 1. Coloque en el horno una taza de agua en una taza medidora de vidrio y cierre la puerta firmemente. Opere el horno por un minuto en microondas, 100% ALTO. A. ¿Se enciende la luz del horno? SÍ _______ NO _______ B. ¿Funciona el ventilador de enfriamiento? SÍ _______ NO _______ Oirá el sonido del ventilador. C. ¿Aparece el indicador de Microondas en la pantalla? SÍ _______ NO _______ D.
TA B L A Tabla de Parrilla Utilice el estante y la bandeja de cristal. Convertir los alimentos más de la mitad de la parrilla. ALIMENTO Ternera Arrachera, 3/4 pulgadas de grosor CANTIDAD HORNO DE AJUSTE 1,0 - 1,5 lb Filetes: Mesón, Chuleta, Entrecot o Solomillo, 1 pulgadas de grosor Hamburguesas*, 1/2 pulgadas de grosor Cerdo TIEMPO (min.
R E C E TA S Brochetas de pollo y albahaca Paquetitos al vapor ½ 8 1 1 1 1 ½ ½ 1 2 2 2 16 ½ libra (0,22 kg) de pechugas de pollo sin hueso, troceadas en 12 trozos 12 hojas grandes de albahaca fresca 1 pimiento amarillo, troceado en 12 (1 pulgada/ 2,5 cm) trozos 6 champiñones de tamaño medio blancos o marrones, sin tallo 6 (4 pulgadas/ 10,2 cm) pinchos de madera 6 tomatitos ¼ de taza de zumo de naranja 1 cucharada sopera de aceite de nuez 1 cucharada sopera de vinagre balsámico 1 cucharada sopera de miel ½
RECETAS Dumplings de cerdo con salsa Dumplings de pollo y bacon 6 ¼ ¼ 1 1 10 1 1 1 1½ 1 36 36 / libra (0,13 kg) de carne de cerdo molida magra 1/3 taza de champiñones bien picados (alrededor de 1 onza / 28,4 gramos) 3 cebolletas, picadas ½ zanahoria pequeña, pelada y bien troceada 1 tallo de apio, bien troceado 2 cucharadas soperas de salsa de soja 1 cucharadita de café de aceite de sésamo 36 potsticker o envolturas para paquetitos Hong Kong* 2 cucharadas soperas de salsa de soja 1 pimiento verde picante
RECETAS Mejillones con salsa de mantequilla y especias 2 ¼ 1 1 1 ½ Pimientos rellenos italianos libras (0,90 kg) de mejillones frescos taza de mantequilla, ablandada diente de ajo, picado cucharada sopera de perejil fresco picado cucharada sopera de cebollinos o albahaca fresca cucharadita de café de cáscara de limón o lima rallada pimienta negra recién molida para saborear Sirve para 6 3 1 1 ½ 1 ½ ½ ¼ 1/8 Frote los mejillones bajo agua fría con un estropajo de nilón o cepillo de cerdas duras.
RECETAS Mazorca de maíz Judías verdes almendradas 1 1 ½ 1 4 cucharada sopera de salsa de soja cucharada sopera de aceite de oliva cucharadita de café de aceite de sésamo diente de ajo, picado mazorcas de maíz fresco, sin cáscara Sirve para 4 Mezcle los cuatro primeros ingredientes en una bolsa de plástico con cierre. Añada las mazorcas de maíz. Gire para cubrir el maíz. Cierre. Déjelas en la nevera durante varias horas o toda la noche, dele la vuelta a las mazorcas de vez en cuando.
RECETAS Brochetas de cerdo con jengibre 1 ½ ¼ 2 1 1 1 1 ½ 2 1 Brochetas de carne ¼ ¼ ¼ 1 1 ¼ 2 taza de azúcar taza de salsa de soja taza de vino blanco cucharada sopera de aceite vegetal cucharadita de café de jengibre picado cucharadita de café de sal libras (0,90 kg) de filetes de ternera magros, cortados en cubos de 1 pulgada (2,5 cm) 2 pimientos verdes grandes, troceados 8 tomatitos, cortados a la mitad 1 lata (8 onzas / 227 gramos) de trozos de piña (paquete con zumo), colada Sirve para 4 huevo, bat
RECETAS Salmón a la parrilla con salsa de albahaca 2 1 ¼ 2 1 ¼ ½ 4 Camarones picantes ¼ ¼ 3 2 1 2 1/8 taza de vino blanco taza de agua cucharadas soperas de salsa de soja cucharadas soperas de azúcar cucharada sopera de aceite vegetal cucharaditas de café de perejil a ¼ cucharadita de café de jengibre picado Una pizca de salsa picante 1 libra (0,45 kg) de camarones crudos gigantes, sin cáscara y limpios Sirve para 4 cucharadas soperas de aceite de oliva diente de ajo, picado taza de vino blanco cucharada
44 SEC AX1100S_sp.indd Sec1:44 10.12.2 4:54:01 PM sobre el número o introduciendo la cantidad pulsando la misma tecla numérica que pulsó en 1 . el horno siguiendo las direcciones de la Guía de cocción o el (los) indicador (es) en la pantalla.