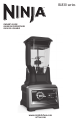
® OWNER’S GUIDE GUIDE DU PROPRIÉTAIRE GUÍA DEL USUARIO www.ninjakitchen.com 1.877.646.
IMPORTANT SAFETY INSTRUCTIONS For Household Use Only WHEN USING ELECTRICAL APPLIANCES, BASIC SAFETY PRECAUTIONS SHOULD ALWAYS BE FOLLOWED, INCLUDING THE FOLLOWING: READ ALL INSTRUCTIONS BEFORE USING YOUR NINJA ULTIMA™ DUAL STAGE BLENDER. POLARIZED PLUG WARNING: To reduce the risk of electric shock, this appliance has a polarized plug (one blade is wider than the other). This plug will fit into a polarized outlet only one way. If the plug does not fit fully into the outlet, reverse the plug.
9. Keep hands, hair, clothing, as well as utensils out of container while processing to reduce the risk of severe injury to persons or damage to the appliance. A scraper may be used but only when the appliance is off. 20. DO NOT overfill. 10. CAUTION: The top blades are not affixed to the pitcher, they are removable and extremely sharp. When handling the top blades do not hold blades, but rather always hold by the shaft. Blades are sharp. Handle carefully! 23.
MESURES DE SÉCURITÉ IMPORTANTES Pour usage domestique seulement CERTAINES CONSIGNES DE SÉCURITÉ DE BASE DOIVENT TOUJOURS ÊTRE RESPECTÉES LORS DE L’UTILISATION DE VOTRE APPAREIL ÉLECTRIQUE, NOTAMMENT : LISEZ TOUTES LES INSTRUCTIONS AVANT D’UTILISER VOTRE MÉLANGEUR À DEUX JEUX DE LAMES NINJA ULTIMAMC . FICHE POLARISÉE AVERTISSEMENT : Afin de réduire les risques de décharge électrique, cet appareil a été muni d’une fiche polarisée (une broche est plus large que l’autre).
9. Afin de réduire le risque de blessures graves ou de dommages à l’appareil, gardez les mains, les cheveux, les vêtements et les ustensiles hors du récipient pendant l’utilisation. Vous pouvez utiliser une raclette, mais seulement lorsque le mélangeur est éteint. 10. MISE EN GARDE : Les lames supérieures ne sont pas fixées au récipient; elles sont amovibles et très tranchantes. Lorsque vous manipulez les lames supérieures, ne les touchez pas directement; tenez l’arbre de cette pièce.
INSTRUCCIONES IMPORTANTES DE SEGURIDAD Para uso doméstico solamente AL USAR APARATOS ELÉCTRICOS, SIEMPRE DEBE SEGUIR PRECAUCIONES BÁSICAS DE SEGURIDAD, INCLUYENDO LAS SIGUIENTES: LEA TODAS LAS INSTRUCCIONES ANTES DE USAR SU LICUADORA NINJA ULTIMAMR DUAL STAGE ENCHUFE POLARIZADO ADVERTENCIA: Para reducir el riesgo de una descarga eléctrica, este artefacto posee un enchufe polarizado (una pata es más ancha que la otra). Este enchufe sólo puede conectarse a un tomacorriente polarizado de una sola forma.
9. Mantenga sus manos, cabello, ropa y utensilios fuera del recipiente al procesar para reducir la posibilidad de daños graves a personas o de dañar la unidad. Puede utilizar una espátula, pero únicamente cuando el artefacto no esté funcionando. 10. CUIDADO: Las cuchillas superiores no están fijas a la jarra, son removibles y muy filosas. Cuando agarre las cuchillas superiores, no las agarre por el filo, sosténgalas siempre del vástago. Las cuchillas son filosas. ¡Manéjelas con cuidado! 11.
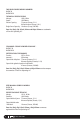
THIS BOOK COVERS MODEL NUMBERS: BL830 30 BL830CB 30 TECHNICAL SPECIFICATIONS Voltage: 120V., 60Hz. Power: 1500 Watts Pitcher Capacity: 72 ounces (9 cups, 2.1 L) 64 liquid ounces (8 cups, 1.8 L ) Single Serve Capacity: 16 ounces (2 cups, 500 Ml) Euro-Pro, Ninja, Sip & Seal, Ultima and Ninja Ultima are trademarks of Euro-Pro Operating LLC. CE MANUEL COUVRE LE MODÈLE SUIVANT : BL830C 30 BL830CB 30 SPÉCIFICATIONS TECHNIQUES Tension : 120 V., 60 Hz.
Contents Thank you for purchasing the Ninja Ultima™ Dual Stage Blender. Getting to Know Your Ninja Ultima™ Dual Stage Blender......................... 9 Using the Ninja Ultima™ Dual Stage Blender .......................................... 11 Assembly and Use for the 72 oz. Pitcher.................................................. 12 Assembly and Use for the Single Serve Cup ............................................ 14 Usage, Blade Selection & Speed Settings...............................................
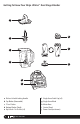
Getting To Know Your Ninja Ultima™ Dual Stage Blender a e b f c d g h i a Pitcher Lid with Locking Handle f Single Serve Drink Cup (x3) b Top Blades (Removable) g Single Serve Blade c 72 oz. Pitcher h Motor Base d Bottom Blades (Fixed) i Control Panel e Sip & Seal To-Go Lids (x3) j Power Cord (not shown) ™ 9 1.877.646.
English The Ninja Ultima™ Dual Stage Blender features a patented dual blade system and 2.5 peak horsepower motor for culinary precision at home. For best results, be sure to carefully read all the instructions contained in the manual before using this appliance. FEATURES: • Patented Ninja Dual Stage Technology • Extra Large 72 oz.
Using the Ninja Ultima™ Dual Stage Blender PLEASE KEEP THESE IMPORTANT SAFEGUARDS IN MIND WHEN USING THE APPLIANCE: IMPORTANT: When using the top blades, always add the ingredients into the blender AFTER inserting the top blades. CAUTION: Blades are sharp! Use extreme caution when handling the top blades. Always hold them by the shaft. IMPORTANT: DO NOT attempt to operate the appliance without the lid on. IMPORTANT: Never run the appliance empty. CAUTION: DO NOT process hot foods or hot liquids.
English Assembly and Use for the 72 oz. Pitcher Assembly Fig. 3a Fig. 1 Fig. 4 Fig. 5 Fig. 2 1 2 3 4 Fig. 3b IMPORTANT: Make sure that the motor base is plugged in for use. Place the motor base on a clean, dry, level surface such as a counter or table top. Align and lower the pitcher onto the motor base. (Fig. 1) Handle should be aligned slightly to the right of the “LOCK” symbol on the motor base. Rotate the pitcher clockwise as far as it will go to lock in place. (Fig.
Assembly and Use for the 72 oz. Pitcher - cont. WARNING: Never leave the appliance unattended while in use. USE Fig. 6 REMOVAL Fig. 7 7 Plug the motor base in for use. 8 Turn the Variable Speed Dial to speed 1. (Fig. 6) The power indicator light ( ) will now turn on. To start the blender, press the “Start/Stop/Pulse” toggle up to start processing. Slowly increase to desired speed.
ASSEMBLY Fig. 9 Fig. 10 PULSE Fig. 11 English Assembly and Use for the Single Serve Cup REMOVAL Fig. 12 Fig. 13 For best results, use short “PULSES”... Practice makes perfect!! 1 2 3 4 5 IMPORTANT: Make sure that the motor base is plugged in for use. Place the motor base on a clean, dry, level surface such as a counter or table top. Add ingredients to the single serve cup. NOTE: Do not overfill! To avoid spilling, do not add ingredients past the “Max” fill line.
Speed Setting & Uses Function Type of Food Suggested Blade(s) Speed Settings Juices / Smoothies Fruits Vegetables Top blades & bottom blades Pulse then 5 - 10 Ice Crushing / Frozen Blending Ice Frozen fruit Ice cream Top blades & bottom blades Pulse then 5 - 10 Pureeing Smooth soups Milkshakes Nut milks Emulsifying Salad dressings Sauces Bottom blades only 1-5 Chopping Salsa Vegetables Nuts Top blades & bottom blades Pulse Mixing Batters Dips Bottom blades only 1-3 Grinding Meat
HOW TO CLEAN CAUTION: Make sure that the motor base is unplugged from the power source before inserting or removing any attachment and before cleaning. CAUTION: DO NOT immerse the motor base into water or any other liquid. 1 Separate/remove all parts from each other. 2 Clean the motor base with a damp cloth and wipe dry. 3 Place the pitcher and single serve cup in the dishwasher. Place the lids and attachments on the top rack. Use caution when handling the blade assemblies as the blades are very sharp.
Troubleshooting Guide PROBLEMS POSSIBLE REASONS & SOLUTIONS Make sure the pitcher or single serve cup is securely placed on motor base. Motor doesn’t start or attachment doesn’t rotate. Make sure the lid is securely on pitcher in the correct position (align arrows). The appliance is unplugged. Plug the unit in, turn the Variable Speed Dial to the desired speed setting and press the Start toggle up to turn “On”. Check that the plug is securely inserted into the electrical outlet.
English TWO (2) YEARS LIMITED WARRANTY EURO-PRO Operating LLC warrants this product to be free from material defects and workmanship for a period of two (2) years from the date of purchase when utilized for normal household use, subject to the following conditions, exclusions and exceptions. The liability of EURO-PRO Operating LLC is limited solely to the cost of the repair or replacement of the unit at our option.
Familiarisez-vous avec votre mélangeur à deux jeux de lames Ninja UltimaMC a e b f c d g h i a Couvercle du récipient avec poignée de verrouillage f Gobelet à portion individuelle (x 3) b Lames supérieures (amovibles) h Bloc-moteur c Récipient de 2.1 L d Lames inférieures (fixés) e Couvercles étanches à rabat (x 3) 19 1.877.646.
Le mélangeur à deux jeux de lames Ninja UltimaMC comporte un système de deux jeux de lames breveté et un moteur de puissance de pointe de 2,5 chevaux-puissance pour accomplir des tâches culinaires de précision à la maison. Pour de meilleurs résultats, assurez-vous de lire attentivement toutes les instructions du manuel avant d’utiliser cet appareil. Français CARACTÉRISTIQUES : • Technologie à deux jeux de lames Ninja brevetée • Très grand récipient de 2.
Utilisation du mélangeur à deux jeux de lames Ninja UltimaMC VEUILLEZ GARDER À L’ESPRIT CES DIRECTIVES DE SÉCURITÉ IMPORTANTES LORSQUE VOUS UTILISEZ L’APPAREIL : IMPORTANT : Lorsque vous utilisez le jeu de lames supérieur, insérez toujours les lames supérieures dans le mélangeur AVANT d’ajouter les ingrédients. MISE EN GARDE : Les lames sont coupantes! Soyez extrêmement prudent lorsque vous manipulez le jeu de lames supérieur. Manipulez toujours cette pièce en tenant l’arbre.
Assemblage et utilisation du récipient de 2.1 L ASSEMBLAGE Fig. 3a Fig. 4 Fig. 1 Français Fig. 2 1 2 3 4 Fig. 3b IMPORTANT : Assurez-vous que le bloc-moteur est branché pour utiliser l’appareil. Déposez le bloc-moteur sur une surface propre, sèche et de niveau, comme un comptoir ou une table. Alignez et déposez le récipient sur le bloc-moteur. (Fig. 1) La poignée doit être légèrement orientée à la droite du symbole de verrouillage « LOCK » du bloc-moteur.
Assemblage et utilisation du récipient de 2.1 L. – suite AVERTISSEMENT : Ne laissez jamais l’appareil sans surveillance pendant l’utilisation. UTILISATION DÉMONTAGE Fig. 6 7 Branchez le bloc-moteur pour utiliser l’appareil. 8 Tournez le bouton de commande de vitesse variable à la vitesse 1. (Fig. 6) Le témoin d’alimentation ( ) s’allumera à ce moment. Pour mettre en marche le mélangeur, déplacez le commutateur « Start/Stop/Pulse » (marche/arrêt/ impulsion) vers le haut pour démarrer l’appareil.
Assemblage et utilisation du gobelet à portion individuelle ASSEMBLAGE IMPULSION DÉMONTAGE Français Fig. 9 Fig. 10 Fig. 11 Fig. 12 Fig. 13 Pour de meilleurs résultats, utilisez de brèves « IMPULSIONS »... C’est en pratiquant qu’on arrive à la perfection! 1 2 3 4 IMPORTANT : Assurez-vous que le bloc-moteur est branché pour utiliser l’appareil. Déposez le bloc-moteur sur une surface propre, sèche et de niveau, comme un comptoir ou une table.
Utilisation, sélection des lames et réglages de la vitesse Fonction Type d’aliment Jeu(x) de lames suggéré(s) Réglages de vitesse Jus / frappés aux fruits Fruits Légumes Lames inférieures et jeu lames supérieur Réglage par impulsion « Pulse », puis vitesse 5 – 10 Glace concassée / mélange surgelé Glace Fruits surgelés Crème glacée Lames inférieures et jeu lames supérieur Réglage par impulsion « Pulse », puis vitesse 5 – 10 Purée Potages veloutés Laits frappés Laits de noix Lames inférieure
Soins et entretien RANGEMENT 1 Rangez le mélangeur à deux jeux de lames Ninja UltimaMC en position verticale en fixant le récipient au bloc-moteur, avec le jeu de lames supérieur inséré et le couvercle sur le récipient. RÉINITIALISATION DU THERMOSTAT DU MOTEUR Le mélangeur à deux jeux de lames Ninja UltimaMC comporte un mécanisme de sécurité pour prévenir les dommages au moteur et au système d’entraînement en cas de surcharge accidentelle de votre appareil.
Guide de dépannage PROBLÈMES CAUSES PROBABLES ET SOLUTIONS Assurez-vous que le récipient ou le gobelet à portion individuelle est solidement fixé au bloc-moteur. Assurez-vous que le couvercle est solidement fixé au récipient, dans la bonne position (alignez les flèches). Le moteur ne démarre pas ou l’accessoire ne tourne pas. L’appareil est débranché.
GARANTIE LIMITÉE DE DEUX (2) ANS EURO-PRO Operating LLC garantit ce produit contre toute défectuosité matérielle ou de main d’œuvre pour une période de deux (2) ans à compter de la date d’achat, dans le cadre d’une utilisation domestique normale, en vertu des conditions, exclusions et exceptions suivantes. La responsabilité d’EURO-PRO Operating LLC se limite au coût des réparations ou du remplacement de l’appareil, à sa discrétion.
Partes de su licuadora Ninja UltimaMR Dual Stage a e b f c d g h i a Tapa de jarra con mango de traba f Taza individual para beber (x3) b Cuchilla superior (removible) g Cuchilla para tazón individual c Jarra de 72 oz. h Base del motor d Cuchilla inferior (fija) i Panel de control e Tapas Sip & Seal j Cable de alimentación (no se muestra) 29 MR (x3) 1.877.646.
La licuadora Ninja UltimaMR Dual Stage tiene un sistema de cuchilla doble patentada y un motor con potencia pico de 2,5 HP para brindar precisión culinaria en el hogar. Para obtener los mejores resultados, asegúrese de leer todas las instrucciones contenidas en el manual antes de usar este artefacto. Español CARACTERÍSTICAS: • Tecnología Ninja Dual Stage patentada • Jarra extra grande de 72 oz.
Uso de su licuadora Ninja UltimaMR Dual Stage TENGA EN CUENTA ESTAS MEDIDAS DE SEGURIDAD AL UTILIZAR EL ARTEFACTO: IMPORTANTE: Cuando use las cuchillas superiores, agregue siempre los ingredientes dentro de la licuadora DESPUÉS de colocar las cuchillas. CUIDADO: ¡Las cuchillas son filosas! Tenga mucho cuidado al manipular las cuchillas superiores. Sosténgalas siempre por el vástago. IMPORTANTE: NO intente usar el artefacto sin la tapa colocada. IMPORTANTE: Nunca haga funcionar el artefacto vacío.
Armado y uso de la jarra de 72 onzas Armado Fig. 1 Fig. 2 1 2 4 Fig. 3b IMPORTANTE: Verifique que la base del motor esté enchufada y lista para usar. Coloque la base del motor sobre una superficie limpia, seca y nivelada como una mesada o mesa. Coloque la jarra sobre la base del motor. (Fig. 1) El mango debe quedar levemente inclinado hacia la derecha del símbolo de “TRABA” en la base del motor. Gire la jarra en sentido horario todo lo que pueda para trabarla en su lugar. (Fig.
Armado y uso de la jarra de 72 onzas - cont. ADVERTENCIA: Nunca deje el artefacto desatendido mientras esté funcionando. EXTRACCIÓN USO Fig. 6 Fig. 7 7 Enchufe la base del motor para usarla. 8 Gire la perilla de velocidad variable a 1. (Fig. 6) Se encenderá la luz indicadora de encendido ( ) Para encender la licuadora, mueva la palanca “Start/Stop/Pulse” hacia arriba para comenzar a procesar. Aumente lentamente la velocidad hasta el nivel deseado.
Armado y uso del tazón individual ARMADO Fig. 9 Fig. 10 PULSO Fig. 11 EXTRACCIÓN Fig. 12 Fig. 13 Para obtener un mejor resultado, use “PULSOS” cortos... ¡La práctica hace la perfección! 1 2 4 5 6 Cuando haya alcanzado la consistencia deseada, gire la taza individual en sentido contra horario (Fig. 12) y levántela para removerla. (Fig. 13) 7 Dé vuelta la taza y remueva la cuchilla individual girando la cuchilla en sentido contra horario.
Velocidades y usos Función Tipo de alimento Cuchillas sugeridas Velocidades Jugos/Batidos Frutas verduras Cuchilla superior y cuchilla inferior Pulso, luego 5 - 10 Moler hielo/Licuados congelados Hielo Fruta congelada Helado Cuchilla superior Cuchilla inferior Pulso, luego 5 - 10 Hacer puré Sopas crema Malteadas Leche de frutos secos Cuchilla superior y cuchilla inferior* Cuchilla inferior solamente* 1 - 10 Emulsionar Aderezos para ensalada Salsas Cuchilla inferior solamente 1-5 Cort
Cuidado y Mantenimiento ALMACENAMIENTO 1 Guarde la licuadora Ninja UltimaMR Dual Stage en posición vertical con la jarra sobre la base del motor, las cuchillas superiores dentro de la jarra y con la tapa colocada. PARA REINICIAR EL TERMOSTATO DEL MOTOR La licuadora Ninja UltimaMR Dual Stage tiene un sistema exclusivo de seguridad que evita daños al motor y al sistema de engranajes de la unidad en caso de sobrecargas.
Guía de diagnóstico de problemas PROBLEMAS POSIBLE CAUSA Y SOLUCIÓN El motor no arranca o los accesorios no rotan. Verifique que la jarra o la taza individual esté correctamente colocada sobre la base del motor. Verifique que la tapa esté colocada en la jarra en la posición correcta (flechas alineadas). El artefacto está desenchufado. Enchufe el artefacto, gire la perilla de velocidad variable a la velocidad deseada y presione la palanca Start hacia arriba para encenderlo.
GARANTÍA LIMITADA DE DOS (2) AÑOS EURO-PRO Operating LLC garantiza este producto contra defectos de materiales y mano de obra por un término de dos (2) años a partir de la fecha de compra original, siempre que sea utilizado para uso doméstico normal, sujeto a las siguientes condiciones, exclusiones y excepciones. La responsabilidad de EURO-PRO Operating LLC se limita únicamente al costo de reparación o reemplazo de la unidad, a nuestro criterio.
Euro-Pro Operating LLC US: CAN: Newton, MA 02459 Ville St-Laurent, QC H4S 1A7 1-877-646-5288 www.ninjakitchen.com Copyright © 2014 Euro-Pro Operating LLC / Droit d’auteur © Euro-Pro Operating LLC, 2014. Euro-Pro, Ninja, Sip & Seal, Ultima and Ninja Ultima are trademarks of Euro-Pro Operating LLC. Euro-Pro, Ninja, Sip & Seal, Ultima et Ninja Ultima sont des marques de commerce d’Euro-Pro Operating LLC. Euro-Pro, Ninja, Sip & Seal, Ultima y Ninja Ultima son marcas registradas de Euro-Pro Operating LLC.