
Operation Manual, User's Manual
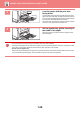
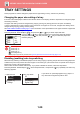
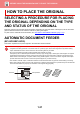
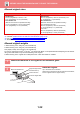


Table Of Contents

1-33
BEFORE USING THE MACHINE►HOW TO PLACE THE ORIGINAL
DOCUMENT GLASS
This section describes the steps for setting the original on the document glass.
Allowed original sizes
When the original is a non-standard size, see the appropriate explanation below for the mode you are using.
► COPIER: "SPECIFYING THE SIZE OF THE ORIGINAL (page 2-12)"
► FAX: "BASIC PROCEDURE FOR SENDING FAXES (page 4-8)"
► SCANNER: "BASIC TRANSMISSION PROCEDURE (page 5-5)"
• Close the automatic document feeder slowly. Abruptly closing the automatic document feeder may damage it.
• Take care that your fingers are not pinched when closing the automatic document feeder.
Maximum original size
Standard size
297 mm (longitudinal) x 420 mm (transversal) or A3
11" (longitudinal) x 17" (transversal)
Non-standard size
297 mm (longitudinal) x 432 mm (transversal)
11-5/8" (longitudinal) x 17" (transversal)
1
Open the automatic document feeder.
2
Load the paper with the print side
facing down.
Place the original face down and align the top left corner of
the original with back left (at the tip of the mark ) of the
document glass.
3
Close the automatic document feeder.
After placing the original, close the automatic document feeder. If the unit is left open, parts outside of the original will be
copied in black, causing excessive use of toner.
If originals have damp spots due to correction fluid, ink or paste up glue, wait until the originals are dry before making
copies. Otherwise the interior of the machine or the document glass may be soiled.
X
Y
Mark
Document glass
scale