
Operation Manual, Web Page Settings Guide
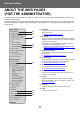

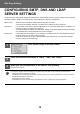
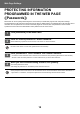
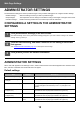

Table Of Contents
- TABLE OF CONTENTS
- ABOUT THIS GUIDE
- WEB PAGE
- ABOUT THE WEB PAGES (FOR USERS)
- CONFIGURING THE PRINTER CONDITION SETTINGS
- ABOUT THE WEB PAGES (FOR THE ADMINISTRATOR)
- CONFIGURING THE SCANNER CONDITION SETTINGS
- CONFIGURING SMTP, DNS AND LDAP SERVER SETTINGS
- PROTECTING INFORMATION PROGRAMMED IN THE WEB PAGE ([Passwords])
- ADMINISTRATOR SETTINGS
- E-MAIL STATUS AND E-MAIL ALERT SETTINGS
- MAIN SETTINGS ON THE WEB PAGE

12
Web Page Settings
CONFIGURING THE SCANNER CONDITION
SETTINGS
STORING DESTINATIONS
To store scanning destinations, click [Destination] in the Web page menu frame. This screen can also be used to edit or
delete stored destinations.
BASIC SETTINGS FOR NETWORK SCAN
(FOR THE ADMINISTRATOR)
To use the Network Scan function, setting from the Web page is required.
Click the menu frame and configure the required settings. A password is required to access this screen.
These settings should only be configured by the network administrator.
For transmission destination settings, refer to the User’s Manual (Address Book Registration).
1
Click [Network Scanning] in the menu frame.
The Network Scanning setup page appears.
2
Select the scanner mode.
In the "Enable Scanner Delivery to:" field, click the checkbox so that a checkmark appears in the checkbox.
3
Select the method for assigning a file name to a scanned image.
Select the method for assigning a file name to a scanned image. In "File Naming", click the items that you wish to use in
the file name. "Date & Time" is initially selected.
4
Click [Submit].
After entering the settings, be sure to click [Submit] to store them.