
user manual
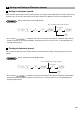
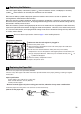
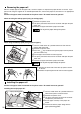
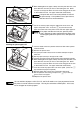
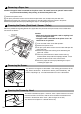
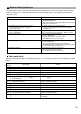
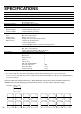

Table Of Contents
- ----- English version -----
- INTRODUCTION
- IMPORTANT
- CONTENTS
- PARTS AND THEIR FUNCTIONS
- GETTING STARTED
- HELP FUNCTION
- OVERVIEW OF FLOW OF DAILY SALES ENTRIES
- BASIC SALES ENTRY
- OPTIONAL FEATURES
- CORRECTION
- PRIOR TO PROGRAMMING
- BASIC FUNCTION PROGRAMMING (For Quick Start)
- AUXILIARY FUNCTION PROGRAMMING
- ADVANCED PROGRAMMING
- TRAINING MODE
- READING (X) AND RESETTING (Z) OF SALES TOTALS
- EJ REPORT READING AND RESETTING
- OVERRIDE ENTRIES
- CORRECTION AFTER FINALIZING A TRANSACTION (Void mode)
- HOW TO USE AN SD MEMORY CARD
- OPERATOR MAINTENANCE
- 1 In case of a Power Failure
- 2 In Case of Printer Error
- 3 Cautions in Handling the Printer and Recording Paper
- 4 Replacing the Batteries
- 5 Replacing the Paper Roll
- 6 Removing a Paper Jam
- 7 Cleaning the Printer (Print Head / Sensor / Roller)
- 8 Removing the Drawer
- 9 Opening the Drawer by Hand
- 10 Before Calling for Service
- SPECIFICATIONS
- ----- La versión española -----
- INTRODUCCION
- IMPORTANTE
- INDICE
- PARTES Y SUS FUNCIONES
- PARA EMPEZAR
- FUNCION DE AYUDA
- REGISTRO BASICO DE VENTAS
- CARACTERISTICAS OPCIONALES
- CORRECCION
- PROGRAMACION DE LAS FUNCIONES BASICAS (Para el inicio rápido)
- PROGRAMACION DE FUNCIONES AUXILIARES
- 1 Programación de secciones
- 2 Programación de PLU (codificación de precios) y subsección
- 3 Programación de teclas misceláneas
- Tasa para [%1], [%2] y [CONV]
- Importe para [(-)]
- Límite de tasa porcentual para [%1] y [%2]
- Parámetros de función para [%1], [%2] y [(-)]
- Parámetros de función para [CONV]
- Límite de dígitos de entrada para [RA], [PO] y [TAX]
- Parámetros de función para [CHK], [CH] y [CA/AT/NS] (cuando se usa como tecla CA)
- 4 Programación de texto
- PROGRAMACION AVANZADA
- MODO DE INSTRUCCION
- LECTURA (X) Y REPOSICION (Z) DE LOS TOTALES DE VENTAS
- LECTURA Y REPOSICION DE INFORMES EJ
- REGISTROS DE ANULACION
- CORRECCION DESPUES DE FINALIZAR UNA TRANSACCION (Modo de cancelación)
- COMO EMPLEAR UNA TARJETA DE MEMORIA SD
- Inserción y extracción de una tarjeta de memoria SD
- Formateo de una tarjeta de memoria SD
- Memorización y restauración de todos los datos
- Lectura de los datos de logotipos gráficos
- Escritura y lectura de todos los datos de programación
- Escritura de datos de ventas
- Escritura de registro diario electrónico
- Impresión de registro diario electrónico
- MANTENIMIENTO PARA EL OPERADOR
- 1 En caso de corte de la alimentación
- 2 En el caso de error de impresora
- 3 Precauciones al manejar la impresora
- 4 Reemplazo de las pilas
- 5 Reemplazo del rollo de papel
- 6 Extracción del papel atascado
- 7 Limpieza de la impresora (cabezal de impresión / sensor / rodillo)
- 8 Extracción del cajón
- 9 Abertura manual del cajón
- 10 Antes de solicitar el servicio de un técnico
74
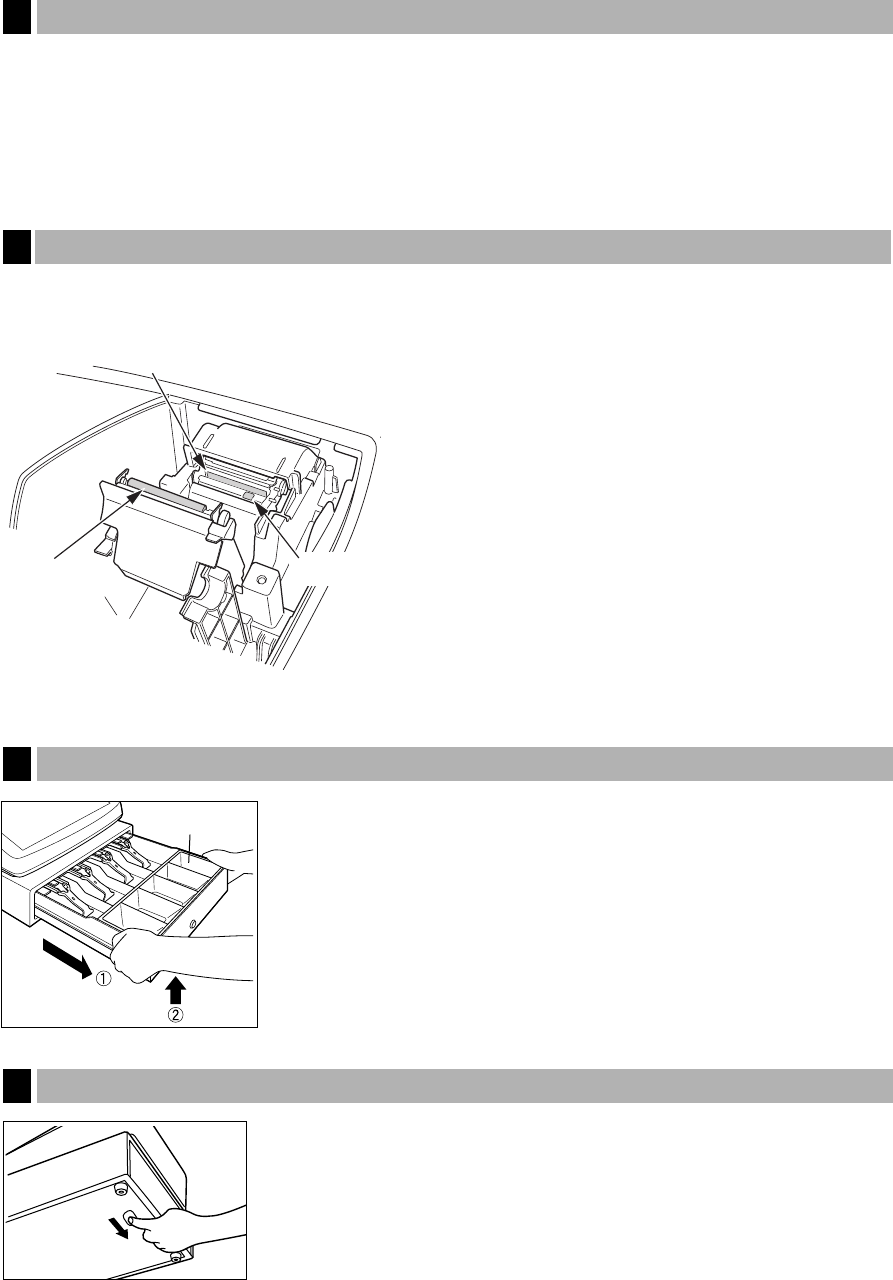
Caution: The paper cutter is mounted on the printer cover. Be careful not to cut yourself. Never touch
the print head immediately after printing, as the head may still be hot.
1. Remove the printer cover.
2. Lift up the print roller release lever to unlock the print roller arm, and open the print roller arm.
3. Remove the paper jam. Check for and remove any shreds of paper that may remain in the printer.
4. Reset the paper roll correctly by following the steps in “Installing the paper roll”.
When the printed text is getting dark or faint, paper dust may be stuck to the print head, sensor and/or roller.
Clean them as follows:
Caution:
• Never touch the print head with a tool or anything hard
as it may damage the head.
• The paper cutter is mounted on the printer cover. Be
careful not to cut yourself.
1. Turn the mode switch to the OFF position.
2. Remove the printer cover.
3. Lift up the print roller release lever to unlock and open the
print roller arm.
4. Remove the paper roll referring to the “Removing the
paper roll” section.
5. Clean the print head with a cotton swab or soft rag
moistened with ethyl alcohol or isopropyl alcohol. Clean
the roller and the sensor in the same manner.
6. Reset the paper roll correctly by following the steps in
“Installing the paper roll”.
The drawer in the register is detachable. After closing your business for the
day, remove the drawer. To detach the drawer, pull it forward fully, and
remove it by lifting it up. The 5-denomination coin case is detachable.
The drawer automatically opens. However, when a power failure occurs or the
machine becomes out of order, slide the lever located on the bottom of the
machine in the direction of the arrow. (See the figure at the left.)
The drawer will not open if it is locked with the key.
Lever
Opening the Drawer by Hand
9
Removing the Drawer
8
Cleaning the Printer (Print Head / Sensor / Roller)
7
Removing a Paper Jam
6
Coin case
Print head
Roller
Sensor