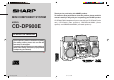
MINI COMPONENT SYSTEM Thank you for purchasing this SHARP product. To obtain the best performance from this product, please read this manual carefully. It will guide you in operating your SHARP product. CD-DP900E Mini Component System consisting of CD-DP900E (main unit), CP-DP900H (front speakers), GBOXS0091AWM1 (centre speaker) and GBOXS0092AWM1 (surround speakers). MODEL CD-DP900E OPERATION MANUAL If you require any advice or assistance regarding your Sharp product, please visit our web-site www.sharp.
CD-DP900E Special notes NOTES FOR USERS IN THE U.K. AND IRELAND The mains lead of this product is fitted with a non-rewireable (moulded) plug incorporating a 3A fuse. Should the fuse need to be replaced, a BSI or ASTA approved BS 1362 fuse marked or and of the same rating as above, which is also indicated on the pin face of the plug must be used. In the unlikely event of the socket outlet in your home not being compatible with the plug supplied, cut-off the mains plug and fit an appropriate type.
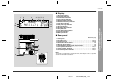
Contents WARNINGS When the ON/STAND-BY button is set at STAND-BY position, mains voltage is still present inside the unit. When the ON/STAND-BY button is set at STAND-BY position, the unit may be brought into operation by the timer mode or remote control. This unit contains no user serviceable parts. Never remove covers unless qualified to do so. This unit contains dangerous voltages, always remove mains plug from the socket before any service operation and when not in use for a long period.
CD-DP900E Precautions General Please ensure that the equipment is positioned in a well-ventilated area and ensure that there is at least 10 cm (4") of free space along the sides and back. There must also be a minimum of 20 cm (8") of free space on the top of the unit.
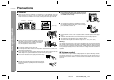
Accessories Please confirm that the following accessories are included. Remote control 1 AM loop aerial YES Correct FM aerial 1 Note: Only the above accessories are included. 1 5 02/1/10 CD-DP900E(UK)_1.fm - Precautions / Accessories - Compact discs are fairly resistant to damage, however mistracking can occur due to an accumulation of dirt on the disc surface. Follow the guidelines below for maximum enjoyment from your CD collection and player.
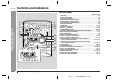
CD-DP900E Controls and indicators Front panel Reference page - Controls and indicators - General Information 1 2 3 8 9 10 11 4 5 6 7 12 13 14 15 18 19 20 21 16 17 1. Disc Tray . . . . . . . . . . . . . . . . . . . . . . . . . . . . . . . . . . . . . . . . . . . . . . .16 2. Timer Set Indicator . . . . . . . . . . . . . . . . . . . . . . . . . . . . . . . . . . . . . .27 3. On/Stand-by Button . . . . . . . . . . . . . . . . . . . . . . . . . . . . . . . . . . . . . .13 4.
CD-DP900E 2 3 4 5 6 7 8 11 12 13 14 9 10 Rear panel Reference page 1. Cooling Fan 2. AC Power Lead . . . . . . . . . . . . . . . . . . . . . . . . . . . . . . . . . . . . . . 10, 12 3. Transport Screw . . . . . . . . . . . . . . . . . . . . . . . . . . . . . . . . . . . . . 10, 29 4. FM 75 Ohms Aerial Socket . . . . . . . . . . . . . . . . . . . . . . . . . . . . . . . . 10 5. AM Loop Aerial Socket . . . . . . . . . . . . . . . . . . . . . . . . . . . . . . . . . . . 10 6.
CD-DP900E Controls and indicators (continued) Front speaker Surround speaker 1 1 - Controls and indicators - General Information 2 3 2 3 4 1. Full-Range Speaker 2. Speaker Wire Note: 1. Tweeter 2. Woofer 3. Bass Reflex Duct 4. Speaker Wire When the surround speakers are hung on the wall, the speaker badge will be turned. In this case, you can adjust the badge to face the proper direction by turning it by hand. Badge Centre speaker Note: 1 The speaker grilles are not removable.
CD-DP900E Remote control 18 19 5 6 7 20 21 8 9 10 11 22 23 24 25 12 13 14 26 27 28 15 16 29 30 Buttons with " " mark in the illustration can be operated on the remote control only. Other buttons can be operated both on the main unit and the remote control. 17 9 02/1/11 CD-DP900E(UK)_1.fm - Controls and indicators - 2 3 4 1. Remote Control Transmitter . . . . . . . . . . . . . . . . . . . . . . . . . . . . . . . . 13 2. Surround Level Up and Down Buttons . . . . . . . . . . . . . . . . . .
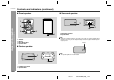
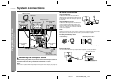
CD-DP900E System connections Aerial connection AM loop aerial Supplied FM aerial: FM aerial Connect the FM aerial wire to the FM 75 OHMS socket and position the FM aerial wire in the direction where the strongest signal can be received. Transport screw Surround speaker (Left) Centre speaker Supplied AM loop aerial: Connect the AM loop aerial to the AM LOOP socket. Position the AM loop aerial for optimum reception. Place the AM loop aerial on a shelf, etc.
CD-DP900E Speaker connection Placing the speaker system Front speakers To enjoy the surround effect, we recommend that you place each speaker as shown to the below. Connect the black wire to the FRONT (-) terminal, and the red wire to the FRONT (+) terminal. Centre speaker Centre speaker Connect the black wire to the CENTER (-) terminal, and the orange wire to the CENTER (+) terminal.
CD-DP900E System connections (continued) To mount the surround speakers on the wall The design of the surround speakers allows them to be hung on the wall. Be sure to use the type and size of screw that is shown to the below. 5 mm (3/16") Connecting the AC power lead After checking all the connections have been made correctly, plug the AC power lead of this unit into the wall socket. If you plug in the unit first, the unit will enter the demonstration mode. Notes: 3.2 mm (1/8") Min.
Remote control Demonstration mode The first time the unit is plugged in, the unit will enter the demonstration mode. You will see words scroll. To cancel the demonstration mode: When the unit is in the power stand-by mode (demonstration mode), press the EQUALIZER/X-BASS/DEMO button. The demonstration mode will be cancelled and the display will disappear. CD-DP900E Battery installation Use 2 "AA" size batteries (UM/SUM-3, R6, HP-7 or similar). Batteries are not included. 1 Remove the battery cover.
CD-DP900E Sound control Extra bass (X-BASS)/Pre-programmed equaliser (Main unit operation) You can select the extra bass and pre-programmed equaliser modes with the same button on the main unit. Changing the mode: - Sound control - Basic Operation When the EQUALIZER/X-BASS/DEMO button is pressed, the current mode setting will be displayed. To change to a different mode, press the EQUALIZER/X-BASS/ DEMO button repeatedly until the desired sound mode appears.
Setting the clock CD-DP900E Press the TUNING/TIME ( or ) button to adjust the hour and then press the MEMORY/SET button. Press the TUNING/TIME ( or ) button to adjust the minutes and then press the MEMORY/SET button. In this example, the clock is set for the 24-hour (0:00) display. 1 2 Press the ON/STAND-BY button to turn the power on. Press the CLOCK button and within 5 seconds, press the MEMORY/SET button. Press the TUNING/TIME ( or ) button once to advance the time by 1 minute.
CD-DP900E Listening to a CD (CDs) This system can also play audio CD-R and CD-RW discs, but cannot record. Some audio CD-R and CD-RW discs may not be playable due to the state of disc or the device that was used for recording. 5 Press the OPEN/CLOSE button to close the disc tray. CD Playback - Listening to a CD (CDs) - Total number of tracks on the CD whose number is flashing 6 To select the CD you want to listen to first, press the DISC SKIP button.
CD-DP900E To locate the beginning of a track To move to the beginning of the next track: Press the / button for less than 0.5 seconds during playback. You can skip to any track by pressing the / button repeatedly until the desired track number appears. To restart the track being played: Starting playback with a desired track You can play a disc starting with the desired track. 1 Whilst in the stop mode, press the DISC SKIP button to select the desired disc.
CD-DP900E Listening to a CD (CDs) (continued) Repeat play Programmed play All tracks on up to 3 discs, or a programmed sequence can be continuously repeated. You can choose up to 32 selections for playback in the order you like. To repeat all tracks on up to 3 discs: Press the / ( ) button twice. 1 Whilst in the stop mode, press the DISC SKIP button to select the desired disc. 2 Press the / or / select the desired track.
Listening to the radio CD-DP900E Tuning 1 2 Press the ON/STAND-BY button to turn the power on. 3 Press the TUNING/TIME ( station. Press the TUNER (BAND) button repeatedly to select the desired frequency band (FM or AM). or ) button to tune in to the desired Manual tuning: Press the TUNING/TIME button as many times as required to tune in to the desired station. Notes: When radio interference occurs, auto scan tuning may stop automatically at that point.
CD-DP900E Listening to the radio (continued) Memorising a station To recall a memorised station You can store 40 AM and FM stations in memory and recall them at the push of a button. (Preset tuning) Radio - Listening to the radio - 1 2 3 Press the MEMORY/SET button to enter the preset tuning saving mode. ) button for less than 0.5 seconds to select Within 30 seconds, press the PRESET ( preset channel number.
Listening to a cassette tape (TAPE 1 or TAPE 2) Playback is possible in TAPE 1 compartment as well as in TAPE 2. 1 2 Press the ON/STAND-BY button to turn the power on. 3 Load a cassette into the TAPE 1 or TAPE 2 cassette compartment with the side to be played facing toward you. TAPE 1 4 Press the TAPE (1 listen to. 5 Press the TAPE 2 2) button to select the cassette you want to / button to start playback. When playback is performed using the remote control, press the TAPE 1 or TAPE 2 button.
CD-DP900E Recording to a cassette tape Before recording: When recording important selections, make a preliminary test to ensure that the desired material is properly recorded. SHARP is not liable for damage or loss of your recording arising from malfunction of this unit. The volume and sound controls can be adjusted with no effect on the recorded signal (Variable Sound Monitor). For recording, use only normal tapes. Do not use metal or CrO tapes.
CD-DP900E Recording from the radio You can record from TAPE 1 to TAPE 2. Tune in to the desired station. (See page 19.) Load a cassette into the TAPE 2 cassette compartment with the side to be recorded on facing you. 1 2 Wind past the leader of the tape, on which recording cannot be performed. Press the REC PAUSE ( ) button. Recording will be paused. 4 Press the / (TAPE 2 start recording. Load a prerecorded cassette into the TAPE 1 cassette compartment.
CD-DP900E Enjoy the surround sound Dolby Pro Logic Surround (Normal or Phantom) mode By connecting this unit to other equipment (DVD player, VCR, etc.) with the trademark and playing it, you can enjoy Dolby Pro Logic Surround sound. To listen in the normal or phantom mode: 1 2 3 Connect the equipment you want to play (see page 28). Press the VIDEO/AUX button. Press the DOLBY PRO LOGIC button on the remote control to select the Dolby Pro Logic Surround mode.
CD-DP900E 2 Adjust the speaker volume level whilst the test tone is being output from the centre or surround speakers. To set the centre speaker volume to the level of the front speakers: When in the normal mode, press the CENTER LEVEL button to increase the volume and the CENTER LEVEL button to decrease it. -10 -9 ... 0 ... +9 +10 -10 To adjust the speaker volume: 1 When in the normal or phantom mode, press the TEST TONE button.
CD-DP900E Timer and sleep operation Timer playback: The unit turns on and plays the desired source (CD, tuner, tape) at the preset time. Timer playback or timer recording Before setting timer: Timer recording: The unit turns on and starts recording from the tuner at the preset time. 1 Press the CLOCK button to check that the clock is on time. 2 For timer playback: Load a cassette or discs to be played. For timer recording: Load a cassette for recording in the TAPE 2 cassette compartment.
CD-DP900E 6 7 Press the TUNING/TIME ( or ) button to specify the minutes, then press the MEMORY/SET button. Sleep operation 1 2 Play back the desired sound source. Press the TIMER/SLEEP button repeatedly until "SLEEP" is displayed. The unit will enter the timer stand-by mode automatically. To cancel the timer playback/timer recording: Press the ON/STAND-BY button to turn the power on. 8 When the preset time is reached, playback or recording will start.
CD-DP900E Enhancing your system Troubleshooting chart The connection lead is not included. Purchase a commercially available lead as shown below. Many potential problems can be resolved by the owner without calling a service technician. If something is wrong with this product, check the following before calling your authorised SHARP dealer or service centre. VCR, DVD, etc.
CD-DP900E If trouble occurs Symptom Cannot record. Cannot record tracks with proper sound quality. Cannot erase completely. Sound skipping. Cannot hear treble. Sound fluctuation. Cannot remove the tape. Possible cause Is the erase-prevention tab removed? Is it a normal tape? (You cannot record on a metal or CrO tape.
CD-DP900E Maintenance Specifications Cleaning the tape-handling parts As part of our policy of continuous improvement, SHARP reserves the right to make design and specification changes for product improvement without prior notice. The performance specification figures indicated are nominal values of production units. There may be some deviations from these values in individual units. Dirty heads, capstans or pinch rollers can cause poor sound and tape jams.
CD-DP900E CD player Centre speaker Type Signal readout D/A converter Frequency response 3-disc multi-play compact disc player Non-contact, 3-beam semiconductor laser pickup 1-bit D/A converter 20 - 20,000 Hz Type Maximum input power Rated input power Impedance 10 cm (4") full-range speaker 40 W 20 W 6 ohms Dynamic range 90 dB (1 kHz) Dimensions Width: 260 mm (10-1/4") Height: 140 mm (5-1/2") Depth: 169 mm (6-5/8") 0.9 kg (2.0 lbs.) Weight FM: 87.
TERMS OF GUARANTEE Sharp Electronics (UK) Ltd. (“Sharp”) guarantees to provide for the repair, or at its option the replacement, of this product subject to the conditions listed below:1. This guarantee shall only apply to faults which are due to inferior workmanship or materials. It does not cover faults or damage caused by accident, misuse, fair wear and tear, neglect, tampering with the product, or repair other than by a Service Facility appointed by Sharp. 2.