4-147-230-11(3) The software of this system may be updated in the future. To find out details on any available updates, please visit the following URL. For customers in Europe: http://support.sony-europe.com/ For customers in Australia: http://www.sony-asia.
WARNING Do not install the appliance in a confined space, such as a bookcase or built-in cabinet. To reduce the risk of fire, do not cover the ventilation opening of the apparatus with newspapers, tablecloths, curtains, etc. Do not place the naked flame sources such as lighted candles on the apparatus. To reduce the risk of fire or electric shock, do not expose this apparatus to dripping or splashing, and do not place objects filled with liquids, such as vases, on the apparatus.
please contact your local Civic Office, your household waste disposal service or the shop where you purchased the product. Notice for customers: the following information is only applicable to equipment sold in countries applying EU directives. The manufacturer of this product is Sony Corporation, 1-7-1 Konan Minato-ku Tokyo, 108-0075 Japan. The Authorized Representative for EMC and product safety is Sony Deutschland GmbH, Hedelfinger Strasse 61, 70327 Stuttgart, Germany.
About These Operating Instructions • The instructions in these Operating Instructions describe the controls on the remote. You can also use the controls on the unit if they have the same or similar names as those on the remote. • Icons, such as , listed at the top of each explanation indicate what kind of disc can be used with the function being explained. For details, see “Playable Discs” (page 100).
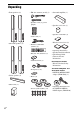
Table of Contents About These Operating Instructions ....... 4 About the S-AIR function....................... 4 Unpacking ............................................... 6 Index to Parts and Control ...................... 8 Getting Started Step 1: Installing the System....... 14 Step 2: Connecting the System... 20 Step 3: Setting up the Wireless System ..................................... 31 Step 4: Performing the Easy Setup........................................ 33 Step 5: Selecting the Source .......
Unpacking • Front speakers (2) • FM wire antenna (aerial) (1) • Surround amplifier (1) or • Speaker cords (2, green/ purple) • Speaker cord cover (1) • Speaker cord holder (1) • Video cord (1) • Wireless transceivers (2) • Surround speakers (2) • Remote commander (remote) (1) • R6 (size AA) batteries (2) • Calibration mic (1) • • • • Operating Instructions Speaker Installation Guide Quick Setup Guide Software Licence Information For European models • Wireless Product Safety Information • Foot
Using the remote Inserting batteries into the remote Insert two R6 (size AA) batteries (supplied) by matching the 3 and # ends on the batteries to the markings inside the compartment. Note • Do not leave the remote in an extremely hot or humid place. • Do not use a new battery with an old one. • Do not drop any foreign object into the remote casing, particularly when replacing the batteries.
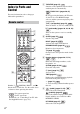
A THEATRE (page 67) Index to Parts and Control Switches to the optimum video mode for watching movies automatically. For more information, refer to the pages indicated in parentheses. By only pressing the button, the TV turns on, the TV is set for BD/DVD input selector, and the system starts playing a disc automatically. ONE-TOUCH PLAY (pages 40, 67) Remote control TV "/1 (on/standby) (page 72) Turns on the TV or sets it to standby mode.
(angle) (page 42) G FUNCTION (pages 36, 40, 48, 50, 56, 60) Switches to other viewing angles when multi-angles are recorded on a BD-ROM/ DVD VIDEO. SYSTEM MENU (pages 37, 47, 54, 58, 61, 74) Selects the playback source. SOUND MODE (page 52) Selects the sound mode. H Playback operation buttons Enters the system menu. See “Playback” (page 40). DIGITAL (page 72) ./> (previous/next) Switches to digital mode. REPLAY/ADVANCE ANALOG (page 72) m/M (fast reverse/fast forward) Switches to analogue mode.
Front panel FUNCTION A "/1 (on/standby) (page 40) C S-AIR indicator Lights up when the S-AIR transceiver is inserted in the unit and the system transmits sound. Turns on the unit, or sets to standby mode. B Play operation buttons (page 40) N (play) Starts or re-starts playback. Plays a slideshow when a disc containing JPEG image files is inserted. x (stop) Stops playback and remembers the stop point (resume point).
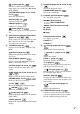
Front panel display About the indications in the front panel display PL x SLEEP NEO:6 TUNED ST NTSC A Current surround format B Lights up when a station is received. (Radio only) (page 56) C Lights up when stereo sound is received. (Radio only) (page 56) D Lights up when outputting a video signal with the NTSC color system. E Lights up when the external memory is recognized.
Rear panel COMPONENT VIDEO OUT ANTENNA VIDEO OUT EZW-RT10 Y PB / CB COAXIAL 75 FM PR / CR HDMI OUT SAT/CABLE DIGITAL IN LAN(100) SPEAKER SPEAKER TV DIGITAL IN CENTER SUBWOOFER FRONT R FRONT L 500mA MAX AUDIO L L R R S-AIR ID A COAXIAL OPTICAL B A.
Surround amplifier Front panel Rear panel EZW-RT10 POWER S-AIR ID SPEAKER A B C POWER/ON LINE L PAIRING PHONES SURROUND SELECTOR SURROUND SURROUND BACK A PHONES jack (page 31) B POWER (ON/OFF) (pages 31, 61) R F Wireless transceiver (EZW-RT10) slot (page 27) C POWER / ON LINE indicator (pages 31, 61) G S-AIR ID switch (pages 31, 61) D PAIRING indicator (page 63) I SPEAKER R jack (page 20) E PAIRING (page 63) J SURROUND SELECTOR switch (pages 31, 61) H SPEAKER L jack (page 20) 13GB
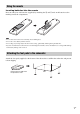
Getting Started Getting Started Step 1: Installing the System Positioning the speakers For the best possible surround sound, place all speakers at the same distance from the listening position (A). The distance can be between 0.0 to 7.0 meters. If you cannot place the center speaker and surround speakers at the same distance as (A), place them within 7.0 meters of the listening position. Place the surround speakers to the rear of the listening position (B).
To add the optional surround back speakers For the position of the surround back speakers, refer the illustration below (C). Center speaker Subwoofer Front left speaker (L) Front right speaker (R) Surround left speaker (L) Surround right speaker (R) 30 45 C Surround back left speaker (L) (optional) 30 45 C Surround back right speaker (R) (optional) 15GB Getting Started You can enjoy 7.1 surround sound by purchasing the Wireless Surround Speaker Kit (WAHT-SBP1, optional).
Getting Started Installing the speakers on a wall Caution • Contact a screw shop or installer regarding the wall material or screws to be used. • Use screws that are suitable for the wall material and strength. As a plaster board wall is especially fragile, attach the screws securely to a beam and fasten them to the wall. Install the speakers on a vertical and flat wall where reinforcement is applied.
3 Disassemble the speaker by lifting the upper part of the speaker. Getting Started Upper part Lower part Rear of the speaker 4 Pull out the speaker cord from the bottom of the lower part of the speaker. The removed speaker cord is used when installing the speaker on a wall.
Fully-disassembled illustration Getting Started Upper part of the speaker Lower part of the speaker Speaker cord Screw To install the speakers on a wall Before installing the speakers on a wall, connect the speaker cord to the speaker. Be sure to match the speaker cords to the appropriate terminals on the speakers: the speaker cord with the color tube to 3, and the speaker cord without the color tube to #.
3 Hang the speakers on the screws.
Getting Started Step 2: Connecting the System For connecting the system, read the information on the following pages. Do not connect the AC power cord (mains lead) of the unit to a wall outlet (mains) until all the other connections are made. Note • When you connect another component with a volume control, turn down the volume of the other components to a level where sound is not distorted.
To connect speaker cords to the unit When connecting to the unit, insert the connector until it clicks. Getting Started Rear panel of the unit ANTE COAX NNA IAL 75 FM 0 -RT1 EZW AUDIO L TV OUT VIDEO Purple (Subwoofer) COMP T ONEN VIDEO EXT DC5V TV PB / CB ABLE SAT/C IN L DIGITA PR / CR Y HDMI L MIC A.
Getting Started Connecting the TV (Video connection) This connection sends a video signal to the TV. Depending on the jacks on your TV, select the connection method. Rear panel of the unit ANTE COAX NNA IAL 75 FM 0 -RT1 EZW AUDIO L TV OUT VIDEO ON COMP ENT VIDEO EXT DC5V TV PB / CB ABLE SAT/C IN L DIGITA PR / C R Y HDMI L MIC A.
To change the color system (PAL or NTSC) 1 2 Turn on the system by pressing "/1. Press x and VOLUME + on the unit simultaneously for more than 5 seconds. Each time you perform this operation, the color system toggles between PAL and NTSC. “NTSC” lights up in the front panel display when the color system is set to NTSC. 23GB Getting Started Depending on the TV to be connected, you may be required to select either PAL or NTSC for the color system. The initial setting of the system is PAL.
Getting Started Connecting the TV (Audio connection) This connection sends an audio signal to the unit from the TV. To listen to TV sound via the system, perform this connection. Rear panel of the unit ANTE COAX NNA IAL 75 FM 0 -RT1 EZW AUDIO L TV OUT VIDEO COMP ONEN T VID EO OU EXT DC5V TV ABLE SAT/C IN L DIGITA PR / C R PB / CB Y HDMI L MIC A.
Connecting the other components Rear panel of the unit H Digital coaxial cord (not supplied) ANTE COAX NNA IAL 75 FM F DIGITAL MEDIA PORT adapter (page 60) 0 -RT1 EZW AUDIO L TV OUT VIDEO COMP T ONEN VIDEO EXT DC5V TV PB / CB ABLE SAT/C IN L DIGITA PR / CR Y HDMI L MIC A.
Getting Started Connecting the antenna (aerial) To connect the antenna (aerial) Rear panel of the unit ANTE COAX NNA IAL 75 FM 0 -RT1 EZW AUDIO L TV L MIC A. CA C2 ECM-A L EXT DC5V MAX 500mA R ID S-AIR A B C R AUDIO IN AUDIO IN or FM wire antenna (aerial) (supplied) Note • Be sure to fully extend the FM wire antenna (aerial). • After connecting the FM wire antenna (aerial), keep it as horizontal as possible.
Inserting the wireless transceiver Rear panel of the surround amplifier Rear panel of the unit ANTE COAX NNA IAL 75 FM 0 -RT1 EZW T10 EZW-R AUDIO L TV L MIC A.
Getting Started Inserting the external memory Insert the external memory device (1 GB or larger USB flash memory, such as Sony USM2GL, USM4GL, or USM1GH, not supplied) into the EXT slot. Check that “EXT” lights up in the front panel display when turning the system on. By connecting an external memory, you can enjoy additional contents (BonusView/BD-Live) depending on the disc (page 47).
Connecting to the network COMPONENT VIDEO OUT PB / CB Rear panel of the unit ANTENNA VIDEO OUT EZW-RT10 Y COAXIAL 75 FM PR / CR HDMI OUT SAT/CABLE DIGITAL IN LAN(100) TV DIGITAL IN TV EXT DC5V 500mA MAX DC5V 700mA MAX AUDIO L DMPORT SPEAKER SPEAKER L S-AIR ID A B R CENTER SUBWOOFER FRONT R FRONT L COAXIAL OPTICAL A.
Getting Started Connecting the AC power cords (mains leads) Before connecting the AC power cords (mains leads) of the unit and the surround amplifier to a wall outlet (mains), connect the front, center speakers and subwoofer to the unit and surround speakers to the surround amplifier. Wall outlet (mains): The shape of the wall outlet (mains) differs depending on the area.
3 4 To use the wireless system, you need to set up the surround amplifier. Before setting, make sure that the wireless transceivers are inserted into the unit and the surround amplifier correctly (page 27). This wireless system is called “S-AIR.” For details of the S-AIR function, see “Using an S-AIR Product” (page 61).
Getting Started When you use multiple S-AIR products See “Establishing sound transmission between the unit and S-AIR sub unit (ID setting)” (page 61). 2 Insert the tabs of the speaker cord holder in the slots of the speaker cord cover, and press it into place. Speaker cord holder To attach the cover to the surround amplifier After connecting and setting, you can attach the cover to the surround amplifier for organizing and storing excess speaker cords.
or c. Press The setting message appears. Getting Started Step 4: Performing the Easy Setup 5 Easy Setup Set the items below required to use this unit. Each of these items may be changed later under "Setup." Follow the Steps below to make the basic adjustments for using the system. Displayed items vary depending on the country model.
Getting Started 8 Note Note • When you do not connect the unit and TV with an HDMI cable, you cannot select [HDMI]. • When connecting the HDMI OUT jack and other video output jacks at the same time, select [Component Video]. • For details about video output resolution, see “Video Output Resolution” (page 103). • If the picture is distorted or no picture appears, wait for about 30 seconds without pressing any buttons. [Is this resolution OK?] appears. Select [Cancel].
12 Press X/x to select the setting for the Control for HDMI function. Check your TV settings when using this function. On You can operate the player quickly after turning on this function. Select [Quick Start] if you want to shorten the startup time from the standby mode. The default setting is [Normal]. Note • Quick Start mode will increase electricity consumption in the standby mode.
20 Press . Getting Started [Auto Calibration] starts. The system adjusts the speaker setting automatically. Be quiet during the measurement. Step 5: Selecting the Source You can select the playback source. Note • Loud test sound is output when [Auto Calibration] starts. You cannot turn the volume down. Give consideration to children and neighbors. • Before [Auto Calibration], install the surround amplifier in the appropriate location.
Step 6: Enjoying Surround Sound 1 2 3 4 5 6 7 8 9 0 SYSTEM MENU X/x/c, Enjoying TV sound with the 5.1 channel surround sound effect 1 2 3 4 5 Press SYSTEM MENU. Press X/x repeatedly until “AUDIO MENU” appears in the front panel display, then press or c. Press X/x repeatedly until “DEC. MODE” appears in the front panel display, then press or c. Press X/x repeatedly until “A.F.D. 7.1CH” appears in the front panel display. Press . The setting is made. 6 Press SYSTEM MENU.
Getting Started 4 Press X/x repeatedly until the surround sound effect you want appears in the front panel display. See the table below for surround sound effect descriptions. 5 Press . The setting is made. 6 Press SYSTEM MENU. The system menu turns off. About speaker output The table below describes the options when you connect all the speakers to the unit. The default setting is “A.F.D. STD” (when connecting the headphones to the surround amplifier, the default setting is “HP 2CH”).
Sound from Effect The system outputs the sound from the front speakers and subwoofer regardless of sound format or number of channels. Multi-channel surround formats are downmixed to 2 channels. “HP 2CH”2) (HEADPHONE 2 CHANNEL STEREO) This decoding mode appears only when you connect headphones to the surround amplifier (page 31). The system outputs the sound from the headphones regardless of sound format or number of channels. Multichannel surround formats are downmixed to 2 channels.
5 6 Playback Press Z. Place a disc. Place one disc on the disc tray, and then press Z. Playing a BD/DVD Depending on the disc, some operations may be different or restricted. Refer to the operating instructions supplied with your disc. FUNCTION Nx Z "/1 FUNCTION When you insert a commercially available BD-ROM or DVD VIDEO, playback may automatically start depending on the disc. In this case, go to Step 9.
To Press Play in slow, freeze frame (playback direction only) M for more than one second in pause mode. When you press M briefly in pause mode, you can play one frame at a time. Depending on the disc, this function may not work. To return to normal playback, press N. Tip • You can change the speed at which the volume is turned up and down. To turn the volume up/down quickly, press and hold the 2 +/– on the remote or VOLUME +/– on the unit.
One-Touch Play (for HDMI connection only) Press ONE-TOUCH PLAY. The system and the connected TV turn on and the input selector on the TV is switched to the system; then you can enjoy the contents of a disc. Changing the angles If various angles (multi-angles) for a scene are recorded on a disc, you can change the viewing angle.
Resuming playback from the point where you stopped the disc When you stop the disc, the system remembers the point where you pressed x. As long as you do not remove the disc, Resume Play will work even if the system is set to standby mode by pressing "/1. 2 While playing a disc, press x to stop playback. Press X/x to select or . A BD/DVD is divided into a lot of sections, which make up a picture or music feature. These sections are called “titles.
Searching for a scene quickly Searching for a Title/Chapter (Scene Search) You can move quickly between scenes within the title currently being played back. 1 Press SCENE SEARCH during playback or in pause mode. Playback pauses and a bar with a scene indicator (square-shaped – indicates the current point) appears at the bottom of the screen. 2 You can search for a chapter if the title contains chapter marks. 1 Press OPTIONS during playback or in pause mode. The options menu appears.
Displaying the playing time and play information To view the playing time and remaining time in the front panel display Press TIME repeatedly. Press DISPLAY during playback. The displayed information differs depending on the disc type and system status. Some displayed items may disappear after a few seconds.
Adjusting pictures for videos 1 Press OPTIONS during playback. The options menu appears. 2 Press X/x to select [Video Settings], then press . The [Video Settings] screen appears. Video Settings Select the item you want to change. Close Picture Quality Mode Standard FNR BNR MNR 3 Standard Press X/x to select an item, then press . [Picture Quality Mode] Optimizes the picture settings for different lighting environments.
Adjusting the delay between the picture and sound (A/V SYNC) 1 2 3 4 Press SYSTEM MENU. Press X/x repeatedly until “AUDIO MENU” appears in the front panel display, then press or c. Press X/x repeatedly until “A/V SYNC” appears in the front panel display, then press or c. Press X/x to adjust the delay between the picture and sound. Some BD-ROMs with “BD-LIVE Logo*” have bonus contents and other data that can be downloaded to the external memory (local storage) for enjoyment.
To delete data in the external memory Playing a CD You can delete unnecessary data. 1 2 3 4 5 6 7 If a disc is inserted, remove the disc from the unit. Press HOME. Press C/c to select [Video]. Press X/x to select [BD Data], then press . 1 2 3 4 5 6 7 8 9 Select the disc name, then press OPTIONS. Select [Erase], then press Select [OK], then press 0 TIME . . The data of the selected disc will be deleted. C/X/x/c, HOME OPTIONS FUNCTION .
To select a track Available OPTIONS 1 2 1 Press HOME. Press C/c to select Press OPTIONS. The options menu appears. [Music]. 2 The available items differ depending on the disc type or system situation. Music Music CD 3 Details [Play] Plays the selected track. [Play from start] (during Plays the current track from playback) the beginning. Press . The music list appears. 4 Items Playback Press X/x to select an item, then press . Press X/x to select a track, then press N or .
Other operations Playing Photo Files 1) 1) 2) 3) BD-REs/BD-Rs containing JPEG image files 2)DVD+RWs/DVD+Rs/DVD-RWs/DVD-Rs containing JPEG image files 3)CD-RWs/CD-Rs containing JPEG image files To Press Play a slideshow N Stop a slideshow x Pause a slideshow X Go to the next photo > Go back to the preceding photo . Display the file information DISPLAY Available OPTIONS 1 2 3 4 5 6 7 8 9 1 DISPLAY 2 OPTIONS ./> N x X 1 2 3 4 Press X/x to select an item, then press .
Note Playback • When you attempt to play the following photo files, the mark appears on the screen and they cannot be played. – Photo files with width or height larger than 8,192 pixels – Photo files with width or height smaller than 15 pixels – Photo files exceeding 32 MB – Photo files with extreme aspect ratios (greater than 50:1 or 1:50) – Photo files in Progressive JPEG format – Photo files that have a “.jpeg” or “.
Note Sound Adjustment Selecting the Effect to Suit the Source You can select a suitable sound mode for movies or music. 1 2 3 4 5 6 7 8 9 0 SOUND MODE Press SOUND MODE repeatedly during playback until the desired mode appears in the front panel display. • “AUTO”: The system selects “MOVIE” or “MUSIC” automatically to produce the sound effect depending on the disc or sound stream. • “MOVIE”: The system provides the sound for movies. • “MOVIE-D.C.S.
x DVD-VR Selecting the Audio Format, Multilingual Tracks, or Channel 1 2 3 4 5 6 7 8 9 Note • [ Stereo (Audio1)] and [ Stereo (Audio2)] do not appear when only one audio stream is recorded on the disc. x CD Sound Adjustment When the system is playing a BD/DVD VIDEO recorded in multiple audio formats (PCM, Dolby Digital, MPEG audio, or DTS), you can change the audio format. If the BD/DVD VIDEO is recorded with multilingual tracks, you can also change the language.
Enjoying Multiplex Broadcast Sound (DUAL MONO) You can enjoy multiplex broadcast sound when the system receives or plays a Dolby Digital multiplex broadcast signal. Using the Sound Effect NIGHT 1 2 3 4 5 6 7 8 9 0 SYSTEM MENU Note • To receive the Dolby Digital signal, you need to connect a TV or other component to the unit with an optical or coaxial digital cord (pages 24, 25) and set the digital output mode of the TV or other component to Dolby Digital.
Enjoying sound at low volume You can enjoy sound effects or dialog, as you would in a movie theater, even at low volume. It is useful for watching movies at night. Press NIGHT. You can adjust the sound by changing the tonal balance of the sound. 1 2 3 Note • When sound is output from the center speaker, this effect is more pronounced, as speech (movie dialog, etc.) is easy to hear. When sound is not output from the center speaker, or you are using the headphones, the system optimally adjusts the volume.
2 Automatic tuning Tuner Press and hold TUNING +/– until the auto scanning starts. [Auto Tuning] appears on the TV screen. Scanning stops when the system tunes in a station. To stop the automatic tuning manually, press TUNING +/– or x. “TUNED” and “ST” (for stereo program) light up in the front panel display. Listening to the Radio You can enjoy radio sound with the system’s speakers. "/1 CLEAR Select the radio station. 1 2 3 4 5 6 7 8 9 Number buttons Manual tuning 0 SYSTEM MENU D.
Presetting radio stations You can preset 20 FM stations. Before tuning, make sure to turn down the volume to minimum. 1 2 Press FUNCTION repeatedly until “TUNER FM” appears in the front panel display. 5 6 Press X/x to select [Preset Memory], then press . Press X/x to select the preset number you want. Press 2 To change the preset number Select the desired preset number by pressing PRESET +/–, then perform the procedure from Step 3.
If an FM program is noisy 6 Press X/x to select the preset number you want. If an FM program is noisy, you can select monaural reception. There will be no stereo effect, but reception will improve. 1 TUNED Tip Press OPTIONS. • You can select the preset number directly by pressing the number buttons. The options menu appears. 2 3 Press X/x to select [FM Mode], then press . Press X/x to select [Monaural]. • [Stereo]: Stereo reception. • [Monaural]: Monaural reception. 4 ST Press . 7 Press .
To name preset stations You can enter a name for preset stations. These names (for example, “ABC”) appear in the front panel display when a station is selected. Only one name can be entered for each preset station. 1 Press FUNCTION repeatedly until “TUNER FM” appears in the front panel display. The last received station is tuned in. 3 4 5 Press PRESET +/– repeatedly to select the preset station you want to create an index name for. Press SYSTEM MENU.
External Audio Device Using the DIGITAL MEDIA PORT Adapter The DIGITAL MEDIA PORT (DMPORT) adapter is for enjoying sound from a portable audio source or computer. By connecting a DIGITAL MEDIA PORT adapter, you can enjoy sound from the connected component on the system. Available DIGITAL MEDIA PORT adapters vary in each area. For details on connecting the DIGITAL MEDIA PORT adapter, see “Connecting the other components” (page 25). Note • Do not connect an adapter other than the DIGITAL MEDIA PORT adapter.
Using an S-AIR Product The unit is compatible with the S-AIR function (page 111), which allows sound transmission between S-AIR products. About S-AIR products For the surround amplifier For the S-AIR receiver Simply by matching the ID of the unit and the S-AIR sub unit, you can establish sound transmission. To set the ID of the unit 1 Set the S-AIR ID switch of the unit to the desired ID.
To set the ID of the surround amplifier 1 2 3 Make sure that the SURROUND SELECTOR switch of the surround amplifier is set to SURROUND. Set the S-AIR ID switch of the surround amplifier to match the ID (A, B, or C) of the unit. Press POWER on the surround amplifier. When sound transmission is established, the POWER / ON LINE indicator of the surround amplifier turns green. For details of the POWER / ON LINE indicator, see “To check the transmission status” (page 31).
8 Adjust the volume on the S-AIR receiver. Note • When the sound is other than 2 channel stereo, multichannel sound is downmixed to 2 channel. • The sound of the S-AIR receiver may be cut off by operation of the unit. To control the system from the S-AIR receiver You can control the system from the S-AIR receiver by using the following buttons. Operation N, X, x, ./> Share the same operations on the remote and unit. S-AIR CH Change the function of the system.
6 x After pairing Sound transmission is established between the paired unit and S-AIR sub unit(s) only. Your room The unit starts pairing and “SEARCH” flashes in the front panel display. To cancel pairing, press SYSTEM MENU. Neighbor This unit 7 ID A ID A S-AIR sub unit No transmission Press POWER on the surround amplifier to turn on the surround amplifier and press PAIRING on the rear panel of the surround amplifier. The PAIRING indicator of the surround amplifier flashes red when pairing starts.
Checking the S-AIR status of the unit 4 • “AUTO”: Normally select this. The system changes “RF CHANGE” to “ON” or “OFF” automatically. • “ON”: The system transmits sound by searching for a better channel for transmitting. • “OFF”: The system transmits sound by fixing the channel for transmitting. You can check the S-AIR status such as the S-AIR ID or pairing information. 1 2 3 Press SYSTEM MENU. Press X/x repeatedly until “S-AIR MENU” appears in the front panel display, then press or c.
Note Other Operations Using the Control for HDMI Function for “BRAVIA” Sync This function is available on TVs with the “BRAVIA” Sync function only.
To set the [Control for HDMI] function of the system to on/off manually 1 Press HOME. The home menu appears on the TV screen. 2 3 Press C/c to select [Setup]. Press X/x to select [HDMI Settings], then press . The options for [HDMI Settings] appear. 4 5 Press X/x to select [Control for HDMI], then press . Press X/x to select the setting, then press . Note • During the setting of the Control for HDMI function for the system, the System Audio Control function does not work.
Enjoying TV sound from the speakers in this system (System Audio Control) You can enjoy TV sound in this system by easy operation. To use this function, connect the system and the TV with an audio cord and an HDMI cable (page 22). You can use the System Audio Control function as follows: • You can enjoy TV sound from the speakers of the system by means of a simple operation. For details, see the operating instructions of the TV.
Calibrating the Appropriate Settings Automatically ANTE COAX NNA IAL 75 FM 0 -RT1 EZW AUDIO L TV L MIC A. CA C2 ECM-A L EXT DC5V TV ABLE SAT/C IN L DIGITA [Auto Calibration] 500mA MAX R ID S-AIR A B C R L IN DIGITA AUDIO IN AUDIO IN AL OPTIC D. C. A. C. (Digital Cinema Auto Calibration) can set the appropriate surround sound automatically. COAX IAL Note • The system outputs a loud test sound when [Auto Calibration] starts. You cannot turn the volume down.
8 Confirm the conclusions of [Auto Calibration]. The conclusions appear on the TV screen. Press C/c to change the page. The first page shows the distance of speakers. The second page shows the level of speakers. Note • If measurement fails, follow the message then retry [Auto Calibration]. 9 Setting the Speakers [Speaker Settings] To obtain the best possible surround sound, set connection of the speakers and their distance from your listening position.
[Subwoofer] [Yes] x [Level] x [Distance] You can adjust the sound level of the speakers. You can set the parameters from –6.0 dB to +6.0 dB. Be sure to set [Test Tone] to [On] for easy adjustment. When you move the speakers, be sure to set the parameters of the distance (A) from the listening position to the speakers. You can set the parameters from 0.0 to 7.0 meters. The speakers in the illustration correspond to the following: 1 2 3 4 A 5 6 7 A 8 [Front Left/Right] 3.
Note • The test tone signals are not output from the HDMI OUT jack. Tip • To adjust the volume of all the speakers at one time, press 2 +/–. Controlling Your TV with the Supplied Remote By adjusting the remote signal, you can control your TV with the supplied remote. Note • When you replace the batteries of the remote, the code number may reset itself to the default (SONY) setting. Reset the appropriate code number.
Manufacturer Code number By pressing You can RADIO SHACK 565 RCA/PROSCAN 510 PROG +/–, c/C Select the TV channel. After pressing /, you can select the next (c) or previous (C) text page. SABA 530, 537, 558 SAMSUNG 515, 517, 544, 566, 569, 571, 574 SANYO 508, 545 SHARP 535, 565 TELEFUNKEN 547, 558 THOMSON Turn off the TV sound temporarily. 547, 549 Number buttons, Select the TV channel. After pressing /, you can select the text page by entering the three digit page number.
Using the Sleep Timer You can set the system to turn off at a preset time, so you can fall asleep listening to music. You can preset the time in 10-minute increments. Press SLEEP. The brightness of the front panel display can be set to either of 2 levels. Each time you press SLEEP, the minutes display (the remaining time) changes by 10-minutes. When you set the sleep timer, “SLEEP” flashes in the front panel display. 1 2 To check the remaining time 3 Press SLEEP once.
Deactivating the Buttons on the Unit (Child Lock) You can deactivate the buttons on the unit (except for "/1) for preventing misoperation, such as child mischief (child lock function). Press x on the unit for more than 5 seconds. Note • When you operate the buttons on the unit while the child lock function is on, “CHILD LOCK” appears in the front panel display. You can turn on/off the demonstration in the front panel display while the system is in standby mode. 1 2 3 4 Press SYSTEM MENU.
Saving Power in Standby Mode Check that the following settings are made: – [Control for HDMI] is set to [Off] (page 66). – “S-AIR STBY” is set to “STBY OFF” (page 63). – “DEMO” is set to “DEMO OFF” (page 75). – [Standby Mode] is set to [Normal] (page 86).
You can setup the following options. Settings and Adjustments Icon Using the Setup Display Updates the software of the system. [Video Settings] (page 79) You can make various adjustments of items such as picture and sound. Select (Setup) on the home menu when you need to change the settings of the system. Makes the video settings according to the type of connecting jacks. [Audio Settings] (page 81) Makes the audio settings according to the type of connecting jacks.
5 Press X/x to select a setting, then press . The setting is selected and setup is complete. The options for the selected item appear. Example: [4:3] [Network Update] You can update and improve the functions of the system. For information about update functions, refer to the following website: For customers in Europe http://support.sony-europe.com/ Setup 4:3 TV Type Set the screen aspect ratio of your TV.
2 Press C/c to select [OK], then press . The unit starts downloading, then updating the software automatically. When updating finishes, “COMPLETE” appears for 5 seconds in the front panel display, then the system automatically turns off. 3 Press "/1 to turn the system on. The system starts up with the updated software. Updating the system’s software using an update disc 1 Insert the update disc. The display asks for confirmation. 2 Select [OK], and press . Software update starts.
x [Cinema Conversion Mode] [Auto]: Normally select this. The unit automatically detects whether the material is video-based or film-based, and switches to the appropriate conversion method. [Video]: The conversion method suited for video-based material will always be selected regardless of the material.
[Auto]: Outputs 1920 × 1080p/24 Hz video signals only when connecting a 1080/24pcompatible TV using the HDMI OUT jack. [On]: Outputs 1920 × 1080p/24 Hz video signals regardless of the connected TV type. [Off]: Select this when your TV is not compatible with 1080/24p video signals. Note • Video signals may not be output when [BD-ROM 1080/24p Output] is set to [On]. x [YCbCr/RGB (HDMI)] You can set the color setting for video signals output from the HDMI OUT jack.
x [Attenuate - AUDIO] x [Sound Effect] Distortion may occur when you listen to a component connected to the AUDIO (AUDIO IN L/R) jacks. You can prevent distortion by reducing the input level on the unit. Distortion is not a malfunction and will depend on the component connected. You can set the system’s sound effects (SOUND MODE, DYNAMIC BASS, NIGHT, “TONE,” and “DEC. MODE”) to on/off. [On]: Attenuates the input level. The output level is changed. [Off]: Normal input level.
to [255] using C/X/x/c and the number buttons. [BD/DVD Viewing Settings] You can make detailed settings for BD/DVD playback. x [BD/DVD Menu] You can select the default menu language for BD-ROMs or DVD VIDEOs. When you select [Select Language Code], the display for entering the language code appears. Enter the code for your language by referring to “Language Code List” (page 106). To cancel the Parental Control setting Select [No Restrictions].
To change the password x [Parental Control Region Code] Playback of some BD-ROMs or DVD VIDEOs can be limited according to the geographic area. Scenes may be blocked or replaced with different scenes. 1 2 3 1 2 Enter your four-digit password using the number buttons. 3 Press X/x to select [OK], then press . 4 Press X/x to select the area restriction, then press . When you select [Select Region Code], the display for entering the region code appears.
[Photo Settings] [HDMI Settings] You can make the photo-related settings. You can make the HDMI settings. x [Slideshow Speed] x [Control for HDMI] You can change the slideshow speed. You can set the [Control for HDMI] function to on/off. For details, see “Using the Control for HDMI Function for “BRAVIA” Sync” (page 66). [Fast]: Photos change rapidly. [Normal]: Photos change at normal speed. [Slow]: Photos change slowly. [On]: On.
[System Settings] You can make the system-related settings. x [OSD] You can select your language for the system onscreen displays. You can get information on newer software versions. The information appears on the TV screen when you turn the system on. Network connections and settings are required when using this function (page 87). x [Standby Mode] [On]: Sets the system to inform you of newer software version information (page 78). [Off]: Off.
[Network Settings] 3 The [Proxy Settings] display appears. If the proxy server does not have a specific setting, go to step 8. You can make detailed settings for Internet and network. x [Internet Settings] These items are necessary when you connect to the Internet via a network cable. Enter the respective (alphanumeric) values for your broadband router or Wireless LAN router. The items that need to be set may differ, depending on the Internet service provider or the router.
You can use the following buttons to enter characters. Buttons Details Red button [Letter Type] Switches the keyboard between alphabet and numbers. Green button [A/a] Switches the keyboard between upper case and lower case. Yellow button [Symbol] Displays the keyboard for symbols. Blue button [Finish] The input is entered, and the system returns to the previous display. CLEAR Erases the character to the right [Clear]/[Clear All] of the cursor.
Resetting all the system settings to the default [Resetting] Resetting the system settings other than the settings related to password You can reset all the system settings to the default settings. 1 You can reset the system settings to their factory default. Settings can be reset by function group. All the settings within the group will be reset. 2 1 3 2 Press to select [Reset to Factory Default Settings], then press .
On operation Additional Information Precautions On safety • To prevent fire or shock hazard, do not place objects filled with liquids, such as vases, on the system, or place the system near water, such as near a bathtub or shower room. Should any solid object or liquid fall into the cabinet, unplug the system and have it checked by qualified personnel before operating it any further. • Do not touch the AC power cord (mains lead) with wet hands. Doing so may cause an electric shock.
On moving the system Before moving the system, make sure that there is no disc inserted, and remove the AC power cord (mains lead) from the wall outlet (mains). About S-AIR function On handling discs • To keep the disc clean, handle the disc by its edge. Do not touch the surface. • Do not stick paper or tape on the disc. • Do not expose the disc to direct sunlight or heat sources such as hot air ducts, or leave it in a car parked in direct sunlight as the temperature may rise considerably inside the car.
Troubleshooting If you experience any of the following difficulties while using the system, use this troubleshooting guide to help remedy the problem before requesting repairs. Should any problem persist, consult your nearest Sony dealer. Note that if service personnel changes some parts during repair, these parts may be retained. In the event of a problem with the S-AIR function, have a Sony dealer check the entire system together (S-AIR main unit and sub unit).
Symptom Remedy The picture is not output correctly. • Check the [Output Video Format] settings (page 80). Picture noise appears. • The disc is dirty or flawed. • If the picture output from your system goes through your VCR to get to your TV, the copy-protection signal applied to some BD/DVD programs could affect picture quality. If you still experience problems even when you connect your unit directly to your TV, try connecting your unit to the other input jacks.
Symptom Remedy The surround effect is difficult to • Check the decoding mode setting (page 37). hear when you are playing a • Check the speaker connections and settings (pages 20, 70). sound track of Dolby Digital, • Depending on the BD/DVD, the output signal may not be the entire 5.1 channel. DTS, or MPEG audio. It may be monaural or stereo even if the sound track is recorded in Dolby Digital or MPEG audio format.
Remedy The disc does not play. • The disc is dirty. • There is no disc inserted. • The disc is upside down. Insert the disc with the playback side facing down. • The disc is skewed on the disc tray. • You are attempting to play a disc with a format that cannot be played back by this system (page 100). • The region code on the BD/DVD does not match the system. • Moisture has condensed inside the unit and may cause damage to the lenses. Remove the disc and leave the unit turned on for about half an hour.
Symptom Remedy The Control for HDMI function • When “HDMI” does not light up in the front panel display, check the HDMI does not work. connection (page 22). • Set [Control for HDMI] in [HDMI Settings] to [On] (page 85). • Make sure that the connected component is compatible with the [Control for HDMI] function. • Check that the AC power cord (mains lead) of the connected component is connected securely. • Check the connected component’s setting for the Control for HDMI function.
The S-AIR function Remedy S-AIR connection is not established (sound transmission is not established), e.g., the indicator of the S-AIR sub unit does the following: • Turns off. • Flashes. • Turns red. • If you use another S-AIR main unit, place it more than 8 meters away from the unit. • Confirm the ID of the unit and S-AIR sub unit (page 61). • You performed pairing the unit and another S-AIR sub unit. Perform pairing of the desired S-AIR sub unit (page 63).
Surround amplifier operation If no sound is output from the surround speakers, check the status of the POWER / ON LINE indicator on the surround amplifier. For details of the POWER / ON LINE indicator, see “Step 3: Setting up the Wireless System” (page 31). Symptom Remedy The power is not turned on. • Check that the AC power cord (mains lead) is connected securely. The POWER / ON LINE indicator does not turn on.
Self-diagnosis Function When the self-diagnosis function is activated to prevent the system from malfunctioning, an error code appears in the front panel display, or just appears without any messages on the entire screen. In these cases, check the following. When an error code appears in the front panel display Error code Corrective action Exxxx Contact your nearest Sony dealer or local authorized Sony service facility and give the error code.
Playable Discs Type Disc logo Characteristics Blu-ray Disc Icon BD-ROMs and BD-REs/BD-Rs in BDMV and BDAV mode, including 8 cm discs (single layer) and DL discs DVD VIDEO Discs such as movies that can be purchased or rented DVD/DATA DVD DVD+RWs/DVD+Rs in +VR mode or DVD-RWs/DVD-Rs in video and VR mode, including 8 cm discs (single layer) and DVD+R DL/ DVD-R DL discs DVD+RWs/DVD+Rs/DVD-RWs/ DVD-Rs containing JPEG* image files AVCHD TM CD DATA CD Discs recorded in AVCHD format** Music CDs or CD
Note on playback operations of a BD/DVD Some playback operations of a BD/DVD may be intentionally set by software producers. Since this system plays a BD/DVD according to the disc contents the software producers designed, some playback features may not be available. Refer to the instructions supplied with the BD/DVD. Region code (BD-ROM/DVD VIDEO only) Your system has a region code printed on the rear of the unit and will only play a BD-ROM/DVD VIDEO (playback only) labeled with identical region codes.
Supported Audio Formats Audio formats supported by this system are as follows. Format LPCM 2ch LPCM 5.1ch, LPCM 7.1ch Dolby Digital Dolby TrueHD, Dolby Digital Plus DTS DTS-ES Discrete 6.1, DTS-ES Matrix 6.1, DTS96/24 DTS-HD High Resolution Audio DTS-HD Master Audio “BD/DVD” a a a a a a* a a “SAT/CABLE” “TV” (DIGITAL IN) a – a – a – – – Function a: Supported format. –: Unsupported format. * BD only.
Video Output Resolution Output resolution differs depending on the [Output Video Format] setting in [Video Settings] (page 79).
Dimensions (approx.) Specifications Amplifier Section Stereo mode (rated) 108 W + 108 W (at 3 ohms, 1 kHz, 1% THD) Surround mode (reference) RMS output power Front L/Front R/Center*: 143 watts (per channel at 3 ohms, 1 kHz, 10% THD) Subwoofer*: 285 watts (at 1.5 ohms, 80 Hz, 10% THD) * Depending on the decoding mode settings and the source, there may be no sound output. Inputs (Analog) TV (AUDIO IN) AUDIO (AUDIO IN) Mass (approx.
Dimensions (approx.) Mass (approx.) 430 mm × 93 mm × 400 mm (w/h/d) incl. projecting parts 430 mm × 93 mm × 430 mm (w/h/d) (incl. Wireless transceiver) 5.4 kg Surround amplifier (TA-SA100WR) Amplifier Section Stereo mode (rated) 80 W + 80 W (at 3 ohms, 1 kHz, 1% THD) Surround mode (reference) RMS output power 143 W (per channel at 3 ohms, 1 kHz, 10% THD)* * Depending on the source, there may be no sound output. Rated impedance General Power requirements Mass (approx.
Language Code List The language spellings conform to the ISO 639: 1988 (E/F) standard.
Terms and Conditions of Use and End User License Agreement The Sony Blu-ray Disc player (“Product”) and associated software (“Software”) are provided and maintained by Sony Electronics Inc. and its affiliates (“Sony”). Sony also provides and maintains associated service (the “Service”), including any subsite accessible through the Service’s Internet homepage (the “Site”).
GNU General Public, Lesser General Public, & Other Licenses. Notwithstanding terms in this Agreement, certain portions of the Software are governed by the GNU Lesser General Public License, Version 2.1 (LGPL), GNU General Public License Version 2 (GPL), and other open source code licenses (“Open Source Licenses”), copies of which are attached hereto and incorporated herein.
11. General Provisions This Agreement, the limited warranty accompanying the Product, plus any additional terms posted on the Service or Site, together constitute the entire agreement between Sony and you with respect to your use of the Product, Service, Site, Content, and Software. Any notice by Sony hereunder may be made by letter, email, or posting on the Service or Site.
BD-ROM BD-ROMs (Blu-ray Disc Read-Only Memory) are commercially produced discs and are available in the same capacities as the BD below. Other than conventional movie and video contents, these discs have enhanced features such as interactive content, menu operations using pop-up menus, selection of subtitle display, and slideshow. Although a BD-ROM may contain any form of data, most BD-ROM discs will contain movies in High Definition format, for playback on Blu-ray Disc/DVD players.
DTS Parental Control Digital audio compression technology developed by DTS, Inc. This technology conforms to 5.1-channel surround. This format comprises of stereo rear channel and there is discrete subwoofer channel in this format. DTS provides the same 5.1 discrete channels of high quality digital audio. The good channel separation is realized due to the all channel data being recorded discretely and processed in digitally.
range of ISM band (Industrial, Scientific, and Medical band), such as wireless LANs and Bluetooth applications. x.v.Colour x.v.Colour is a familiar term for the xvYCC standard proposed by Sony. xvYCC is an international standard for color space in video. This standard can express a wider color range than the currently used broadcast standard. 24p True Cinema Movies shot with a film camera consist of 24 frames per second.
Index Numerics 24p True Cinema 112 A A/V SYNC 47 Angle 42 Attenuate - AUDIO 82 Attenuate - TV 81 Audio 83 Audio DRC 81 Audio Settings 81 Auto Calibration 69, 82 Auto Display 86 AVCHD 100, 109 B BD Audio Setting 81 BD Data 48 BD Internet Connection 84 BD Parental Control 83 BD/DVD Menu 83 BD/DVD Viewing Settings 83 BDAV 100 BD-Live 47 BDMV 100 BD-R 109 BD-RE 109 Blu-ray Disc 110 DVD Parental Control 83 DYNAMIC BASS 54 E Easy Setup 33, 88 F FM MODE 56 Front panel 10 Front panel display 11 H HDMI YCbCr/R
X x.v.