MINI COMPONENT SYSTEM MODEL CD-G14000 OPERATION MANUAL Thank you for purchasing this SHARP product. To obtain the best performance from this product, please read this manual carefully. It will guide you in operating your SHARP product. Accessories Please confirm that the following accessories are included. CD-G14000 Mini Component System consisting of CD-G14000 (main unit), CP-G14000 (consisting of 1 set of front speaker) and 1 unit of CP-SW14000 (active subwoofer).
CD-G14000 SPECIAL NOTES NOTE This has been tested to Class B digital pursuant to Part the the limits for a These terference in a residential installation. This equipment generates, uses, Important Instruction CAUTION: TO REDUCE THE RISK OF ELECTRIC SHOCK, DO NOT REMOVE COVER (OR BACK). NO USER-SERVICEABLE PARTS INSIDE. REFER SERVICING TO QUALIFIED SERVICE PERSONNEL.
IMPORTANT SAFETY INSTRUCTIONS 10) Protect the power cord from being walked on or pinched particularly at plugs, convenience receptacles, and the point where they exit from the apparatus. 11) Only use attachments/accessories specified by the manufacturer. 12) Use only with the cart, stand, tripod, bracket, or table specified by the manufacturer, or sold with the apparatus. When a cart is used, use caution when moving the cart/ apparatus combination to avoid injury from tip-over. 1) Read these instructions.
Important Instruction CD-G14000 IMPORTANT SAFETY INSTRUCTIONS (continued) 18) Damage Requiring Service - Unplug this product from the wall outlet and refer servicing to qualified service personnel under the following conditions : a) When the AC cord or plug is damaged, b) If liquid has been spilled, or objects have fallen into the product, c) If the product has been exposed to rain or water, d) If the product does not operate normally by following the operating instructions.
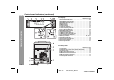
Contents Products that have earned the ENERGY STAR® are designed to protect the environment through superior energy efficiency. General Information Precautions . . . . . . . . . . . . . . . . . . . . . . . . . . . . . . . . . . . . . . . . . 6 Controls and indicators . . . . . . . . . . . . . . . . . . . . . . . . . . . .7 - 10 Preparation for Use System connections . . . . . . . . . . . . . . . . . . . . . . . . . . . . . .11 - 15 Remote control . . . . . . . . . . . . . . . . . . . . . . . . . . .
CD-G14000 Precautions General Please ensure that the system is positioned in a well-ventilated area and ensure that there is at least 4" (10 cm) of free space along the sides, top and back of the equipment. 4" (10 cm) 4" (10 cm) 4" (10 cm) 5 4 3 2 1 REMOTE SENSOR TIMER POWER ON/ STAND-B Y c OPEN/ CLOSE CD 5 TAPE (1 2) 4 TUNER (BAND) 3 PRESET PRESET 2 AUDIO IN 1 TUNING TUNING VOL. PLAYBACK (PLAY & STOP) General Information PHONES VOL.
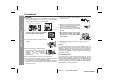
Controls and indicators CD-G14000 5 4 3 2 1 REMOTE SENSOR TIMER POWER ON/ STAND-BY c OPEN/ CLOSE CD 5 TAPE (1 2) 4 TUNER (BAND) 3 PRESET PRESET TUNING TUNING 2 AUDIO IN 1 VOL. PLAYBACK (PLAY & STOP) PHONES VOL. Reference page 1. Disc Trays . . . . . . . . . . . . . . . . . . . . . . . . . . . . . . . . . . . . . . . 21 2. Timer Indicator . . . . . . . . . . . . . . . . . . . . . . . . . . . . . . . . . . . 37 3. Power On/Stand-by Button . . . . . . . . . . . . . 18, 20, 30, 32, 36 4.
CD-G14000 Controls and indicators (continued) Display General Information Reference page 1. Disc Number Indicators . . . . . . . . . . . . . . . . . . . . . . . . . . . . 21 2. MP3/WMA Folder Indicator. . . . . . . . . . . . . . . . . . . . . . . . . . 26 3. MP3/WMA Title Indicators. . . . . . . . . . . . . . . . . . . . . . . . . . . 26 4. MP3 Indicator. . . . . . . . . . . . . . . . . . . . . . . . . . . . . . . . . . . . . 21 5. WMA Indicator . . . . . . . . . . . . . . . . . . . . . . . . . . . . .
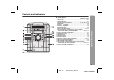
CD-G14000 Front speaker 2 3 1. Woofer 2. Tweeter 3. Bass Reflex Duct 4. Speaker Terminals 4 3 4 5 6 1 2 7 8 Active subwoofer Reference page 1. Subwoofer 2. Bass Reflex Duct 3. Power Switch . . . . . . . . . . . . . . . . . . . . . . . . . . . . . . . . . . . . 17 4. Volume Control . . . . . . . . . . . . . . . . . . . . . . . . . . . . . . . . . . 17 5. Crossover Frequency Control . . . . . . . . . . . . . . . . . . . . . . 17 6. Cooling Fan . . . . . . . . . . . . . . . . . . . . . . . . . . .
CD-G14000 Controls and indicators (continued) Remote control 1 9 General Information 2 3 4 10 11 12 13 21 18 22 19 23 24 20 25 14 15 5 26 27 28 29 6 7 8 17 16 Reference page 1. Remote Control Transmitter . . . . . . . . . . . . . . . . . . . . . . . . 16 2. Disc Number Select Buttons . . . . . . . . . . . . . . . . . . . . . . . . 20 3. Tuning Up, Cursor Up Button . . . . . . . . . . . . . . . . . . . . . . . 26 4.
System connections CD-G14000 Make sure to unplug the AC power cord before making any connections. Front speaker (right) FM antenna AM loop antenna Front speaker (left) Active subwoofer Subwoofer connection (see page 14) FM ANTENNA GND AM RATED SPEAKER IMPEDANCE : 6 OHMS MIN. 75 OHMS Preparation for Use Antenna connection (see page 12) Speaker connection (see page 12) To AC outlet To AC outlet (AC 120 V ~ 60 Hz) AC power connection (see page 14) 11 08/1/15 CD-G14000_EN.
System connections (continued) Antenna connection Speaker connection Supplied FM antenna: Connect the FM antenna wire to the FM FM 75 OHMS jack and position the FM antenna wire in the direction where the antenna strongest signal can be received. Front speakers: Connect the black wire to the FRONT SPEAKERS (–) terminal, and the red wire to the FRONT SPEAKERS (+) terminal. Supplied AM loop antenna: Connect the AM loop antenna to the AM and GND terminals.
CD-G14000 Placing the speaker system Outdoor FM antenna To enjoy the surround effect, we recommend that you place each speaker as shown to the below. Use an outdoor FM antenna if you require better reception. Consult your dealer. Active subwoofer Front speaker (left) ANTENNA FM Front speaker (right) Main unit GND AM Outdoor FM antenna 75 OHMS 75 ohms coaxial cable Note: When an outdoor FM antenna is used, disconnect the supplied FM antenna wire.
CD-G14000 System connections (continued) Make sure to unplug the AC power cord of the main unit before making any connections. Connecting the subwoofer Use the subwoofer cable to connect the SUBWOOFER PRE-OUT jack on the main unit and the SUBWOOFER IN jack on the active subwoofer. AC power connection After checking all the connections have been made correctly, plug the AC power cord of this unit into the AC outlet. If you plug in the unit first, the unit will enter the demonstration mode.
CD-G14000 Cooling fan: The main unit and the active subwoofer are built with a cooling fan at the rear of the units for improved cooling. Please do not cover the opening of the fan with any obstacles, as this will block proper ventilation. Demonstration mode When you plug the unit in for the first time, the unit will enter the demonstration mode. You will see words scroll.
CD-G14000 Remote control Battery installation Use 2 “AA” size batteries (UM/SUM-3, R6, HP-7 or similar). Batteries are not included. 1 2 Preparation for Use 3 Open the battery cover. Insert the batteries according to the direction indicated in the battery compartment. When inserting or removing the batteries, push them toward the battery terminals. Close the cover. Notes concerning use: Replace the batteries if the operating distance is reduced or if the operation becomes erratic.
Subwoofer control CD-G14000 Before you turn the system on/off on the main unit, minimize the speaker volume on the main unit and turn the VOLUME control of the subwoofer to “–”. Subwoofer light up The subwoofer unit surface will light up and blink according to BASS SOUND LEVEL. During STAND-BY MODE (low power consumption mode): When subwoofer is turned ON, no light will be emitted from the subwoofer unit. Notes: Observe the following to avoid malfunction and sound distortion.
CD-G14000 General control Volume control Main unit operation: When the VOLUME control is turned clockwise, the volume will increase. When it is turned counterclockwise, the volume will decrease. Remote control operation: Press the VOLUME (+ or –) button to increase or decrease the volume. 5 4 3 2 1 POWER ON/ STAND-BY REMOTE SENSOR TIMER POWER ON/ STAND-BY c OPEN/ CLOSE CD 5 TAPE (1 2) 4 TUNER (BAND) 3 PRESET PRESET 2 AUDIO IN 1 TUNING TUNING VOL. 0 ..... 30 MAXIMUM VOL. — VOL. VOL.
Setting the clock (Remote Control only) 5 CD-G14000 Press the or button to adjust the hour and then press the MEMORY button. or button once to advance the time by Press the 1 hour. Hold it down to advance continuously. Press the or button to adjust the minutes and then press the MEMORY button. In this example, the clock is set for the 12-hour (AM 12:00) display. 1 2 3 Press the ON/STAND-BY button to turn the power on.
CD-G14000 Listening to a CD or MP3/WMA disc This system can play back a standard CD, CD-R/RW in the CD format and CD-R/RW with MP3 or WMA files, but cannot record on them. Some audio CD-R and CD-RW discs may not be playable due to the state of the disc or the device that was used for recording. POWER ON/ STAND-BY 5 4 3 2 CD or MP3/WMA disc Playback 1 MP3: MP3 is a form of compression. It is an acronym which stands for MPEG Audio Layer 3.
CD-G14000 1 Press the POWER ON/STAND-BY button to turn the power on. 2 3 Press the CD button. 4 Place the disc on the disc tray 1, label side up. Be sure to place 3" (8 cm) disc in the middle of the disc trays. Press the 1 button and within 5 seconds, press the OPEN/CLOSE button to open the disc tray 1. 5" (12 cm) 5 3" (8 cm) Press the OPEN/CLOSE button to close the disc tray 1.
CD-G14000 Listening to a CD or MP3/WMA disc (continued) Various disc functions CD or MP3/WMA disc Playback Function Main unit Remote control Operation Play Press in mode. Stop Press in the playback mode. Pause Press in the playback mode. Press the / button to resume playback from the paused point. Press in the playback or stop mode. If you press the button in the stop mode, press the / button to start the desired track.
Advanced CD or MP3/WMA disc playback To specify a disc to play Direct track search You can play a disc by specifying the disc number. By using the direct search buttons, the desired tracks on the current disc can be played. 1 Press one of the 1- 5 buttons to select the desired disc. Use the direct search buttons on the remote control to select the desired track while playing the selected disc.
CD-G14000 Advanced CD or MP3/WMA disc playback (continued) Repeat play Random play Repeat play can play all 5 discs, all tracks on a chosen disc, or a programmed sequence continuously. The tracks on the disc(s) can be played in random order automatically. CD or MP3/WMA disc Playback To repeat one disc: Press the / button twice. To random play all tracks on up to 5 discs: Press the RANDOM button on the remote control. To repeat all tracks on up to 5 discs: Press the / button three times.
CD-G14000 You can choose up to 32 selections for playback in the order you like. 1 2 While in the stop mode, press the MEMORY button to enter the programming save mode. To cancel the programmed play mode: While in the stop mode and the “MEMORY” indicator is lit, press the CLEAR/DIMMER button on the remote control. The “MEMORY” indicator will disappear and all the programmed contents will be cleared. Press one of the 1 - 5 buttons to select the desired disc.
CD or MP3/WMA disc Playback CD-G14000 MP3/WMA navigation (only for MP3/WMA files) MP3/WMA navigation: You can search and play files by folder or title. For example, when you assign three titles to a file, enter genre (such as jazz) as title 1, album name as title 2, and music title as title 3 to search the file by any title. You can search and play files by folder or title 1/2/3 within one MP3/WMA disc (see page 27).
CD-G14000 File search (by folder or title 1/2/3) You can search and play files by folder or title 1/2/3 within one MP3/ WMA disc. 1 Press one of the 1 5 buttons to select a disc tray containing an MP3/WMA disc. 2 Press the disc. 3 Press the CD button to stop playback. “NAVI READ” appears and the display shows the total number of folders and files on the selected disc. Use the or cursor button to scroll and select a folder (or title), and then press the ENTER button.
CD-G14000 MP3/WMA navigation (only for MP3/WMA files) (continued) Character search (for folder or title 1/2/3) CD or MP3/WMA disc Playback By entering a name, you can search files by folder or title 1/2/3 within one MP3/WMA disc. 1 Perform steps 1 - 3 in “File search (by folder or title 1/2/3)” on page 27. 2 3 Press the NAVIGATION button. 4 5 6 Press the , , or cursor button on the remote control to select “FOL”, “T-1”, “T-2” or “T-3”. To search files by folder name, select “FOL” (will flash).
CD-G14000 Folders or titles can be programmed within one MP3/WMA disc. Folder, title 1, title 2 and title 3 cannot be programmed together simultaneously. 1 2 3 4 Perform steps 1 - 3 in “File search (by folder or title 1/2/3)” on page 27. Press the , , or cursor button on the remote control to select “FOL”, “T-1”, “T-2” or “T-3” and then press the ENTER button. The total number of folders (or titles) appears for 2 seconds, and names of the first 2 folders (or titles) are displayed.
CD-G14000 Listening to the radio Tuning 5 4 3 2 1 POWER ON/ STAND-BY 1 2 Press the ON/STAND-BY button to turn the power on. 3 Press the TUNING ( station. REMOTE SENSOR TIMER POWER ON/ STAND-BY c OPEN/ CLOSE CD 5 Press the TUNER (BAND) button repeatedly to select the desired frequency band (FM or AM). or ) button to tune in to the desired TAPE (1 2) 4 TUNER (BAND) 3 PRESET PRESET 2 AUDIO IN 1 TUNING TUNING VOL. VOL.
CD-G14000 Memorizing a station To recall a memorized station You can store 40 AM and FM stations in memory and recall them at the push of a button. (Preset tuning) Press the PRESET ( or select the desired station. Perform steps 1 - 3 in “Tuning” on page 30. To scan the preset stations Press the MEMORY button to enter the preset tuning saving mode. The stations saved in memory can be scanned automatically.
CD-G14000 Listening to a cassette tape (TAPE 1 or TAPE 2) Before playback: For playback, use normal or low-noise tapes for the best sound. (Metal or CrO tapes are not recommended.) Do not use C-120 tapes or poor-quality tapes, as they may cause malfunctions. Before loading a tape into the cassette compartment, tighten the slack with a pen or a pencil. Tape playback 1 2 Open the cassette compartment by pushing the area marked “ ”.
Various tape functions Function Main unit Remote control Operation Play Press in the stop mode. Stop Press in the playback, fast forward or rewind mode. Fast forward/ Fast rewind (TAPE 2 only) Press in the playback or stop mode. PRESET PRESET Caution: To remove the cassette, press the button, and then open the compartment. Before changing from one tape operation to another, press the button.
CD-G14000 Recording on a cassette tape (continued) Recording from a CD (or MP3 disc) POWER ON/ STAND-BY 1 2 3 5 4 3 2 1 c CD OPEN/ CLOSE REMOTE SENSOR TIMER POWER ON/ STAND-BY c OPEN/ CLOSE CD 5 TAPE (1 2) 5 4 Press the ON/STAND-BY button to turn the power on. Press the CD button. Load a cassette into the TAPE 2 cassette compartment with the side to be recorded on facing you. Wind past the leader of the tape, on which recording cannot be performed. Press the button.
CD-G14000 To stop recording: Press the button. The disc and tape will stop. Dubbing from tape to tape You can record from TAPE 1 to TAPE 2. 1 2 Recording from the radio 1 2 3 Load a prerecorded into the TAPE 1 compartment. Insert tape into the TAPE 2 compartment. cassette cassette a blank cassette Tune in to the desired station. (See page 30) Press the TAPE (1 the display. Press the 4 Press the button. Recording will be paused. 5 Press the button. button to start recording.
CD-G14000 Timer and sleep operation (Remote Control only) Timer playback: The unit turns on and plays the desired source (CD, MP3 disc, tuner, tape) at the preset time. Timer recording: The unit turns on and starts recording from the tuner at the preset time. Advanced Features This unit has 2 types of timer: ONCE TIMER and DAILY TIMER. Once timer: Once timer play and once timer recording works for one time only at a preset time.
4 Within 10 seconds, press the or button to select “ONCE SET” or “DAILY SET”, and press the MEMORY button. 5 Press the or button to select “PLAY” or “REC”, and press the MEMORY button. White 9 Switch input with the or button, and then press the MEMORY button. To select the timer playback source: CD, TUNER, TAPE 1 or TAPE 2. To select the timer recording source: TUNER. When you select the tuner, select a station by pressing the or button, and then press the MEMORY button.
Advanced Features CD-G14000 Timer and sleep operation (Remote Control only) (continued) 12 When the preset time is reached, playback or recording will start. The volume will increase gradually until it reaches the preset volume. 13 When the timer end time is reached, the system will enter the power stand-by mode automatically. Once timer: The timer will be canceled. Daily timer: The timer will operate at the same time every day. It will continue until the daily timer setting is canceled.
CD-G14000 The radio, CD, MP3 disc and cassette tape can all be turned off automatically. 1 2 3 4 Play back the desired sound source. Press the CLOCK/TIMER button. Within 10 seconds, press the or button to select “SLEEP”, and press the MEMORY button. Press the or button to select the time. (Maximum: 3 hours - Minimum: 1 minute) 3 hours - 5 minutes 5-minute intervals 5 minutes - 1 minute 1-minute intervals 5 Press the MEMORY button. “SLEEP” will appear.
CD-G14000 Enhancing your system The connection cord is not included. Purchase a commercially available cord as shown below. Portable audio player, etc. 5 4 3 2 1 AUDIO IN To the line output jack REMOTE SENSOR TIMER POWER ON/ STAND-BY c OPEN/ CLOSE CD Listening to sounds of Portable Audio Player, etc. 1 Connect a Portable Audio Player etc. to the front AUDIO IN jack. 2 3 4 Press the ON/STAND-BY button to turn the power on. Press the AUDIO IN button. Play the connected equipment.
Troubleshooting chart Before plugging in or unplugging the headphones, reduce the volume. Be sure your headphones have a 1/8" (3.5 mm) diameter plug and impedance between 16 and 50 ohms. The recommended impedance is 32 ohms. Plugging in the headphones disconnects the speakers automatically. Adjust the volume using the VOLUME control. 5 4 3 2 1 REMOTE SENSOR TIMER POWER ON/ STAND-BY c OPEN/ CLOSE CD 5 TAPE (1 2) 4 TUNER (BAND) 3 PRESET PRESET 2 AUDIO IN 1 TUNING TUNING VOL.
CD-G14000 Troubleshooting chart (continued) Tuner Cassette deck Symptom Cannot record. References Possible cause Is the erase-prevention tab removed? Cannot record tracks with Is it a normal tape? (You cannot proper sound quality. record on a metal or CrO tape.) Cannot erase completely. Sound skipping. Is there slack in the tape? Cannot hear treble. Is the tape stretched? Sound fluctuation. Are the capstans, pinch rollers, or heads dirty? Cannot remove the tape.
CD-G14000 If trouble occurs Before transporting the unit When this product is subjected to strong external interference (mechanical shock, excessive static electricity, abnormal supply voltage due to lightning, etc.) or if it is operated incorrectly, it may malfunction. Remove all CDs from the unit. Make sure there is no CD in the disc tray. Then, set the unit to the power stand-by mode. Carrying the unit with discs left inside can damage the unit.
CD-G14000 Maintenance Cleaning the tape-handling parts Dirty heads, capstans or pinch rollers can cause poor sound and tape jams. Clean these parts with a cotton swab moistened with commercial head/pinch roller cleaner or isopropyl alcohol. When cleaning the heads, pinch rollers, etc., unplug the unit which contains high voltages.
Specifications Amplifier Output power Front speakers General Power source AC 120 V ~ 60 Hz Power consumption 98 W Dimensions Width: 10-1/4" (260 mm) Height: 13" (332 mm) Depth: 12-7/8" (324 mm) Weight Output terminals 16 lbs. (7.
CD-G14000 Specifications (continued) Cassette deck Active subwoofer Frequency response 50 - 14,000 Hz (normal tape) Signal/noise ratio 55 dB (TAPE-1 playback) 50 dB (TAPE-2 recording/playback) Wow and flutter 0.
MEMO
z CONSUMER LIMITED WARRANTY SHARP ELECTRONICS CORPORATION warrants to the first consumer purchaser that this Sharp brand product (the “Product”), when shipped in its original container, will be free from defective workmanship and materials, and agrees that it will, at its option, either repair the defect or replace the defective Product or part thereof with a new or remanufactured equivalent at no charge to the purchaser for parts or labor for the period(s) set forth below.