MANUAL Conti-Dryer CD 25-600 Serial No. ................... ISO 08.01.02.12.GB 986041 Rev.
Rev.February 1996 Conti-Dryer CD 25-600 Page 1 1.0 CONTENTS 2.0 GENERAL INFORMATION 3 2.1 2.2 2.3 2.4 2.5 2.6 Use Limitations Construction Standards, directives, instructions etc. used Operating principles Certificates 3 3 4 5 5 6 3.0 TECHNICAL DATA 8 3.1 3.2 3.3 3.4 3.5 3.6 Technical specifications Typeplate Dimensioned sketches Capacity table Security measures Noise level 8 9 10 12 13 14 4.0 ASSEMBLY / DISASSEMBLY 15 4.1 4.2 4.3 4.4 4.5 4.6 4.7 4.
Rev.February 1996 Conti-Dryer CD 25-600 Page 2 7.0 TROUBLESHOOTING 28 7.1 7.2 7.3 The machine does not start/dies The machine runs, but heats insufficiently The machine dries insufficiently (temperature ok) 28 28 30 8.0 REPAIR 31 8.1 Replacement of heater 31 9.0 INDEX 10.0 SPARE PARTS NB! All electrical diagrams can be found in the pocket in the back of the manual.
Rev.February 1996 2.0 GENERAL INFORMATION 2.1 Use Conti-Dryer CD 25-600 Page 3 The Conti-Dryer CD is a hot air dryer designed for drying of free-flowing plastics raw material in the form of granules. The Conti-Dryer is able to dry in batches or continuously. 2.2 Limitations The Conti-Dryer CD operates on ambient air. The final residual humidity that is obtainable will therefore always depend on the ambient temperature and relative humidity.
Rev.February 1996 2.
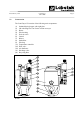
Rev.February 1996 2.4 Conti-Dryer CD 25-600 Page 5 Standards, directives, instructions etc. used EN - 60204 - 1 / IEC - 204 – 1 IEC – 529 AT - instruction no. 2.2.0.1 of October 1990 Directive no. 73/23/EEC (low tension directive) Directive no. 89/336/EEC changed by directive no. 92/31/EEC (EMC-directive). Directive no. 89/392/EEC changed by directive no. 91/368/EEC (machine directive). 2.5 Operation principles When the machine is turned on the blower (7) starts.
Rev.February 1996 2.6. Certificates 2.6.
Rev.February 1996 2.6.
Rev.February 1996 3.0 TECHNICAL DATA 3.1 Technical specifications Conti-Dryer CD 25-600 Conti-Dryer Page 8 CD CD CD CD CD CD CD 25 50 90 180 350 500 600 Supply voltage 3 x 220/380/415/440 V 3 x 380/415/440 V 50-60 Hz 50-60 Hz Control voltage 24 V via transformator 24 Volt AC via transformer Total load, kW 1.87/ 2.87/ 6.1/ 7.5/ 12.2/ 18.0/ 19.0/ 1.95 2.93 6.3 7.8 12.5 18.6 19.6 Blower motor 50/60 Hz 0.37/ 0.37/ 1.1/ 1.5/ 2.2/ 4.0/ 4.0/ 0.43 0.43 1.3 1.8 2.5 4.6 4.6 Heater, kW 1.5 2.
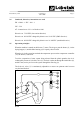
Rev.February 1996 3.2 Conti-Dryer CD 25-600 Page 9 Typeplate The typeplate is located on the side of the control containing all electrical data for connections. The serial number consists of a code (A)(B), a type number (C) and a serial number (D). 3.2.1 Code (A) and (B): The first and last digit (A) in the code indicate the year in which the machine was produced. E.g. 9ST5 = 1995. The two middle letters (B) in the code indicate whether the machine is a standard model or not.
Rev.February 1996 3.3 Dimensioned sketches All measurements in mm.
Rev.
Rev.February 1996 43 36 36 86 72 72 168 140 140 240 288 200 240 200 240 7.5 15 27 54 105 150 180 80 7 13.5 24 48 93 133 160 2.25 120 7 13.5 24 48 93 133 160 2.25 65-70 7 13.5 24 48 93 133 160 2.25 2.25 2.75 2.75 80 120 75 120 7 13.5 24 6 12 21.5 5.5 11 19.5 5.5 11 19.5 48 43 39 39 93 84 76 76 133 160 120 144 109 131 109 131 3.0 3.0 3.25 75 100 80 1.0 5 5 4.5 10 10 9 18 18 16.5 36 36 33 70 70 65 100 120 100 120 92 111 3.25 3.25 75-85 90 1.0 4.5 4.
Rev.February 1996 Conti-Dryer CD 25-600 Page 13 Drying temperatures and times are directive only, as these can vary from one producer to another. Therefore it is advisable always to check with the supplier of the relevant raw material. The capacities stated are obtained at an ambient temperature of 20° C and a relative humidity of 65% under which conditions a final moisture content of 0.04% is obtainable.
Rev.February 1996 3.5.4. Conti-Dryer CD 25-600 Page 14 Heater (see fig. 2.3) At operation at high temperatures the filter housing (4) and the heater (3) are able to reach extremely high temperatures. Signs warning against high-temperature condition are placed accordingly. 3.
Rev.February 1996 4.0 ASSEMBLY / DISASSEMBLY 4.1 Assembly Conti-Dryer CD 25-600 Page 15 The Conti-Dryer is designed for assembly directly on the processing machines replacing the machine hopper. If the Conti-Dryer flange does not match the hopper flange on the processing machine, it is necessary to make an intermediate flange. 4.1.1 Assembly flange The Conti-Dryer is supplied fully equipped. The machine is lifted in the transversed lifting fixture (10) on the frame, as shown in the sketch.
Rev.February 1996 4.1.2 Conti-Dryer CD 25-600 Page 16 Assembly of Con-Evator The lid (2) on the machine features a cutting and a flange for assembly of a Con-Evator vacuum conveyor (11) type PGT. 1. Disassemble the cover plate (12) on CD lid. 2. Fix the vacuum conveyor (11) bolt holes matching on the lid, using 4 bolts M8. R1630 The below table indicates which types of Labotek vacuum conveyors that can be fitted on CD.
Rev.February 1996 4.2 Conti-Dryer CD 25-600 Page 17 Disassembly If it is required to disassemble the Conti-Dryer, all material must be discharged first. Power must be disconnected, and Con-Evator, if attached, disassembled. The Conti-Dryer can now be handled in the lifting fixture (10). See fig. 4.1.1 4.3 Connections 1. Check that the voltage available correspond to the voltage requirement indicated on the typeplate. The typeplate is located on side of the control (see point 3.1). 2.
Rev.February 1996 4.4 Control 4.4.1 Control buttons Conti-Dryer CD 25-600 Page 18 (13) Temperature controller (14) Fuse (15) Diode - power on (16) Diode - overtemperature (17) Diode - motor overloaded (18) Main switch On CD 25-180 units the whole control box can be tilted to an angle of 90 degrees thus providing easy access to all front components. On CD 350-600 units the control front plate is integrated in the cabinet. Access to components via side door in cabinet. 4.4.
Rev.February 1996 Conti-Dryer CD 25-600 Page 19 Diode, overtemperature (23) Diode giving signal if current temperature is 12° C (35°F) above/below set temperature. 4.5 Adjustment 1. Adjust required drying temperature on the temperature controller (13) 2. Adjust air intake on top of the filter by turning the fresh air valve (5). Maximum = full fresh air intake Minimum = lowest air intake and major recirculation share As a start the fresh air valve is adjusted in the middle of the interval.
Rev.
Rev.February 1996 4.7.1 Conti-Dryer CD 25-600 Page 21 Change of material The stop/start procedure applies to change of material also. At change of material it is recommended to clean out dust and regrind from the hopper. Remaining granulate can be removed by opening the slide valve. Dust can be removed by opening the lid or by disassemble the sight glass and clean out using compressed air - the discharge valve (31) must be kept open during this procedure. 4.8 Stop 1.
Rev.February 1996 5.0 Conti-Dryer CD 25-600 Page 22 ACCESSORIES The following standard accessory is available to the machine. Labotek will always be at your disposal on development of special parts. 5.
Rev.February 1996 Conti-Dryer CD 25-600 Page 23 5.2 Assembly of accessories 5.2.1 Assembly of mounting base (26)(see fig. R1637 section 5.1) The mounting base, featuring a sight glass and a magnet grid, is fitted to avoid magnetic particles in the raw material from entering the screw of the production machine, or when it is required to add masterbatch or other additives. The mounting base is as standard equipped with a manually operated slide valve. A pneumatic one is also available. 1.
Rev.February 1996 5.2.3 Conti-Dryer CD 25-600 Page 24 Assembly of conveyor Con-Evator PGT (11). The conveyor Con-Evator PGT will automatically keep the drying hopper full, thus creating an even flow of material in the drying hopper, corresponding to the material consumption in the production. Assembly, see section 4.1.2 5.2.4 Level control + alarm lamp (38a) (38b) The machine is not factory prepared for this accessory which must be fitted by an authorized Labotek technician.
Rev.February 1996 Conti-Dryer CD 25-600 6.0 MAINTENANCE 6.1 Maintenance of filters Page 25 The CD features the following filters: Designation Type of filter Check-up intervals Check-up procedure Intake filter (8) Wire mesh As required Check-up and clean using air. At insufficient result, wash the filter. Recirculation filter (81) Cartridge (paper) As required Recommendation: 50 hours Check-up and clean using air.
Rev.February 1996 6.2 Conti-Dryer CD 25-600 Page 26 Maintenance of magnet grid (accessory) The magnet grid (25) is placed in the mounting base (26)(accessory). The grid automatically picks up magnetic material, thus avoiding damage of screw of production machine. Inspect magnet grid at least once a year. 1. Close slide valve (24) 2. Remove finger screw (27) on glass lid. Warning: The granulate in the bottom of the hopper may be warm. 3. Remove magnet grid (25) and clean it using e.g.
Rev.February 1996 6.3 Conti-Dryer CD 25-600 Page 27 Maintenance of drying hopper 1. Turn off the machine and discharge the drying hopper (1) as at change of material. 2. Open lid (2), disassemble and remove air distributor (30) being mounted by means of a quick coupling (28). (On CD 25 the air distributor is assembled by means of a split pin). 3. Disassemble sight glass (29). 4. Close slide valve (24).
Rev.February 1996 7.0 TROUBLESHOOTING 7.1 The machines does not start / dies Conti-Dryer CD 25-600 Page 28 Signal: green light does not light up Cause Remidial action 1. No power Check main connections / fuse 2. Fuse on PCB defective Replace 3. Circuit breaker overload OFM1 for motor cut out Reset QFM1 (see 6.1) 4. Fuses on primary side of transformator cut out Replace FU1/FU2 5.
Rev.February 1996 Conti-Dryer CD 25-600 Page 29 Temperature controller defective Replace Thermistor defective Replace Control PCB etc. defective Replace B. Signal: Green lamp lights up + green diode on temperature controller Cause Remidial action The temperature controller does not activate the heater 1. Circuit breaker overload for heater cut out Reset QFM2. At recurrences call for a repairman. 2. Temperature controller defective Replace 3.
Rev.February 1996 7.3 Conti-Dryer CD 25-600 Page 30 The machine dries insufficiently (temperature ok) Signal: Finished products show surface defects due to humidity Cause Remidial action 1. Use of additives Additives can make it almost impossible to dry plastics raw naterial. Check with your raw material supplier. Check material consumption and drying time. Compare to capacity table. If capacity is too low, replace to a larger CD type. 2. Consumption too big and/or drying time too short 3.
Rev.February 1996 8.0 REPAIR 8.1 Replacement of heater Conti-Dryer CD 25-600 Page 31 1. Turn off power to the machine. 2. Remove cover (93) of casing (85) 3. Disassemble wires to heater (3) and label accordingly. Then disassemble housing (85), on which the fire protection (83) is assembled, by loosening the three screws (84). 4. Unscrew heater of heater pipe (32) 5. Pick up new heater, and pull carefully the bars a little from eachother.
Rev.