
Owner manual


AR-5127 UNPACKING AND INSTALLATION 5 - 1
[5] UNPACKING AND INSTALLATION
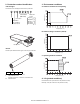
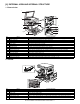
1. Removal of protective material and fixing
screw
1) Remove all tapes, then open the document cover and remove the
protective material of sheet shape.
2) Remove the fixing screw using a coin.
The fixing screw is required when transporting the machine. Keep
it in the tray. (Refer to the later description.)
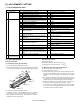
2. Removal and storage of fixing pin
1) Lift the knob and gently pull out the tray.
2) Hold the paper pressure plate and turn the fixing pin in the arrow
direction.
3) Store the removed fixing pin and the fixing screw which was
removed in the above procedure, together in the specified storage
place in the tray.
∗
If power is turned don without removing the fixing pin, it will be diffi-
cult to pull out the tray.
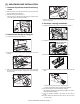
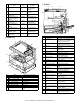
3. Developer cartridge installation
1) Hold the both sides of the front cover, and pull down to open it.
2) Loosen the screw and remove the developer cartridge.
3) Remove the developer tank from the developer cartridge.
4) Supply developer into the developer tank while rotating the MG
roller.
∗
Shake the developer bag enough before opening it.
∗
Check to insure that the hook is engaged in two positions.
5) Attach the developer tank to the developer cartridge.
After supplying developer into the developer cartridge, do not tilt or
shake the developer cartridge.
6) Attach the developer cartridge to the copier, and fix it with the
screw.
Note: When replacing the OPC drum with a new one, be sure to clear
the drum count.
Fixing pin
Fixing screw
TD cartridge lock
release lever
Hook