
Owner manual


AR-5127 ADJUSTMENTS 7 - 9
∗
When the lens unit is moved, execute the OC main scanning magni-
fication ratio auto adjustment, SIM 48-1-1, SIM48-3 and the SPF
original off-center adjustment.
∗
This adjustment is basically O.K. with SIM 63-7.
(16) SPF scan position auto adjustment
[Function]
Used to adjust the SPF scan position automatically.
[Operation]
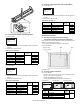
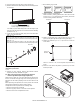
1) With the SPF or the OC cover open, place a chart of black back-
ground on the OC glass. (In the SPF standard model, the SPF
glass surface is included.)
∗
Use a black chart (UKOG-0011QSZZ) or prepare a chart as shown
below.
Chart size: 310 x 470, prepared with cutting sheet No. 791 (Black) or
an equivalent one.
2) Enter SIM53-08, and press [START] button.
Outline of SIM: The optical unit is shifted to recognize the bound-
ary between the OC glass and the SPF glass cover.
With the same position as the reference, the SPF scan position is
automatically adjusted.
<Note>
• After completion of the SPF scan position auto adjustment, the SPF
lead edge adjustment must be executed. (Both surfaces)
• There must be no other sheet than the black chart on the glass sur-
face.
• Especially when in SPF scan, the center area is scanned in the main
scan direction. Be careful to prevent external light from entering the
scan area.
3) Check that the lead edge is not shifted. (Both surfaces)
(If the original lead edge adjustment has been made properly, even
when the scan position is shifted, it is followed automatically.)
4) Change the adjustment value of the SPF scan end position.
(Change the adjustment value of SIM50-6-3 from 50 to 36.)
Change the number of steps for Pin off – scan end position from
1,014 to 986.
Be sure to execute this adjustment because an image may be cut
off during FAX transmission though copying is normally performed.
5) Change the initial value of the SPF exposure adjustment (SIM46-
20) from 50 to 53.
(For the CCD exposure adjustment with SPF, use the value of the
OC adjustment value +3.)
There are suffixes of –1 SPF and –2 SPF. Change each of them.
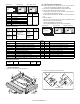
C. Image density (exposure) adjustment
(1) Copy mode (SIM46-2)
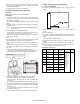
1) Set a test chart (UKOG-0162FCZZ) on the OC table as shown
below.
2) Place three or more sheets of A3 (11" x 17") paper on the test
chart.
3) Execute SIM 46-2.
4) After warm-up, shading is performed and the current set value of
the density (exposure) level is displayed on the display section in 2
digits.
For mode selection, use the [10-key].
5) Change the set value with the [10-key] to adjust the copy image
density.
6) Make a copy and check that the specification below is satisfied.
Note: Place originals in the rear reference, and the test chart in the
front reference when adjusting the exposure.
<Adjustment specification>
Reason: To prevent erroneous detection by disturbing light of a fluo-
rescent lamp, etc.
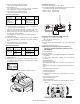
Place only the black
chart on the OC glass.
For the SPF standard-provision
machine, check that the black
chart covers the SPF glass.
Placing the black chart
The black chart must cover
this area.
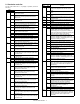
Density
mode
Display
Lamp
Exposure
level
Sharp Gray
Chart output
Set value
Setting
range
AUTO AUTO
–
"3" is
copied.
If too bright,
increase the
quantity
displayed on
the copy
quantity
display.
If too dark,
decrease the
quantity
displayed on
the copy
quantity
display.
0 – 99
TEXT TEXT
3
"3" is
copied.
TEXT/
PHOTO
TEXT/
PHOTO
3
"3" is
copied.
PHOTO PHOTO
3
"3" is
copied.
SUPER
PHOTO
SUPER
PHOTO
3 Disabled
TONER
SAVE
AUTO (TS)
3
"3" is
copied.
TEXT (TS)
3
"3" is
copied.
TEXT
PHOTO (TS)
3
"3" is
copied.
Rear
Front