
Owner manual


AR-5127 SIMULATION 8 - 31
Operation/procedure
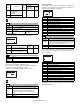
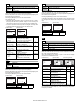
Select the mode with the arrow keys, enter the adjustment value with
the 10-key, and press the [OK] key.
When the [START] key is pressed, a print is made and the display
returns to the mode selection menu.
Setup of various copy conditions: Similar to the normal copy mode.
Use of [SPECIAL FUNCTION] key, [JOB STATUS] key, and [INTERRUPT] key is inhibited.
Operation/procedure
Select the mode with the arrow keys, enter the adjustment value with
the 10-key, and press the [OK] key.
When the [START] key is pressed, a print is made and the display
returns to the mode selection menu.
Setup of various copy conditions: Similar to the normal copy mode.
Use of [SPECIAL FUNCTION] key, [JOB STATUS] key, and [INTER-
RUPT] key is inhibited.
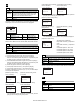
50
50-1
Purpose Adjustment
Function
(Purpose)
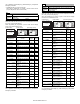
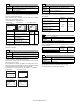
Used to adjust the copy lead edge position.
Item Picture quality Image position
(Initial screen) (Input screen) (Executing screen)
Sim50-1 LEAD EDGE
1:RRC-A 43
2:RRC-B 18
3:RRC-MANUAL 18
1/4 [ 1- 99] 43
Display items Content
Setting
range
Default Remark
1:RRC-A
Original scan start position adjustment 1-99 43 Tray selection: Made by user.
2:RRC-B
Lead edge cancel adjustment (Main cassette) 1-99 18 Tray selection: Main cassette is specified.
3:RRC-MANUAL
Lead edge cancel adjustment (Manual feed cassette) 1-99 18 Tray selection: Manual feed cassette is
specified.
4:RRC-OPTION
Lead edge cancel adjustment (Option cassette) 1-99 18 Tray selection: 2nd cassette is specified.
5:RRC-DUPLEX
Lead edge cancel adjustment (back of the machine) 1-99 18 Tray selection: Made by user.
6:DEN-B
Rear edge void adjustment 1-99 30 Tray selection: Made by user.
7:DEN-B-DUP
Rear edge void adjustment (Duplex) 1-99 50 Tray selection: Made by user.
8:SIDE VOID
Left edge void adjustment (First print surface) 1-99 18 Tray selection: Made by user.
9:SIDE VOID-DUP
Left edge void adjustment (Duplex) 1-99 18 Tray selection: Made by user.
10:LOSS(OC)
Image loss quantity adjustment 1-5 3 Tray selection: Made by user.
50-5
Purpose Adjustment
Function
(Purpose)
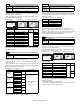
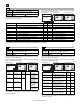
Used to adjust the print image position (top margin) on
the print paper in the print mode.
Item Picture quality Print area
(Initial screen) (Input screen) (Executing screen)
Display
items
Content
Setting
range
Default Remark
1:TRAY1
1st cassette 0-99 53 Tray selection:
1st cassette is
specified.
2:OPTION
Option cassette 1-99 Tray selection:
2nd cassette is
specified.
3:MANUAL
Manual feed Tray selection:
Manual feed
cassette is
specified.
4:DUPLEX
Back print Tray selection:
Made by user.
Sim50-5 PRINT EDGE
1:TRAY1 50
2:OPTION 50
3:MANUAL 50
1/2 50
50-6
Purpose Adjustment
Function
(Purpose)
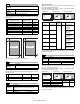
Used to adjust the print image position (top margin) on
print paper in the copy mode. (SPF/RSPF)
Item Picture quality Image position
(Initial screen) (Input screen) (Executing screen)
Display items Content
Setting
range
Default
1:SIDE1
Surface original scan start
position adjustment value
1-99 50
2:SIDE2
Back original scan start
position set value
1-99 50
3:END EDGE
Rear edge void
adjustment value (SPF)
1-99 36
4:LOSS(SIDE1)
Surface image loss
quantity set value
1-5 3
5:LOSS(SIDE2)
Back image loss quantity
set value
1-5 3
6:REARLOS(SIDE1)
Surface rear edge image
loss quantity set value
1-5 3
7:REARLOS(SIDE2)
Back rear edge image
loss quantity set value
1-5 3
Sim50-6 SPF EDGE
1:SIDE1 50
2:SIDE2 50
3:DEN-B 50
1/4 50