
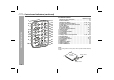
Specifications


9
DK-A10H
DK-A10H(BK)
Preparation for Use
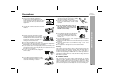
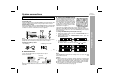
System connections
Aerial connection
Note:
Placing the aerial on the unit or near the AC power lead may cause noise
pickup. Place the aerial away from the unit for better reception.
Installing the AM loop aerial:
External FM aerial
Use an external FM aerial if you require better reception.
Consult your dealer.
Note:
When an external FM aerial is used, disconnect the supplied FM
aerial wire.
This product is not equipped with a span selector. However, it will be
adjusted to a 9 kHz AM (50 kHz FM) interval when shipped from the factory.
Before using the unit, be sure to set it to the AM/FM tuning interval (span)
used in your area.
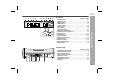
To change the AM/FM tuning interval (main unit only):
Note:
The AM/FM tuning interval will not change unless you press the
button within 6 seconds.
Caution:
When the unit is left for a few days after the span has been changed and
the AC power lead disconnected, the AM span will be automatically
returned to 9 kHz (FM span to 50 kHz). If this happens, set the span again.
When the span is changed, all the memorised stations will be cancelled.
This operation can not operate when alarm is activated.
Deactivate the alarm first. (refer page 30)
Make sure to unplug the AC power lead before any connections.
Supplied FM aerial:
Connect the FM aerial wire to the FM 75 OHMS socket and position the FM
aerial wire in the direction where the strongest signal can be received.
Supplied AM loop aerial:
Connect the AM loop aerial to the AM and GND terminals. Position the AM
loop aerial for optimum reception. Place the AM loop aerial on a shelf, etc.,
or attach it to a stand or a wall with screws (not supplied).
< Assembling > < Attaching to the wall >
Wall Screws (not supplied)
External
FM aerial
75 ohms
coaxial cable
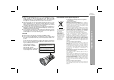
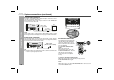
Setting the FM/AM interval
The International Telecommunication Union
(ITU) has established that member coun-
tries should maintain either a 10 kHz or 9
kHz interval between broadcasting frequen-
cies of AM stations and 100 kHz or 50 kHz
for FM stations. The illustration shows the
50/9 kHz zones (regions 1 and 3), and the
100/10 kHz zone (region 2).
1 During demonstration mode, press the E SOUND/DEMO button to
enter the stand-by mode.
2 Whilst holding down the SNOOZE/DIMMER button, press the
ON/STAND-BY button.
3 Within 6 seconds, press the or button to select the interval
(span) in your area.
The display switches each time you press the or button.
4 Within 6 seconds, press the button.
The unit will enter the power stand-by mode automatically.