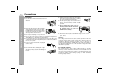
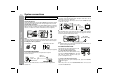
Thank you for purchasing this SHARP product. To obtain the best performance from this product, please read this manual carefully. It will guide you in operating your SHARP product. MUSIC SYSTEM FOR iPod® MODEL DK-A1 DK-A1BK N FUNCTIO CLOCK VOL / SNOOZER DIMME ALARM SLEEP Y DISPLA E SOUND /DEMO PLAY MODE EQ TUNING CLEAR MEMOR Y The illustrations printed in this operation manual are for the model DK-A1. Accessories OPERATION MANUAL Please confirm that the following accessories are included.
DK-A1 DK-A1BK SPECIAL NOTES Important Instruction CAUTION: TO REDUCE THE RISK OF ELECTRIC SHOCK, DO NOT REMOVE COVER (OR BACK). NO USER-SERVICEABLE PARTS INSIDE. REFER SERVICING TO QUALIFIED SERVICE PERSONNEL.
IMPORTANT SAFETY INSTRUCTIONS Electricity is used to perform many useful functions, but it can also cause personal injuries and property damage if improperly handled. This product has been engineered and manufactured with the highest priority on safety. However, improper use can result in electric shock and/or fire. In order to prevent potential danger, please observe the following instructions when installing, operating and cleaning the product.
Important Instruction DK-A1 DK-A1BK IMPORTANT SAFETY INSTRUCTIONS (continued) 18) Damage Requiring Service - Unplug this product from the wall outlet and refer servicing to qualified service personnel under the following conditions : a) When the AC cord or plug is damaged, b) If liquid has been spilled, or objects have fallen into the product, c) If the product has been exposed to rain or water, d) If the product does not operate normally by following the operating instructions.
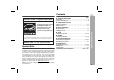
Contents ® General Information DK-A1 DK-A1BK Page ENERGY STAR Program Information Precautions . . . . . . . . . . . . . . . . . . . . . . . . . . . . . . . . . . . . . . . . . 6 Controls and indicators . . . . . . . . . . . . . . . . . . . . . . . . . . . . .7 - 9 Products that have earned the ENERGY STAR® are designed to protect the environment through superior energy efficiency. System connections . . . . . . . . . . . . . . . . . . . . . . . . . . . . . . . . . 10 Remote control . . . . . . . . .
DK-A1 DK-A1BK Precautions General General Information Use the unit on a firm, level surface free from vibration. 6 Keep the unit away from direct sunlight, strong magnetic fields, excessive dust, humidity and electronic/electrical equipment (home computers, facsimiles, etc.) which generate electrical noise. Do not place anything on top of the unit. Do not expose the unit to moisture, to temperatures higher than 140˚F (60˚C) or to extremely low temperatures.
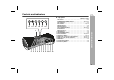
Controls and indicators DK-A1 DK-A1BK 13 14 15 16 17 18 1 Reference page 1. iPod Dock . . . . . . . . . . . . . . . . . . . . . . . . . . . . . . . . . . . . . . . 15 2. POWER ON/STAND-BY Button . . . . . . . . . . . . . . . . 12, 17, 23 3. Clock Button . . . . . . . . . . . . . . . . . . . . . . . . . . . . . . . . . . . . . 13 4. iPod Button . . . . . . . . . . . . . . . . . . . . . . . . . . . . . . . . . . . 14, 15 5. Alarm Indicator . . . . . . . . . . . . . . . . . . . . . . . . . . . . . . .
DK-A1 DK-A1BK Controls and indicators (continued) 1 2 3 4 5 6 7 General Information The model name/serial no.label (*) Reference page 1. Alarm Indicator . . . . . . . . . . . . . . . . . . . . . . . . . . . . . . . . . . . 19 2. Sleep Indicator . . . . . . . . . . . . . . . . . . . . . . . . . . . . . . . . . . . 20 3. iPod Indicator . . . . . . . . . . . . . . . . . . . . . . . . . . . . . . . . . . . . 14 4. Aux Indicator . . . . . . . . . . . . . . . . . . . . . . . . . . . . . . . . . . . .
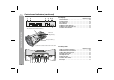
DK-A1 DK-A1BK 9 1 2 FUNCTION 3 CLOCK VOL SLEEP SNOOZE/ DIMMER ALARM 4 DISPLAY 5 E SOUND /DEMO 6 PLAY MODE TUNING CLEAR 7 MEMORY 8 EQ 10 11 12 13 14 15 16 17 18 Reference page 1. Remote Control Transmitter . . . . . . . . . . . . . . . . . . . . . . . . 11 2. Function Button . . . . . . . . . . . . . . . . . . . . . . . . . . . . . . . . . . 12 3. On/Stand-by Button . . . . . . . . . . . . . . . . . . . . . . . . . 11, 12, 17 4. Volume Up and Down Buttons . . . . . . . . . . . . . . . . . .
DK-A1 DK-A1BK System connections Make sure to unplug the AC power cord before any connections. Antenna connection Supplied FM antenna: Connect the FM antenna wire to the FM 75 OHMS jack and position the FM antenna wire in the direction where the strongest signal can be received. Supplied AM loop antenna: Connect the AM loop antenna to the AM and GND terminals. Position the AM loop antenna for optimum reception. Place the AM loop antenna on a shelf, etc.
Remote control DK-A1 DK-A1BK Battery installation This product contains a CR Coin Lithium Battery which contains Perchlorate Material – special handling may apply. California residents, see www.dtsc.ca.gov/hazardouswaste/perchlorate/ 1 While pushing the locking tab toward the center of the remote control, slide out the battery holder. Back of remote control Notes concerning use: Replace the battery if the operating distance is reduced or if the operation becomes erratic.
DK-A1 DK-A1BK General control E SOUND control The special sound created to enhance iPod sound as sound been produced by CD-Audio quality. When the E SOUND/DEMO button is pressed, the current mode setting will be displayed. To change the setting, press the E SOUND/ DEMO button repeatedly to toggle ON or OFF. When ON is selected, the unit will enter the E SOUND mode and adjust low bass and high frequency automatically according to volume input.
Setting the clock DK-A1 DK-A1BK 4 iPod AUX TUNER CLOCK ALARM ALARM ON/OFF SNOOZE Press the or button to adjust the minutes and then press the CLOCK button. Press the or button once to advance the time by 1 minute. Hold it down to change the time in 5-minutes interval. DIMMER To confirm the time display: [When the unit is in the stand-by mode or in demonstration mode.] Press the CLOCK button to enter the clock function. 1 2 Press the CLOCK button for more than 2 seconds.
DK-A1 DK-A1BK Listening to the iPod Supported iPod models: iPod nano (software 1.0 above) iPod photo (software 1.0 above) iPod mini (software 1.2 above) 5th Generation iPod (software 1.0 above) (Dock connector equipped Click Wheel model) 4th Generation iPod (software 3.0.2 above) (Dock connector equipped Click Wheel model) 3rd Generation iPod (software 2.2 above) (Dock connector equipped Click Wheel model) iPod Caution: Please update your iPod unit to the latest software version before using it.
DK-A1 DK-A1BK To remove iPod adaptor 1. Push the iPod sliding door until end. Hold this tip and pull as direction shown to remove adaptor. EQ AUX + E SO UN UN iPod playback 2. Insert the iPod adaptor into unit and connect your iPod. iPod iPod (bottom) Dock connector 1 2 Press the ON/STAND-BY button to turn the power on. 3 Open the iPod terminal door and insert iPod unit in iPod dock of main unit.
DK-A1 DK-A1BK Listening to the iPod (continued) Various iPod functions Function Main unit Remote control Play Press in the pause mode. Pause Press in the playback mode. Track up/ down iPod Operation Press in the playback or pause mode. If you press the button in the pause mode, press the / button to start the desired track. Press and hold down in the playback mode. Release the button to resume playback. Fast forward/ reverse Display ____ iPod back light ON.
Listening to the radio DK-A1 DK-A1BK Tuning iPod AUX TUNER CLOCK SNOOZE ALARM ON/OFF 1 2 Press the ON/STAND-BY button to turn the power on. 3 Press the TUNING ( or ) button on remote control to tune in to the desired station. Press the TUNER button on main unit or FUNCTION button on remote control repeatedly to select the desired frequency band (FM or AM). Manual tuning: Press the TUNING ( or ) button as many times as required to tune in to the desired station.
DK-A1 DK-A1BK Listening to the radio (continued) Memorizing a station Radio You can store 40 AM and FM stations in memory and recall them at the push of a button. (Preset tuning) 1 2 Perform steps 1 - 3 in “Tuning” on page 17. 3 Within 1 minute, press the or button to select the preset channel number. Store the stations in memory, in order, starting with preset channel 1. 4 Within 1 minute, press the MEMORY button on remote control to store that station in memory.
Alarm and sleep operation DK-A1 DK-A1BK 1 Check that the clock is set to the correct time (refer page 13). If it is not set, you cannot use the alarm function. 2 For iPOD playback: insert iPod to the unit. (refer page 15) 3 For TUNER: Set preset memory. (refer page 18) Setting the alarm content 1 2 Press and hold the ALARM button for more than 2 seconds. Press the or button to select source or buzzer. Press the ALARM button. 3 If TUNER is selected, press the or button to select a preset station.
DK-A1 DK-A1BK Alarm and sleep operation (continued) Sleep operation The radio and iPod can be turned off automatically. Advanced Features 1 2 20 Play back the desired sound source. Press the SLEEP button on remote control to select sleep time. To confirm the remaining sleep time: 1 While “SLEEP” is indicated, press the SLEEP button once to select “SLEEP XXX”. “XXX” is sleep remaining time. The remaining sleep time is displayed for about 10 seconds.
Enhancing your system DK-A1 DK-A1BK Listening to the playback sounds from VCR, DVD, etc. The connection cord is not included. Purchase a commercially available cord as shown below. 1 White To the line output jacks White Red 2 3 Press the ON/STAND-BY button to turn the power on. 4 Play the connected equipment. Press the AUX button on main unit once or press the FUNCTION button on remote control repeatedly to select AUX.
DK-A1 DK-A1BK Troubleshooting chart Many potential problems can be resolved by the owner without calling a service technician. If something is wrong with this product, check the following before calling your authorized SHARP dealer or service center. General Symptom The clock is not set to the correct time. References When a button is pressed, the unit does not respond. No sound is heard. Possible cause Is the ST switch set to the correct setting? Did a power failure occur? Reset the clock.
Specifications 2 3 Press the ON/STAND-BY button to enter the power stand-by mode or demonstration mode. While pressing down the SNOOZE/DIMMER button and the E SOUND button, press the POWER ON/STAND-BY button until “CLEAR ALL” appears. Can be operate on main unit only. Caution: This operation will erase all data stored in memory including clock, alarm settings and tuner preset. Before transporting the unit Remove the iPod from the unit. Then, set the unit to the power standby mode.
z CONSUMER LIMITED WARRANTY SHARP ELECTRONICS CORPORATION warrants to the first consumer purchaser that this Sharp brand product (the “Product”), when shipped in its original container, will be free from defective workmanship and materials, and agrees that it will, at its option, either repair the defect or replace the defective Product or part thereof with a new or remanufactured equivalent at no charge to the purchaser for parts or labor for the period(s) set forth below.