Thank you for purchasing this SHARP product. To obtain the best performance from this product, please read this manual carefully. It will guide you in operating your SHARP product. MUSIC SYSTEM FOR iPod MODEL DK-AP2 DK-AP2(BK) OPERATION MANUAL iPod is a trademark of Apple Inc., registered in the U.S. and other countries. The illustrations printed in this operation manual are for the model DK-AP2.
Important Instruction DK-AP2 DK-AP2(BK) Special notes WARNINGS When the ON/STAND-BY button is set at STAND-BY position, mains voltage is still present inside the unit. When the ON/STAND-BY button is set at STAND-BY position, the unit may be brought into operation by the remote control. This unit contains no user serviceable parts. Never remove covers unless qualified to do so.
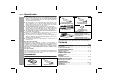
Precautions DK-AP2 DK-AP2(BK) General 10 cm (4") DC IN 6V VIDEO OUT AUX IN 10 cm (4") Use the unit on a firm, level surface free from vibration. Hold the AC power plug by the head when removing it from the wall socket, as pulling the lead can damage internal wires. The AC power plug is used as disconnect device and shall always remain readily operable. Do not remove the outer cover, as this may result in electric shock. Refer internal service to your local SHARP service facility.
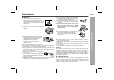
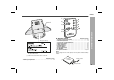
DK-AP2 DK-AP2(BK) Controls and indicators Top view Reference page 1. Power Indicator . . . . . . . . . . . . . . . . . . . . . . . . . . . . . . . . . . 6, 8 2. E SOUND Indicator . . . . . . . . . . . . . . . . . . . . . . . . . . . . . . . . . 8 3. Skip Down Button . . . . . . . . . . . . . . . . . . . . . . . . . . . . . . . . 11 4. Play/Pause Button . . . . . . . . . . . . . . . . . . . . . . . . . . . . . 10, 11 5. Skip Up Button . . . . . . . . . . . . . . . . . . . . . . . . . . . . . . . . . . .
DK-AP2 DK-AP2(BK) 6 2 7 3 8 9 10 4 5 Remote control The spec label (*) DK-AP2 MUSIC SYSTEM DC IN 6V 2000mA 3V (UM-3 / SUM-3, R6 / AA) X4 [DO NOT USE UN-SPECIFIED AC ADAPTOR---] The spec label illustration may be different from the actual label used. (*) Label is located at the bottom of the unit. Bottom view Reference page 1. Battery Compartment . . . . . . . . . . . . . . . . . . . . . . . . . . . . . . 7 Reference page 1. Remote Control Transmitter . . . . . . . . . . . . . . . . . . . . . . .
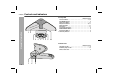
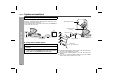
DK-AP2 DK-AP2(BK) System connections Make sure to unplug the AC power lead before any connections. Connecting iPod to TV iPod photo and 5th Generation iPod with photo and video can be viewed by connecting to TV/monitor. If the TV/monitor has a video input, connect it to the VIDEO OUT socket at the side of the unit.
DK-AP2 DK-AP2(BK) 1 Disconnect the AC/DC adaptor, and open the battery compartment. 2 Insert 4 “AA” size batteries (UM-3, R6 or similar) into the battery compartment. 1 + 3 + 2 4 + + “AA” size batteries (UM-3, R6 or similar) are not included. Battery Insertion: Slide in batteries 1 and 3. Then push batteries 2 and 4 towards . Battery removal: Push batteries 2 and 4 towards and remove the batteries before sliding out batteries 1 and 3. 3 4 Close the battery compartment.
DK-AP2 DK-AP2(BK) General control Remote control (continued) Notes concerning use: Replace the battery if the operating distance is reduced or if the operation becomes erratic. Purchase “CR 2025”, coin lithium battery. Periodically clean the transmitter on the remote control and the sensor on the unit with a soft cloth. Exposing the sensor on the unit to strong light may interfere with operation. Change the lighting or the direction of the unit if this occurs.
Listening to the iPod Caution: Please update your iPod unit to the latest software version before using it. Please visit Apple’s homepage to download the latest version for your iPod. Notes: Once the iPod is connected to the unit it will begin charging when AC/DC adaptor is used. The iPod unit cannot be charged whilst the main unit is in the stand-by mode or when batteries are used as power supply. iPod adaptor connection Choose the iPod adaptor that fits your iPod.
DK-AP2 DK-AP2(BK) Listening to the iPod (continued) To insert iPod adaptor To remove iPod adaptor 1. Insert the iPod adaptor into unit and connect your iPod. iPod (bottom) Insert the tip of a screwdriver (“-” type, small) into the iPod adaptor hole as shown and lift upward to remove. iPod Dock connector iPod playback Note: Do not connect the Audio cable to AUX IN socket during iPod playback. Otherwise, sound from the iPod will not be heard.
DK-AP2 DK-AP2(BK) Various iPod functions iPod operation The operations described below depend on the generation iPod you are using. Main unit Remote control Operation Play Press in the pause mode. Pause Press in the playback mode. Skip up/ down Press in the playback or pause mode. If you press the button in the pause mode, press the / button to start the desired track. Press and hold down in the playback mode. Release the button to resume playback.
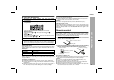
DK-AP2 DK-AP2(BK) Enhancing your system Troubleshooting chart The connection lead is not included. Purchase a commercially available lead as shown below. Many potential problems can be resolved by the owner without calling a service technician. If something is wrong with this product, check the following before calling your authorised SHARP dealer or service centre. Portable audio player General Symptom AUX IN Advanced Feature Computer When a button is pressed, the unit does not respond.
Specifications If trouble occurs When this product is subjected to strong external interference (mechanical shock, excessive static electricity, abnormal supply voltage due to lightning, etc.) or if it is operated incorrectly, it may malfunction. If such a problem occurs, do the following: 1 Set the unit to the stand-by mode and turn the power on again. 2 If the unit is not restored in the previous operation, unplug and plug in the unit, and then turn the power on.
MEMO
MEMO
SHARP CORPORATION TINSEA187AWZZ 07G R MW 1 03/11/4 DK-AP2_BACK.