
Product guide


7
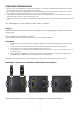
Backside 2 3 4
Fig. 2
5 6 7 8 9 10 11
2) DMX signal connector (IN) 5-pin
3) DMX signal connector (OUT) 5-pin
4) Fuse 7A
5) Menu Buttons
6) LCD Display
7) DMX LED
8) DMX signal connector (IN) 3-pin
9) DMX signal connector (OUT) 3-pin
10) Powercon
10) ON / OFF
Installation
Installing the Lamp
The Showtec Phantom uses the HMI 575 (ordercode 80901O) bulb as manufactured by all popular
manufacturers. Use only the appropriate lamp for your unit.
Note that, product versions that use other lamps, may be offered in the future. Check your product
specification label for information.
Always disconnect from electric mains power supply before changing lamps.
The lamp has to be replaced when it is damaged or deformed due to the heat.
Do not install lamps with a higher wattage! Lamps with a higher wattage generate temperatures the
device was not designed for.
Damages caused by non-observance are not subject to warranty.
Procedure :
1. Loosen the 4 screws (W, X, Y, Z) on the back of the housing.
2. Gently tilt the head so the small metal housing will slide out more easy.
3. Read lamp instructions. Do not touch the lamp bulb glass. (See Figure 3.)
Oil on hands shortens the lamp life. (If you touch the bulb glass, wipe off the glass with a clean, lint-free
towel and rubbing alcohol.).
4. Insert the lamp into the small bracket in the lamp socket. You can adjust the distance between the
lamp and the lens by turning the 4 screws (A, B, C, D) on the back of the cover.
5. Put the lamp cover back and fasten the screws snugly.
1 2 3 4 5
Fig. 3