
Quick Start Manual


E
x , x AND x RECESSED LED TROFFER INSTALLATION INSTRUCTIONS
Intended Use
The Sharp recessed LED troer is intended for retail,
hospitality, education and other commercial applications.
CaUtIon – safety statements
Warning - Do not handle energized luminaires. Always turn
o power before installing, removing, or inspecting.
Qualified licensed professionals should perform all
installation work. Installation must be completed in strict
conformance with local building and electrical codes.
Do not dis-assemble the luminaire.
Do not remove or attempt to operate without lens cover
over LED.
Warning – Do not expose wiring to edges of metal to
prevent damage.
Warning – For removal of luminaire, turn o power. Allow
luminaire to cool before handling. Reverse process of
installation for removal.
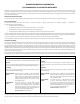
InstallatIon
. Unpack the product and remove all packing material.
. Turn o power.
. Orient luminaire, securely seat in T-bar ceiling grid. See
Figure A.
FIGURE A
FIGURE B
. Remove and retain screws
on the cover plate as shown in
Figure B. Remove knockouts on
the side. Install code approved
fittings to holes for wire
protection.
. The AC connection will be connected through one
dedicated ½ inch conduit entry. Dimmer controls must be
connected through a separate knockout. Use local code
approved twist on wire connectors. See Figure C.
DIMMER:
VIOLET, GRAY
GROUND: GREEN
AC SOURCE:
WHITE, BLACK
FIGURE C
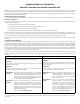
. Connections shall
follow the wiring
diagram as show in
Figure D.
DIMMER
V
GREEN
WHITE
BLACK
VIOLET
GRAY
GROUND
AC
SOURCE
-
FIGURE D
. Carefully tuck the
wires back into the
enclosure and attach
the cover plate as
shown in Figure E.
FIGURE E
DANGER - RISK OF SHOCK
DISCONNECT POWER BEFORE INSTALLATION