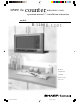
over the counter microwave oven operation manual & installation instruction models R-1200R-1201 Read all instructions carefully before using the oven.
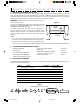
F O R C U S T O M E R A S S I S TA N C E To aid in reporting this microwave oven in case of loss or theft, please record below the model number and serial number located on the unit. We also suggest you record all the information listed and retain for future reference.
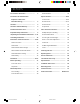
CONTENTS For Customer Assistance .......................... 2 Manual Defrost.......................................... Precautions to Avoid Possible 18 Special Features ......................................... 19-24 Exposure to Excessive Cook Center .............................................. 19-20 Microwave Energy .................................. 2 Reheat Center .......................................... 21-22 Contents ......................................................
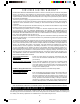
CONSUMER LIMITED WARRANTY SHARP ELECTRONICS CORPORATION warrants to the first consumer purchaser that this Sharp brand product (the “Product”), when shipped in its original container, will be free from defective workmanship and materials, and agrees that it will, at its option, either repair the defect or replace the defective Product or part thereof with a new or remanufactured equivalent at no charge to the purchaser for parts or labor for the period(s) set forth below.
I M P O R TA N T S A F E T Y I N S T R U C T I O N S When using electrical appliances basic safety precautions should be followed, including the following: WARNING - To reduce the risk of burns, electric shock, fire, injury to persons or exposure to excessive microwave energy: 1. READ ALL INSTRUCTIONS BEFORE USING THE APPLIANCE. 12. Do not store or use this appliance outdoors. Do not use this product near water—for example, near a kitchen sink, in a wet basement or near a swimming pool, and the like. 2.
U N PA C K I N G A N D I N S TA L L AT I O N I N S T R U C T I O N S Unpacking and Examining Your Oven Open the bottom of the carton, bend the carton flaps back and tilt the oven over to rest on plasticfoam pad. Lift carton off oven and remove all packing materials, Wall and Top Template, Turntable and Turntable Support. SAVE THE CARTON AS IT MAY MAKE INSTALLATION EASIER. 1. Remove the feature sticker from the outside of the door, if there is one. 2.
UNPACKING AND INSTALLATION INSTRUCTIONS 3 ELECTRICAL GROUNDING INSTRUCTIONS This appliance must be grounded. This oven is equipped with a cord having a grounding wire with a grounding plug. It must be plugged into a wall receptacle that is properly installed and grounded in accordance with the National Electrical Code and local codes and ordinances. In the event of an electrical short circuit, grounding reduces risk of electric shock by providing an escape wire for the electric current.
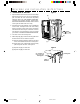
UNPACKING AND INSTALLATION INSTRUCTIONS 6 PREPARATION OF THE OVEN Figure 4 1. Open the bottom of the carton, bend the carton flaps back and tilt the oven over to rest on plasticfoam pad. Lift carton off oven and remove all packing materials, WALL and TOP CABINET TEMPLATE, Turntable and Turntable Support. DO NOT REMOVE THE WAVEGUIDE COVER, which is located on the right side wall of the oven cavity. (A) (B) 2.
UNPACKING AND INSTALLATION INSTRUCTIONS 7 OVEN INSTALLATION THIS OVEN CANNOT BE PROPERLY INSTALLED WITHOUT REFERRING TO THE MOUNTING INSTRUCTIONS FOUND ON WALL AND TOP CABINET TEMPLATE. THE NEXT STEP IS TO READ AND FOLLOW MOUNTING INFORMATION ON WALL AND TOP CABINET TEMPLATE. NOTE: THIS OVEN SHOULD BE ATTACHED TO AT LEAST ONE WALL STUD. See WALL CONSTRUCTION on page 6. MOUNTING SCALE PLATE Attached 2 Scale Plates !, with tape (not included). See Figure 6 and WALL TEMPLATE for locations.
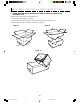
UNPACKING AND INSTALLATION INSTRUCTIONS 8 PREPARATION AND USE OF THE CARTON TO ASSIST IN THE INSTALLATION OF THE MICROWAVE OVEN Utilization of the carton may make installation easier. 1. Place carton upside down. See Figure 10. 2. Using cutting line around the carton, cut into two pieces (A) and (B). See Figure 11. 3. Position oven to assist in mounting to the wall. See Figure 12.
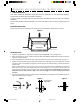
UNPACKING AND INSTALLATION INSTRUCTIONS MOUNTING OVEN TO THE WALL Two people are recommended to attach the Microwave Oven to the Mounting Plate. 1. Thread the Power Supply Cord through the hole made in the bottom of the top cabinet. Install the oven by snapping it onto the Mounting Plate. See Figure 13. 2. Use two Tapping Screws 5 to secure the levers that are on the bottom of the oven. See Figure 14. 3.
GROUNDING INSTRUCTIONS This appliance must be grounded. This oven is equipped with a cord having a grounding wire with a grounding plug. It must be plugged into a wall receptacle that is properly installed and grounded in accordance with the National Electrical Code and local codes and ordinances. In the event of an electrical short circuit, grounding reduces risk of electric shock by providing an escape wire for the electric current.
I N F O R M AT I O N Y O U N E E D T O K N O W ABOUT YOUR OVEN When using the oven at power levels below 100%, you may hear the magnetron cycling on and off. It is normal for the exterior of the oven to be warm to the touch when cooking or reheating. This Operation Manual is valuable: read it carefully and always save it for reference. A good microwave cookbook is a valuable asset. Check it for microwave cooking principles, techniques, hints and recipes.
INFORMATION YOU NEED TO KNOW ABOUT UTENSILS AND COVERINGS becomes very hot should not be used. It is not necessary to buy all new cookware. Many pieces already in your kitchen can be used successfully in your new microwave oven. Make sure the utensil does not touch the interior walls during cooking. The following coverings are ideal: • Paper towels are good for covering foods for reheating and absorbing fat while cooking bacon.
INFORMATION YOU NEED TO KNOW ABOUT MICROWAVE COOKING • Arrange food carefully. Place thickest areas towards outside of dish. • Rearrange foods such as meatballs halfway through cooking both from top to bottom and from the center of the dish to the outside. • Watch cooking time. Cook for the shortest amount of time indicated and add more as needed. Food severely overcooked can smoke or ignite. • Add standing time. Remove food from oven and stir, if possible.
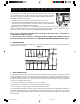
PART NAMES FRONT VIEW 10 7 2 11 8 9 6 1 4 3 5 13 BOTTOM VIEW 12 6 (Front of Microwave) (Rear of Microwave) 1 Oven door with see-through window Be careful with the edge of the oven door as it is glass and could chip or break. 2 Door hinges 3 Waveguide cover: DO NOT REMOVE. 4 Turntable motor shaft 5 Oven light It will light when oven is operating or door is open. 6 Safety door latches The oven will not operate unless the door is securely closed.
PART NAMES CONTROL PANEL Words in the lower portion of the display will light to indicate what function is in progress. 14 24 26 26 19-20 21-22 18 Indicators 23 26 17 Number indicates pages on which there are feature descriptions and usage information. B E F O R E O P E R AT I N G • Before operating your new microwave oven make sure you read and understand this operation manual completely. • Before the oven can be used, follow these procedures: 1. Plug in the oven. Close the door.
M A N U A L O P E R AT I O N • Suppose you want to defrost for 5 minutes at 30%. TIME COOKING PROCEDURE Your oven can be programmed for 99 minutes 99 seconds (99.99). Always enter the seconds after the minutes, even if they are both zeros. 1 5 • Suppose you want to cook for 5 minutes at 100%. PROCEDURE 1 5 0 0 15.00 Enter defrosting time. D I S P L AY 0 2 15.00 Enter cooking time.
S P E C I A L F E AT U R E S COOK CENTER COOK CENTER allows you to cook many of your favorite foods by touching just one pad. NOTE: 1. To increase quantity, touch chosen pad until number in display is same as desired quantity to cook. Ex: touch FROZEN VEGETABLES three times for three cups. More or less food than the quantity listed in the chart should be cooked following the guidelines in any microwave cookbook. • Suppose you want to cook 3 medium baked potatoes.
SPECIAL FEATURES COOK CENTER CHART (continued) FOOD POPCORN PROCEDURE AMOUNT This setting works well with most brands of microwave popcorn. You may wish to try several and choose your favorite. Pop only one bag at a time. Unfold bag and place in oven according to directions. Touch POPCORN once for regular. REG . 3.5 oz bag 2.85 - 3.5 oz bag Touch POPCORN twice within 2 seconds for light regular. L-REG . (Light) 1.5 or 1.75 oz Touch POPCORN three times within 3 seconds for snack. SNK .
SPECIAL FEATURES REHEAT CENTER REHEAT CENTER automatically computes the correct warming and heating time and microwave power level for foods shown in the chart below. 3 1 D I S P L AY REHEAT CENTER 3 CUPS Repeat touching same number pad 2 to increase quantity to 3 cups. (Ex: touch two more times for 3 cups or hold down until the desired quantity appears.) • Suppose you want to reheat 3 cups of soup. PROCEDURE 2 RC- 4 START Touch START pad. Touch REHEAT CENTER once.
SPECIAL FEATURES REHEAT CENTER CHART (continued) FOOD 5. Dinner Plate PROCEDURE AMOUNT 1 plate Use this pad to reheat precooked foods from the refrigerator. Place meaty portions and bulky vegetables to outside of plate. Cut large items like baked potatoes in smaller pieces. Flatten foods such as mashed potatoes and other dense foods. Cover with wax paper or plastic wrap. ONE PLATE ONLY. After cooking, check that food is very hot throughout and that the bottom center of the plate is very hot.
SPECIAL FEATURES DEFROST CENTER 4 DEFROST CENTER automatically defrosts all the foods shown in the DEFROST CENTER CHART below. Round the weight to the nearest half pound. (Ex: if the steak's actual weight is 2.2 lb round to 2.0 lb. If the steak's weight is 2.4 lb round to 2.5 lb). 5 To enter weight, touch the number pads to select weight. (Ex: touch 2 for 2.0 lb). After the second stage, open the door, turn steak over and shield any warm portions. Close the door. Touch START pad.
SPECIAL FEATURES KEEP WARM WITH MANUAL COOKING KEEP WARM allows you to keep food warm for 15 minutes. • Suppose you want to cook a cup of soup for 2 minutes at 70% and keep the soup warm for 15 minutes. To use, simply touch the KEEP WARM pad. You can also program Keep Warm with manual cooking to keep food warm continuously after cooking. PROCEDURE DIRECT USE 1 Enter cooking time. 2 2 Touch POWER LEVEL pad 4 times for 70% power. POWER LEVEL 3 Touch KEEP WARM pad. KEEP WARM 4 Touch START pad.
O T H E R C O N V E N I E N T F E AT U R E S DEMONSTRATION MODE MULTIPLE SEQUENCE COOKING To demonstrate, touch TIMER/CLOCK, the number 0 and then touch the START pad and hold for three seconds. DEMO will appear in the display. Cooking operations and specific special features can now be demonstrated with no power in the oven. For example, touch MINUTE PLUS pad and the display will show 1:00 and count down quickly to End .
OTHER CONVENIENT FEATURES ACCENT LIGHT AND TASK LIGHT MINUTE PLUS Minute Plus allows you to cook for a minute at 100% by simply touching the MINUTE PLUS pad. You can also extend cooking time in multiples of 1 minute by repeatedly touching the MINUTE PLUS pad during manual cooking. To operate the Accent Light and Task Light, follow the procedures in the chart below: PROCEDURE • Suppose you want to heat a cup of soup for one minute. PROCEDURE Touch MINUTE PLUS pad.
(LOW) CLEANING AND CARE Disconnect the power cord before cleaning or leave the door open to inactivate the oven during cleaning. Exterior IGH) LOW) Touch Control Panel GH) Wipe the panel with a cloth dampened slightly with water only. Dry with a soft cloth. Do not scrub or use any sort of chemical cleaners. Close door and touch STOP/CLEAR. IGH) Odor Removal Occasionally, a cooking odor may remain in the oven.
SERVICE CALL CHECK Please check the following before calling for service: Place one cup of water in a glass measuring cup in the oven and close the door securely. Operate the oven for one minute at HIGH 100%. A Does the oven light come on? YES _______ NO _______ B Does the cooling fan work? (Put your hand over the left side of louver.) YES _______ NO _______ C Does the turntable rotate? (It is normal for the turntable to turn in either direction.
S P E C I F I C AT I O N S R-1200, R-1201 AC Line Voltage: Single phase 120V, 60Hz, AC only AC Power Required: 1530 watts, 13.0 amps. Output Power: 1100 watts* (IEC Test Procedure) Frequency: 2450 MHz Outside Dimensions: 23 7/8"(W) x 14 1/16"(H) x 15 9/16"(D) Cavity Dimensions: 17 1/2"(W) x 9 7/8"(H) x 14 15/16"(D) Oven Capacity: 1.5 Cu. Ft. Cooking Uniformity: Turntable system Weight: Approx.
REHEATING CHART STARTING TEMPERATURE ITEM PROCEDURE MICROWAVE TIME Plate of Food 1 serving of meat, 2 servings of vegetables Room temp. Refrigerated MED.-HIGH (70%) 11/2-2 3/4 min. 2 3/4-4 min. Meaty portions and bulky vegetables to outside. Cover with wax paper. Meat (Chicken pieces, chops, hamburgers, meat loaf slices) 1 serving 2 servings MED.-HIGH (70%) 1-2 min. 2-4 min. Cover loosely with wax paper. Refrigerated Refrigerated Room temp. Refrigerated MEDIUM (50%) 1-1 3/4 min.
GUIA AUTO-TOUCH Para mayor informacion y precauciones de seguridad, consulte el Manual de Operaciones. PONER LA HORA Si aparece 88:88 "STOP/CLEAR". CENTRO DE RECALENTAMIENTO en la pantalla, primero oprima 1 Oprima TIMER/CLOCK. 2 Ponga la hors correcta del dia oprimiendo los numeros en secuencia (Ej: 12:30). 3 Oprima TIMER/CLOCK otra vez. 1 Pulse el botón REHEAT CENTER. 2 Seleccione el programa deseado en el configuración de REHEAT CENTER (Ex: Pulse 2 para recalentar 1 plato de sopa.
AUTO-TOUCH GUIDE For more complete information and safety precautions, refer to your Operation Manual. SET CLOCK If 88:88 REHEAT CENTER is in the display, first touch STOP/CLEAR. 1 Touch TIMER/CLOCK pad. 2 Enter correct time of the day by touching numbers in sequence. (Ex: 12:30) 3 Touch TIMER/CLOCK pad again. TIMER CLOCK 1 2 3 0 TIMER CLOCK MANUAL OPERATION 1 Enter cooking time by touching number pads. (Ex: 1 min. 30 sec.) 2 Touch START pad.