
User manual


Broadcast Safe Colors
Televisions have a limited range of colors that can correctly be displayed on a picture tube. This color range is
referred to as Broadcast Safe Colors. Since NTSC is the standard for North American television, we will only
discuss NTSC Broadcast Safe Colors in this article. If you are designing a DVD that will be sent to a
non-NTSC country, click here for more information.
When setting up your DVD menu, choose at least 24bit (if possible) and limit your RGB colors to 233 or below.
Also limit your saturation to below 90% and keep luminance values below 80%. It’s much easier to limit your
colors now, rather than to try to correct them later (especially after your client has approved the menu).
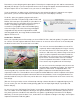
Why limit colors? Colors outside of the broadcast safe range are considered “illegal” and can tend to bleed,
buzz, icker, or crawl. Visually, this translates to images that seem to move or shake. Not only is this
unpleasant to look at, but it can make text illegible.
By limiting colors, you help ensure the viewer will be able to read your menu without straining their eyes. Bear
in mind that just because you have created Broadcast Safe Colors doesn’t mean your menu will look good on
a TV. In fact, there are many factors that can affect how your menu will appear on a TV. We’ll cover those in
the next issue (Part II of this article).
Safe Levels for Black and White
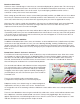
In addition to Broadcast Safe Colors, there are limitations on white and black levels (called luminance). White
levels that are too high (referred to as “hot”) can cause buzzing, bleeding, crawling, and ickering, just like
“illegal” colors. Be sure to set your white RGB levels no higher than 233 (luminance values below 80%) and
black no lower than 16. White set to 233 may look gray on your computer monitor, but rest assured it will look
white on a TV.
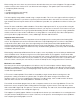
Button States, Normal – Selected – Activated
For a DVD menu to be truly interactive, there needs to be a way to indicate button states. Often these states
are referred to as rollovers, but this term as applied to DVDs is incorrect. Rollover applies to button states or
link states for web and computer applications. With DVD menus, we refer to the button states as Normal,
Selected, and Activated. On most DVD menus the normal state is not visible or is considered off. However
there will always be one button in the selected state by default.
The selected state indicates which button has been navigated to.
The activated state refers to a button that has been triggered by
pressing the enter button on the remote and causes something
to happen (most often to play a part of the DVD). Depending on
your DVD player, this state can last from up to a few seconds to
not visible at all.
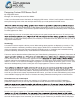
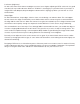
There are two methods used to create button states:
1) subpicture overlay and 2) the use of Photoshop layers.
Subpicture overlay uses a black image on a white background
imported the same way as other menu assets. The black areas
are assigned a color in the authoring software to indicate the state and the white area is transparent (Alpha
channel).
There are some drawbacks when using this method. Only solid colors can be used to indicate a button state.
Also subpictures cannot be antialiased and can result in overlays with jagged edges. Because this may
appear unprofessional, most DVD designers do not use elements such as text or complex shapes as a state
indicator, and opt to use simple geometric shapes instead.
Selected State (Play Movie)