
User manual


When testing your menu, there are several factors that will effect how your menu will appear. The type of cable
used to connect to the monitor or TV can effect how well it displays. Your options (from worst to best) are:
1. Composite (RCA connector)
2. S-video
3. Component (professional analog)
4. SDI (Serial Digital Interface)
The lowest quality image will be created using a composite cable. This is the same type used in the majority of
home viewing situations. If you want to see what your menu will look like in the worst case scenario, use this
type. Another factor to keep in mind is all TVs are different. If possible, use a production monitor to review your
menus.
Newer TVs have comb lters and line doublers. These lters help improve the TV so you won’t be seeing the
raw video signal as you would with a production monitor. If you only have a consumer TV, it’s best to test your
menu on several different TVs to get a good understanding of how it will display. If you are using a production
monitor, make sure to turn off the comb lter to see the graphics in a raw (worst) state. After a little practice,
you may be able to judge what fonts, colors, and designs will work and what won’t.
Important tools of the trade
In addition a production monitor, it’s important to have the proper tools to create professional looking DVD
menus. Two important tools are the waveform and vector scope. Explaining how to use these is beyond the
scope of this article, but in short, these are engineering tools used in professional video production that
measure luminance (light and dark) and Chrominance (color) levels and phase. These tools will allow you to
measure video levels in graphics to determine if they are within NTSC guidelines (see Part I) and are available
in hardware and software forms.
When buying software-based Waveforms/Vector scopes, some only display one line of video per eld instead
of the full eld or frame. This does not give an accurate representation of your graphics. Professional video
editing applications such as Final Cut Pro come with their own versions of Waveforms and Vector scopes, and
FCP shows a full frame of video. Check your software as you may already have these tools. If you don’t know
how to use them, consult your user manual, or search the web (there are many good resources out there).
Mechanics of a monitor
Now that you have all the right equipment, let’s discuss why TVs and computer monitors display images
differently. A computer screen is made up of individual pixels each assigned it’s own discrete luminance (light
and dark) and chrominance (color) scanned progressively. That means each line is scanned, one after another,
in order from top to bottom.
A TV screen is made up elds. These elds are created by a single electron beam scanning across the
phosphorus coating on the back of a picture tube. The point of this beam changes chrominance and
luminance values as it scans comprising the TV picture. In a video image, each second contains 30 frames
and each frame consists of 2 elds (odd/even – 60 elds a second).
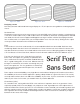
These elds are not drawn progressively as with a computer monitor or on some high denition TV sets. The
beam traces across the picture tube creating eld one rst (gure 1a) then retraces to the top of the screen
and creates eld 2 (gure 1b). This process is known as interlacing. The end result, the two elds appear to be
seamlessly integrated into one solid picture (gure 1c).
This happens so quickly (approx 1/60th of a second) that the human eye cannot detect it is occurring because
of a phenomenon called persistence of vision. However, it is this process of interlacing that causes problems
with computer generated graphics on a TV.