
User Manual


55
GB
Timer Recording/The GUIDE Plus+
®
System
Editing (Confirm, Change
and Cancel) a Timer
Programme
HDD
VR MODE
DVD-RW
VIDEO MODE
DVD-RW
DVD-R
The operation method is the same for both
HDD and DVD.
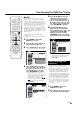
About Schedule Area
The “Schedule” Area is the central location for
you to examine, set, delete and edit scheduled
events. Within the “Schedule” Area you can:
Edit/Delete a One-Button-Record (Page 49)
Set/Edit/Delete a SHOWVIEW recording (Page
51)
Set/Edit/Delete a Manual Recording (Page 53)
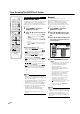
Confirming
You can confirm on the Timer setting screen a
list of all timer programmes that are already
set.
Preparations for timer confirmation
• If the TIMER indicator on the front of the
Recorder is lit, press TIMER ON/OFF to
turn off the TIMER indicator and to set the
Timer Standby mode to off.
1
Press GUIDE to display the
“GUIDE Plus+” screen.
2
Press ' / | to display the “Sched-
ule” Area.
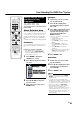
Changing
1
Follow steps
1
to
2
of “Confirm-
ing” described above.
2
Press ' / " to highlight the
scheduled event that you would
like to edit.
3
Press \ / | to highlight the setting
to be changed and correct it by
using the corresponding colour
buttons, ' / " / \ / | or the
Number buttons.
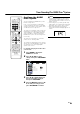
Cancelling
1
Follow steps
1
to
2
of “Confirm-
ing” described left.
2
Press ' / " to highlight the timer
recording to be cancelled, then
press Red (A).
3
Press GUIDE to exit.
Record Schedule Mode Freq. Dest.
P 00 1-Sep 17:13
Grid Search Schedule
SHOWVIEW Manual Home
My TV
'Schedule' displays programmes you've Set to Record.
Press " to use. Press the red button for ShowView
recording, the green button for manual recording, \
to view 'My TV' and | to view 'Info'.
SP Once HDD1-Sep 16:20 17:00
LP Once DVD1-Sep 18:00 19:00
RTL
ZDF
What you can edit here are as follows:
• Change date
• Change Start /End Time
• Change the source
• Press Red (A) to change the REC
MODE.
• Press Green (B) to change the
Recording Frequency (Once/Daily/
Weekly).
• Press Yellow (C) to change the
destination.
• On the next right recording tile, press
Yellow (C) to add extra time to the
end or to choose VPS/PDC.
4
Press GUIDE to exit.
3
Press ' / " / \ / | to select the
event to confirm.
4
If the settings are correct, press
GUIDE to exit.
NOTE
• If there are some programmes to be
recorded, do not forget to press TIMER
ON/OFF to return the Recorder to Timer
Standby mode.
• If you turn off the Timer Standby mode
during timer recording, the timer recording
is switched to a normal recording which will
not stop at the timer recording end time. To
stop the recording, press REC STOP.
• When the Recorder is in Timer Standby
mode but a timer recording is not in
progress, you can neither add nor change
a timer programme but can cancel one.
When a timer recording is in progress, you
can neither add, change, nor cancel a
timer programme.