Portable DVD Video Player Reproductor de Video DVD Portátil Bärbar DVD-spelare DV-L70S DV-L70BL OPERATION MANUAL MANUAL DE MANEJO BRUKSANVISNING ENGLISH ............. GB 1 – GB 95 ESPAÑOL ............... E 1 – E 95 SVENSKA ...............
This equipment complies with the requirements of Directives 89/336/EEC and 73/23/EEC as amended by 93/68/EEC. Dieses Gerät entspricht den Anforderungen der EG-Richtlinien 89/336/ EWG und 73/23/EWG mit Änderung 93/68/EWG. Ce matériel répond aux exigences contenues dans les directives 89/336/ CEE et 73/23/CEE modifiées par la directive 93/68/CEE. Dit apparaat voldoet aan de eisen van de richtlijnen 89/336/EEG en 73/ 23/EEG, gewijzigd door 93/68/EEG. Dette udstyr overholder kravene i direktiv nr.
SPECIAL NOTE FOR USERS IN THE U.K. The mains lead of this product is fitted with a non-rewireable (moulded) plug incorporating a 3A fuse. Should the fuse need to be replaced, a BSI or ASTA approved BS 1362 fuse marked or and of the same rating as above, which is also indicated on the pin face of the plug, must be used. Always refit the fuse cover after replacing the fuse. Never use the plug without the fuse cover fitted.
CONNECTION and INITIAL SETTING OPERATION MANUAL GENERAL INFORMATION ENGLISH BASIC OPERATIONS SPECIAL FUNCTIONS OTHERS
IMPORTANT SAFEGUARDS AND PRECAUTIONS CAUTION BEFORE OPERATING YOUR NEW DVD PLAYER, PLEASE CAREFULLY READ THIS OPERATION MANUAL AND THEN SAVE IT FOR FUTURE REFERENCE. Note: This unit can be used only where the power supply is AC 110V-240V, 50/60Hz. It cannot be used elsewhere. CAUTION: USE OF CONTROLS OR ADJUSTMENTS OR PERFORMANCE OF PROCEDURES OTHER THAN THOSE SPECIFIED HEREIN MAY RESULT IN HAZARDOUS RADIATION EXPOSURE.
IMPORTANT SAFEGUARDS AND PRECAUTIONS GENERAL INFORMATION • • • • This DVD player is classified as a CLASS 1 LASER product. “CLASS 1 LASER PRODUCT” is printed at the bottom of the player. The laser caution label is located at the bottom of the player. This product contains a low power laser device. To ensure continued safety do not remove any cover or attempt to gain access to the inside of the product. Refer all servicing to qualified personnel.
IMPORTANT SAFEGUARDS AND PRECAUTIONS Power Cord Protection To avoid any malfunctions of the unit, and to protect against electric shock, fire or personal injury, please observe the following. • Hold the plug firmly when connecting or disconnecting the AC power cord. • Keep the AC power cord away from heating appliances. • Never put any heavy object on the AC power cord. • Do not attempt to repair or reconstruct the AC power cord in any way.
IMPORTANT SAFEGUARDS AND PRECAUTIONS Condensation Moisture may form on the pickup lens in the following conditions: • immediately after a heater has been turned on. • in a steamy or very humid room. • when the unit is suddenly moved from a cold environment to a warm one. If moisture forms inside this unit, it may not operate properly. In this case, turn on the power and wait about one hour for the moisture to evaporate.
IMPORTANT SAFEGUARDS AND PRECAUTIONS Apparatus Claims of U.S.Patent Nos. 4,631,603, 4,577,216, 4,819,098 and 4,907,093 licensed for limited viewing uses only. This product incorporates copyright protection technology that is protected by method claims of certain U.S. patents and other intellectual property rights owned by Macrovision Corporation and other rights owners.
Disc Handling and Maintenance Handling precautions • Hold the disc by the edges so the surface will not be soiled with fingerprints. ( A ) Fingerprints, dirt and scratches can cause skipping and distortion. • Do not write on the label side with a ball-point pen or other writing utensils. • Do not use record cleaning sprays, benzine, thinner, static electricity prevention liquids or any other solvent. • Be careful not to drop or bend the disc. • Do not install more than 1 disc.
Contents GENERAL INFORMATION IMPORTANT SAFEGUARDS AND PRECAUTIONS .................................................................... 2 Disc Handling and Maintenance ................................................................................................. 7 Handling precautions .............................................................................................................. 7 Features ......................................................................................................
Contents BASIC OPERATIONS Playing a Disc ............................................................................................................................. 57 To play a disc ........................................................................................................................ 57 To adjust the volume level ..................................................................................................... 58 To stop disc play ....................................................
Features 7" LCD Screen and Stereo Speakers • A big 7" LCD screen and built-in stereo speakers provide exciting DVD viewing, even without connecting to a TV. • Dolby Virtual provides high-quality surround sound. 2-Way Power Supply (Battery pack is sold separately.) • A 2-way power supply allows operation using the supplied AC adapter for indoor play, or the battery pack sold separately for outdoor play.
Accessories Remote Control Unit BACKLIGHT OPERATE HI/LOW/OFF VIEW MODE DIGITAL Audio Cord S-video/Video Cord AC Adapter Earphones VIDEO ADJUST DIGITAL VIRTUAL GAMMA S.PICTURE TITLE ENTER MENU RETURN SKIP PLAY SKIP RESUME STOP STILL/PAUSE DISPLAY REV FWD SLOW REPEAT PROGRAM CLEAR MEMORY DIRECT ANGLE AUDIO SETUP SUBTITLE ON/OFF SUBTITLE Two (R6 UM/SUM-3 or AA) Batteries for the Remote Control Unit AC Cord For the European Continent except the U.K.
Types of Disc that can be played on Your DVD Player The unit can play back discs bearing any of the following marks: DVD [8cm disc/12cm disc] Video CDs [8cm disc/12cm disc] See See See 1 2 on the next page 3 on the next page See 2 on the next page • Supports version until version 2.0. Audio CDs [8cm disc/12cm disc] Other CDs 1) On CD-G and CD-EXTRA discs, only the sound can be played (no images). 2) Photo CD, DVD-ROM and CD-ROM discs cannot be used.
Types of Disc that can be played on Your DVD Player The list below shows the countries covered by region number 2.
Types of Disc that can be played on Your DVD Player Discs that Cannot be Played 1. You cannot play illegally produced discs. • You cannot play discs of other region number than No. 2 (refer to the list of region number 2 on page 13), such as discs for the use in U.S.A. (region No. 1) and China (region No. 6). 2. You cannot play scratched discs. 3. You cannot play discs that are dusty, soiled or marked with fingerprints.
Types of Disc that can be played on Your DVD Player Title, chapter and tracks • DVDs are divided into “titles” and “chapters”. If the disc has more than one movie on it, each movie would be a separate “title”. “chapters”, on the other hand, are subdivisions of titles. Example: DVD Title 1 Chapter 1 Title 2 Chapter 2 Chapter 3 Chapter 1 Chapter 2 • Video CDs and audio CDs are divided into “tracks”. You can think of a “track” as one tune on an audio CD.
Discs recorded by PAL system, Discs recorded by NTSC system and Type of TV connection • The DVD player can play back discs recorded by NTSC using the modified PAL system, such as Video CD, DVD-region 2, but cannot play back discs for the use in U.S.A. (region No. 1). • Region numbers cannot be changed in this system. • This DVD player also has a built-in system converter which makes it possible to view discs (Video CD, DVD-region 2) recorded by the NTSC system using a PAL TV.
Quick Start Guide This Quick Start Guide provides only the most basic information for operating your DVD player. See the other sections of this Operation Manual for full details about operational procedures, precautions, and other information. • Connections and initial settings ... on pages 29 to 50 • To play a disc ............................... on pages 57 to 82 • To view images from a video deck or other external equipment .....................................................
Quick Start Guide 3 Turn on the DVD player. 1 2 3 4 Plug the AC cord into the power socket of the AC adapter (1). Plug the DC output plug into the DC input jack of the DVD player (2). Plug the other end of the AC cord into a household power outlet (3). Slide the main power switch to the “ON” position (4). AC Adapter (supplied) Power socket AC cord (supplied) 3 DC cord 1 To power socket DC output plug 2 3 For the U.K.
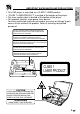
Quick Start Guide 4 Prepare the disc you want to play. Before loading a disc, check to make sure that it is one that is supported by the DVD player.
Quick Start Guide To load a disc into the disc player 1 Slide the disc compartment cover release button in the direction indicated by the arrow and open the cover. • Pressing the button causes the cover to open only partially. Lift the cover by hand to open it the rest of the way. 2 Gently press down on the disc in the vicinity of the centre hole so it seats properly into place. • You should be able to hear and feel the disc seat securely into place when you press down on it.
Quick Start Guide BACKLIGHT VIEW MODE VIDEO ADJUST VIRTUAL DIGITAL GAMMA DIGITAL S.
Quick Start Guide BACKLIGHT VIEW MODE VIDEO ADJUST VIRTUAL DIGITAL GAMMA DIGITAL S.
Quick Start Guide To fast forward and fast reverse 1 2 While a disc is playing, press FWDè or ÈREV. • FWDè starts fast forward. • ÈREV starts fast reverse. T0 1C0 0 1 1 : 02 : 36 To stop a fast forward or fast reverse operation, press ûPLAY. • This returns to normal play. • You may not be able to use fast forward and fast reverse with some discs. To stop disc play 1 Press ËSTOP.
General Guide DVD Player - Right side VOLUME 2 MAX VOLUME 2 4 VIDEO 6 MAX 4 VIDEO 6 AUDIO PHONES DIGITAL OUT (OPTICAL) MIN AUDIO PHONES DIGITAL OUT (OPTICAL) MIN Headphones jack (green) (see page 28) Volume dial (see page 58) Audio input/output jack (white) (see page 29) Video input/output jack (yellow) S-video output jack (yellow) (see page 29) Optical digital output jack (white) (see page 32) Battery guide (see page 35) DVD Player - Left side DC IN 9V DC IN 9V DC IN jack (see
General Guide DVD Player - Front Display panel release (see page 17) LCD screen (see page 17) Display panel movement range Speakers 180° Disc compartment cover (see page 20) 0° Disc compartment cover release button (see page 20) PUSH TO CLOSE ON/STANDBY Power/Standby lamp (see page 38) 1 2 3 4 5 6 7 8 9 0 q w e r t y INPUT/DVD (see page 41) PLAY (û)/GUI button (see page 57/79) SKIP (À) button (see page 62) STOP (Ë) button (see page 58) TITLE button (see page 77) ENTER button (see page 42) \ (see
General Guide DVD Player - Bottom Battery connectors Anti-tip stand Extending the anti-tip stand protects against the DVD player tipping backwards while the display panel is open.
General Guide Remote Control Unit 1 2 3 4 BACKLIGHT OPERATE HI/LOW/OFF 5 6 7 8 9 0 q w VIEW MODE VIDEO ADJUST DIGITAL DIGITAL VIRTUAL GAMMA S.
Using Headphones You can connect the earphones that come with the DVD player or commercially available headphones with a stereo mini plug to the headphones jack and listen to the audio output. To use the supplied earphones 1 Connect the earphones that come with the DVD player to the headphones jack. • The headphones jack is a stereo mini jack.
Connecting to External Equipment for Input Selecting “INPUT” as the INPUT mode of the DVD player automatically switches the function of its video and audio input/output jacks to input. Then you can view images from a connected VCR or camcorder on the screen of your DVD player.
Connecting a TV with External Terminals You can use the S-video plug of the S-video/video cord to connect your DVD player to a television equipped with an S-video input jack and enjoy viewing high-quality images on the TV screen. • Be sure to turn both the DVD player and the TV equipment off before connecting them.
Connecting to Audio Equipment Connecting the DVD player to audio equipment provides normal stereo sound plus powerful stereo sound enhanced by Dolby Digital (5.1 channel) and DTS. Playing 2 channel audio The audio input/output jack of the DVD player also doubles as an optical digital output jack.
Connecting to Audio Equipment Helpful Hints • When connecting to audio equipment, we recommend that you set the “COMPRESSION (Dolby Digital Output Level)” to “OFF” (see page 47). Digital Connection to an MD to Record a CD When you are using a digital connection to record the contents of a CD to an MD, the track numbers of the CD may not match the track numbers recorded to the MD. Playing Dolby Digital (5.1 channel), DTS and MPEG Version 2.
Using the AC Adapter AC Adapter (supplied) Power socket DC cord AC cord (supplied) To power socket To household power outlet DC output plug To DC input jack For the U.K. and Eire Important! • Make sure the main power switch of the DVD player is in the “OFF” position before attaching or detaching the AC adapter. • Use only the AC adapter specified for the DVD player. Use of another type of AC adapter can cause damage to and malfunction of the player. • The AC adapter may become warm after long-term use.
Using a Battery Pack (Sold Separately) The following describes how to charge the battery pack sold separately (BTL100 (S)/BT-L100 (BL)) and use it to power the DVD player. To charge the battery pack Use the AC adapter that comes with the DVD player to charge the battery pack. 1 Plug the AC cord into the power socket of the AC adapter (1). • Push the cord into the AC adapter as far as it can go. 2 Plug the other end of the AC cord into a household power outlet (2).
Using a Battery Pack (Sold Separately) Be sure to charge a battery pack before using it. To attach a battery pack to the DVD player Make sure the DVD player’s main power switch is in the “OFF” position. 1 Align the battery guide " with the ' mark (1) on the battery pack. 2 Slide the DVD player in the direction indicated by the arrow (2). 3 Plug the battery pack’s DC cable into the DC input jack of the DVD player.
Using a Battery Pack (Sold Separately) DVD continuous play time DVD continuous play time (Using speakers) Approximately 3 hours • The DVD continuous play time is a reference value indicating maximum play time with low display brightness at 20°C. • Play time may be shorter due to disc type, temperature, battery condition, and speaker volume. To remove the battery pack from the DVD player Make sure the DVD player’s main power switch is in the “OFF” position. 1 Unplug the DC cable.
Battery Capacity Indicator • The battery capacity indicator appears only while the display mode is “AUTO” or “ON”. With “AUTO”, the indicator appears for a short while and then disappears. • Battery condition, temperature, and operational conditions affect the remaining capacity of a battery. Because of this the battery capacity indicator is intended to be for reference purposes only. • Regardless of the display mode, the low battery warning appears on the display whenever the battery is about to go dead.
Turning Power On and Off To turn main power on and off Y ANDB ON/ST Power/standby lamp Main power switch on For the U.K. and Eire POWER ON OFF Main power switch off POWER ON OFF • Slide the main power switch left to the “ON” position to turn power on. • Slide the main power switch right to the “OFF” position to turn power off. • In the following cases, the power/standby lamp on the front of the DVD player lights green to let you know that power is on.
Turning Power On and Off To turn power on and off with the remote control unit When the main power switch is in the “ON” position, you can turn power off and on by pressing OPERATE. BACKLIGHT VIEW MODE VIDEO ADJUST VIRTUAL DIGITAL GAMMA DIGITAL S.
Using the Remote Control Unit To load batteries For information about how to load the batteries, see page 17. Remote control unit operating range Important! • Do not subject the remote control unit to strong impact. • Do not allow the remote control unit to become wet and keep it out of areas subject to high humidity. • The remote control unit may fail to work properly after you replace its batteries. When this happens, remove the batteries and leave them out for at least five minutes.
Operation Modes Your DVD player has two operation modes. Select the one that suits the operation you want to perform.
Setup TITLE ENTER MENU RETURN SKIP RESUME DISPLAY PLAY SKIP STOP STILL/PAUSE REV FWD ENTER SLOW REPEAT INP UT DVD / SKIP BA HI/LOCKLIG W/OF HT F PLAY /GU VIE MO W DE I SK IP STOP TIT PROGRAM STILL LE /PA USE PH OP EN ENTE ME R NU AU CLEAR MEMORY DIRECT OP RETU ON/ ST SETUP DIO SETUP RN ANDB Y VID MI VO LU ME MA TIC AL AN AL ON ES OG EO INPUT/ DVD ENTER N X SUBTITLE Setting the language 1 Press INPUT/DVD a number of times until you enter the DVD mode.
Setup TV MODE SET setting The following describes how to select the DVD playback display format. Viewing on the DVD Player Screen or a Wide Screen TV Using a 16:9 Wide Image Select 16 : 9 for wide DVD video output. • A wide image size is output when playing a wide image disc. • When playing a 4:3 image disk, you can select the image size you want for the DVD player screen or connected TV (see page 52). Viewing on a 4:3 Size TV Using Pan Scan Select 4 : 3 P S for wide DVD video output.
Setup BACKLIGHT OPERATE HI/LOW/OFF VIEW MODE DIGITAL VIDEO ADJUST DIGITAL VIRTUAL GAMMA S.
Setup PARENTAL setting Parental level DVD discs equipped with the parental lock function are rated according to their content. The rated content allowed by a parental lock level and the way a DVD disc can be controlled may vary from disc to disc. For example, if the disc allowed you to edit out violent scenes unsuitable for children and replace them with more viewable scenes, or lock out play of the DVD disc altogether.
Setup To make PARENTAL setting 1 Press SETUP. • This displays the DVD SET UP screen. 2 Use " and ' to select “PARENTAL”. Press |. DVD SE T UP T V MO D E SET 16 : 9 PARENTA L OF F ---- = P A S S WO R D • If there is no password registered yet, the password input field appears . as ? ? ? ? instead of 3 4 Use the number buttons to input the password. Use \ and | to select the parental level and then press ENTER. • This returns to the startup screen.
Setup COMPRESSION (Dolby Digital Output Level) setting When Dolby Digital is used to record the audio on a DVD disc, the average overall volume level of the audio is relatively lower than that produced by an audio CD. This is to provide the widest possible dynamic range. To counteract this, your DVD player automatically raises the overall average volume level of a disc recorded using Dolby Digital to a level that is similar to that of an audio CD.
Setup BACKLIGHT VIEW MODE VIDEO ADJUST VIRTUAL DIGITAL GAMMA DIGITAL S.
Setup DIGITAL DIGITAL VIRTUAL GAMMA S.
Setup Selecting languages from OTHER 1 2 Use ', ", \, | to select “OTHER”, then press ENTER to set the “OTHER” input item (two letters). D I SC M E NU L A NGUAGE DEU T SCH NEDER L ANDS I T A L I A NO OTHER –– For example, to select “AF” (Afrikaans), use ' or " to select “A” as the first letter, use \ or | to move to the second place, then use ' or " to select “F”. • When “A” is selected for the first letter, only letters to the right of codes beginning with “A” can be selected as the second letter.
Setup Language code list on menu screen Code Language Name Code Language Name Code Language Name Code Language Name AA Afar FY Frisian MG Malagasy SL Slovenian AB Abkhazian GA Irish MI Maori SM Samoan AF Afrikaans GB Scots Gaelic MK Macedonian SN Shona AM Ameharic GL Galician ML Malayalam SO Somali AR Arabic GN Guarani MN Mongolian SQ Albanian AS Assamese GU Gujarati MO Moldavian SR Serbian AY Aymara HA Hausa MR Marathi SS Siswat AZ Azerbaija
Screen Size Setting When viewing a DVD on your DVD player screen, you select the screen size that best suits the image you are viewing. To set the screen size Software Type Wide 4:3 4:3 Letter Box SMART STRETCH Full Screen Image is stretched by its four corners. Image is stretched by its four corners. Top and bottom remain black. STRETCH Full Screen Mode ZOOM Above screen stretched Screen stretched horizontally to fit. Top and bottom remain black. horizontally to fit.
Screen Size Setting BACKLIGHT VIEW MODE VIDEO ADJUST VIRTUAL DIGITAL GAMMA DIGITAL S.
Changing the Display Mode To change the display mode 1 Press DISPLAY. • Each press of DISPLAY cycles through the display mode settings in the following sequence: ON → OFF → AUTO → ON. AUTO ...... Display indicators appear for about three seconds and then disappear. ON .......... Display indicators remain displayed. BACKLIGHT OPERATE HI/LOW/OFF VIEW MODE DIGITAL VIDEO ADJUST DIGITAL VIRTUAL GAMMA S.
Changing the Display Mode ■ Audio Switching DVD ■ INPUT Mode INPUT T0 1C0 0 1 1/4 DIGITAL 0 : 00 : 24 Audio indicator (for Dolby Digital 5.1 channel) ■ DVD Player GUI (DVD Mode) 1/3 Linear PCM 2ch 1/4 1 / 2T0 1C0 0 1 ON : E N T0 1C0 0 1 2/4 LPCM 0 : 00 : 24 Audio indicator (for linear PCM 2ch) Audio MPEG Version 2.0 T0 1C0 0 1 3/4 MPEG 0 : 00 : 24 Audio indicator (for Audio MPEG Version 2.
Changing the Display Mode DVD mode operation indicators The following are examples of display indicators that appear during DVD playback. DVD Player Status Display Indicators Play attempted without a disc Play attempted with a non-compatible disc Loading (data being read from disc) Stop Play T0 1C0 0 1 1 : 23 : 24 Appears when display mode is “ON”. Pause T0 1C0 0 1 1 : 23 : 24 Appears when display mode is “ON”. Slow T0 1C0 0 1 1 : 23 : 24 Appears when display mode is “ON”.
Playing a Disc This DVD player can play a DVD, video CD, or audio CD using the procedure described below. BACKLIGHT VIEW MODE VIDEO ADJUST VIRTUAL DIGITAL GAMMA DIGITAL S.
Playing a Disc CAUTION • Never try to open the disc compartment cover and look inside the disc compartment at the laser while a disc is playing. Doing so creates the danger of serious eye damage. Important! • Do not press down on the disc compartment cover while a disc is playing. • Keep the disc compartment cover closed except when loading or removing a disc. Otherwise, dust getting into the DVD player can lead to malfunction.
Other Disc Play Features This section explains how to use skip, slow motion, and other play features. BACKLIGHT VIEW MODE VIDEO ADJUST VIRTUAL DIGITAL GAMMA DIGITAL S.
Other Disc Play Features To use fast forward and fast reverse 1 While a disc is playing, press FWDè to start fast forward or ÈREV for fast reverse. • Initially, the fast forward or fast reverse operation is performed at a relatively slow speed. With a DVD (but not an audio CD or video CD), you can press FWDè or ÈREV again to increase the speed. Example: Display after FWDè is pressed T0 1C0 0 1 0 : 00 : 24 2 Press ûPLAY to resume normal play.
Other Disc Play Features BACKLIGHT VIEW MODE VIDEO ADJUST VIRTUAL DIGITAL GAMMA DIGITAL S.
Other Disc Play Features TITLE ENTER MENU RETURN SKIP PLAY SKIP RESUME STOP STILL/PAUSE DISPLAY REV FWD SLOW RETURN SKIP PLAY SKIP INP UT DVD / SKIP REPEAT Number buttons OP STAN MEMORY DIRECT SETUP /GU EN STILL LE ENTE ME R RETU PROGRAM CLEAR BA HI/LOCKLIG W/OF HT F PLAY GUI VIE MO W DE I SK IP STOP TIT RN /PA USE ES ON PH OG AL DIO AN AU AL TIC OP EO VID N MI DBY DIRECT NU ME LU X VO MA SKIP SKIP RETURN (C) CLEAR SUBTITLE ON/OFF SUBTITLE ANGLE AUDIO See
Other Disc Play Features Title/track direct skip You can use direct skip only with a disc that is playing or that was playing but it now stopped. In the case of a video CD or audio CD, start from step 2. 1 2 While the disc is playing or stopped, press DIRECT. Use the number buttons to input the number of the title (track) to which you want to skip. Example: Press 3. T - 3C0 0 3 1 : 39 : 54 3 Press ûPLAY. • You must press ûPLAY within about 10 seconds after inputting a number.
Repeat Playback BACKLIGHT VIEW MODE VIDEO ADJUST VIRTUAL DIGITAL GAMMA DIGITAL S.PICTURE OPERATE HI/LOW/OFF TITLE ENTER MENU RETURN SKIP PLAY SKIP RESUME STOP STILL/PAUSE DISPLAY REV FWD SLOW REPEAT REPEAT A-B PROGRAM CLEAR MEMORY DIRECT Chapter repeat (DVD only) Example: To repeat play the chapter you are currently viewing 1 2 Play the chapter you want to repeat. Press REPEAT to start repeat play of the chapter. • To cancel repeat play, press REPEAT C again.
Repeat Playback Disc repeat (video CD, audio CD only) Example: To repeat play a disc 1 While the disc is playing, press REPEAT to start repeat play. • To cancel repeat play, press REPEAT again. This clears the “ ” indicator from the display. • You cannot use repeat play with PBC (playback control) play of a PBC video CD. • You may not be able to use repeat play with certain discs. • You cannot use repeat play in combination with programmed play.
Programmed Playback You can program your DVD player to play titles, tracks, or chapters in the sequence you want.
Programmed Playback 2 Use the number buttons to input the title number or track number you want, and then press M (MEMORY). Example: To input Title (Track) 10, press 1, 0 and then M (MEMORY). DVD T I TLE P ROGR AM T=T I TLE T10 T–– T–– T–– T–– T–– T–– T–– T–– T–– T–– T–– T–– T–– T–– T–– T–– T–– T–– T-– Video CD, Audio CD TRACK P ROGR AM T = TRACK T10 T–– T–– T–– T–– T–– T–– T–– • Repeat step 2 for up to 20 titles (tracks) in the sequence that you want them to play.
Programmed Playback Setting on the screen TITLE ENTER MENU RETURN SKIP PLAY SKIP RESUME STOP STILL/PAUSE RETURN PLAY STOP DISPLAY REV FWD SLOW REPEAT PROGRAM CLEAR MEMORY DIRECT SETUP Number buttons PROGRAM (M) MEMORY INP UT DVD / SKIP OP EN (C) CLEAR SUBTITLE ON/OFF BA HI/LOCKLIG W/OF HT F PLAY /GU I SK IP PLAY VIE MO W DE STOP STILL /PA USE TIT LE ME NU ENTE R RETU RN ES ON PH RETURN ON/ STAN DB SUBTITLE ANGLE AUDIO STOP OG AL DIO AN AU AL TIC OP EO VID N MI Y ME
Programmed Playback 3 Use the number buttons to input the chapter number you want, and then press M (MEMORY). Example: To input Chapter 23, press 2, 3 and then M (MEMORY). CHAP T ER T=T I T L E : 1 0 P ROGR AM C=CHAP T ER C023 C––– C––– C––– C––– C––– C––– C––– • Repeat step 3 for up to 20 chapters in the sequence that you want them to play. 4 Press û PLAY to start play in the sequence you specified. PROGRAM T1 0C0 2 3 1 : 05 : 46 To stop programmed play 1 Press Ë STOP.
Making Display Settings Digital gamma is a function that brings out the best that DVD has to offer by making darker areas of the image brighter while leaving its bright areas unchanged. Digital super picture enhances the fine detail of the image and outlines of the objects it contains. It also minimizes noise, making the image clearer. BACKLIGHT OPERATE HI/LOW/OFF VIEW MODE VIDEO ADJUST DIGITAL DIGITAL DIGITAL GAMMA VIRTUAL GAMMA S.PICTURE TITLE ENTER DIGITAL S.
Making Display Settings 2 While “ON” is selected, use \ and | to set the digital gamma level. • The current level is shown on the display. GAMMA Bright ↔ Brighter \ | Level display • The level display remains on the screen for about 10 seconds. Helpful Hints • If the level setting disappears from the screen, you can change the level setting by pressing DIGITAL GAMMA to display it again. Next, use \ and | to change the level. To make digital super picture settings (DVD, Video CD only) 1 Press DIGITAL S.
Audio Selection (DVD, Video CD only) A number of different methods are used to record audio onto a DVD, including multi-channels (used for voiceovers in other languages), Dolby Digital (5.1ch), DTS, linear PCM and Audio MPEG Version 2.0. Your DVD player provides a number of different audio modes from which you can choose to suit the type of disc you are playing. BACKLIGHT OPERATE HI/LOW/OFF VIEW MODE DIGITAL VIDEO ADJUST DIGITAL VIRTUAL GAMMA S.
Audio Selection (DVD, Video CD only) 2 Press AUDIO to cycle through the available channels and select the one you want. • In the case of a video CD or audio CD, each press of AUDIO cycles through the channels in the following sequence: L+R → L → R. 3/3 LPCM L R Helpful Hints • With a DVD player, use ' and " to scroll through the channel numbers. • The channel number selection display remains on the screen for about 10 seconds.
Angle Selection (DVD only) You can change the angle of view when playing a DVD that contains scenes recorded from multiple angles. BACKLIGHT VIEW MODE VIDEO ADJUST VIRTUAL DIGITAL GAMMA DIGITAL S.
Subtitle Selection (DVD only) You can use the following procedure to select the set of subtitles you want to use when the DVD you are playing includes subtitle sets for multiple languages. To change the subtitle set 1 While the disc is playing, press SUBTITLE. • This displays the currently selected subtitle set number. Example: When there are three subtitle sets • If the disc does not have any subtitle data, X X appears in place of the subtitle set number.
Using Dolby Virtual (DVD only) • Your DVD player has built-in virtual surround circuitry that provides rich audio output when playing through a stereo (2-channel) television or through audio equipment. • Dolby Virtual lets you play audio from DVDs recorded using Dolby Digital (5.1 channel) and Dolby Surround (Pro Logic). • See the disc jacket for information about how its audio was recorded. Dolby Virtual The following table shows the types of audio recordings for which Dolby Virtual is enabled.
Selecting Titles from the Title Menu of a DVD (DVD only) Some DVDs have a title menu that you use to select the title you want to play. BACKLIGHT OPERATE HI/LOW/OFF VIEW MODE VIDEO ADJUST DIGITAL DIGITAL TITLE VIRTUAL GAMMA S.
Setting Play Parameters Using the Disc Menu (DVD only) Some DVDs include a disc menu that you can use to select subtitle set, audio channel, and Dolby Digital (5.1 channel) or DTS audio. You can also turn disc menu on and off. BACKLIGHT VIEW MODE VIDEO ADJUST VIRTUAL DIGITAL GAMMA DIGITAL S.
Settings from the DVD Player Control Panel (GUI) Certain DVD settings must be made using the DVD player’s control panel, and cannot be made using the remote control unit. Other settings can be made using either the remote control unit or the control panel.
Settings from the DVD Player Control Panel (GUI) 2 While “Screen 1” or “Screen 2” is on the display, use \ and | to select the setting you want to change. Example: View angle 1/3 1/4 1 / 2T0 1C0 0 1 Example: Dolby Virtual GAMMA A U T O S.PICTURE O N VIRTUAL O F F The icon of any function that is not supported by the disc you are using is replaced by X X . 3 Use " and ' to change the selected setting. 1/3 2/4 1 / 2T0 1C0 0 1 GAMMA A U T O S.
Adjusting Display Use the procedures described here to adjust the brightness and contrast of the colours that appear on the display, and the overall brightness of the display. BACKLIGHT OPERATE HI/LOW/OFF VIEW MODE VIDEO ADJUST DIGITAL DIGITAL VIRTUAL GAMMA S.
Adjusting Display BACKLIGHT HI/LOW/OFF BACKLIGHT OPERATE HI/LOW/OFF VIEW MODE DIGITAL VIDEO ADJUST DIGITAL VIRTUAL GAMMA S.
Viewing Images from an External Device Use the following procedure to set up the DVD player for use as a monitor for viewing images from a VCR or camcorder. INP UT DVD / SKIP BA HI/LOCKLIG W/OF HT F PLAY /GU VIE MO W DE I SK IP STOP TIT OP EN STILL LE ENTE ME R RETU ON/ STAN RN NU /PA USE ES ON PH INPUT/ DVD OG AL DIO AN AU AL TIC OP EO VID N MI DBY ME LU X VO MA To view images from an external device 1 2 3 4 5 Connect the external device using the procedure on page 29.
References Precautions Use & Care • Avoid magnetic sources. Using the DVD player near strong fluorescent lights, motors, televisions, or other magnetic sources may adversely affect recorded images. • Remember to remove the disc, turn off the power when the DVD player is not in use. • Using the DVD player near a broadcasting station or other powerful transmission source may cause buzzing or picture deterioration. • Avoid shocks and dropping.
References • Do not leave the DVD player on your lap for a long time during use. Heat generated by the DVD player can cause low-temperature burning of the skin over time. Moving and shipment • Remove the disc before packing the DVD player for moving or shipment. It is also a good idea to remove the disc and turn off power whenever you are not using the DVD player. Saving power • Help save power by turning off the DVD player when you are not using it.
References AC Adapter • The supplied AC adapter is compatible with 50Hz and 60Hz electrical systems in the range of 110 V to 240 V AC. • The AC adapter may interfere with reception if used near a radio. • Prevent flammables, liquids, and metal objects from entering the adapter. • The adapter is sealed unit. Do not attempt to open and modify it. • Do not damage, drop, or subject the adapter to vibration. • Do not leave the adapter in direct sunlight.
References Warning! 1. Never drop the battery pack or otherwise subject it to strong impact. 2. Use and store the battery pack in areas that is out of the reach of small children. 3. Never place the battery pack inside a microwave oven or a washing machine. 4. Fluid from inside the battery pack getting into the eyes can cause loss of eyesight. Wash out the eyes thoroughly with plain water and then contact a doctor immediately. Battery pack fluid on clothing or skin can cause skin irritation.
Troubleshooting Whenever you are having problems with your DVD player, check the following points before requesting service. Problem Power does not turn on or suddenly turns off. Recommended Action Page • Make sure the power plug of the AC adapter is plugged into a power outlet. 33 • Try turning power off and then back on again. 38 Power does not • Check if the battery pack is charged. If not, turn on or charge it. suddenly turns off under battery power.
Troubleshooting Problem Nothing appears on the screen. Recommended Action • Check the DVD player’s overall screen brightness setting to make sure it is not “OFF”. No audio is output. • Make sure the display panel is open. Audio is not output through the DVD player speakers while the display panel is closed. • Check the volume dial setting. If it is at zero, rotate the dial to turn up the volume. Page 82 30 21, 58 • Make sure headphones are not connected to the headphones jack.
Troubleshooting Recommended Action Page • Make sure the main power switch is in the 34, 35 “OFF” position. The battery pack does not charge when it is connected to the DVD player while DVD player power is turned on. • A warm battery takes longer than normal to – charge. Wait until the battery cools to normal temperature before trying to charge it. • Replace the battery pack with a charged one or 33-36 Power does not turn on. switch to AC adapter power.
Error Indicators and Warnings The error indicators and warnings described below appear on the display whenever there is a disk play problem, operational problem, etc. Display Meaning • The region number of the DVD you are attempting to play is not 2 or ALL. • The disc you are attempting to play is not compatible with this DVD player. • You are attempting a play operation while there is no disc in the disc compartment. • The disc you are using does not support the operation you are trying to perform.
Specifications Product Model Signal System Supported Disc Types Video Input/Output S-Video Output Audio Input/Output Digital Audio Interface Audio Output Headphones Output Display Speakers Light Source Video Signal Audio Signals Power Requirements Power Consumption (AC Adapter) Dimensions GB 92 Portable DVD Player DV-L70S/DV-L70BL NTSC/PAL DVD (Region Number 2, ALL), Video CD, Audio CD Input/Output Jack: Mini jack × 1 (accepts supplied S-video/video cord) Input/Output Levels: 1Vp-p (75Ω) Y Output Le
Specifications Weight Operating Temperature Operating Humidity Storage Temperature 620g 5°C to 35°C 80% RH maximum –20°C to 40°C AC Adapter Specifications Power Requirements 110 to 240V AC, 50/60Hz Rated Input Capacity DVD Operation: 30VA Charging (110V): 30VA Rated Output DVD Operation: 9V DC Charging: 9V DC Dimensions 58 (W) × 104 (D) × 275 (H) mm Weight 170g Specifications are subject to change without notice. Weight and dimensions are approximate.
Glossary Backlight Built-in fluorescent light that supplies screen illumination. Chapter A section inside a title. Compression (Dolby Digital output level) Setting that increases the average volume of Dolby Digital audio when playing a DVD. Digital gamma Corrects for gradations in dark areas of images to make images clearer. Digital super picture Enhances the fine detail of the image and outlines of the objects it contains.
Glossary Linear PCM audio Audio signal recording system used for audio CDs. Pan scan 4 : 3 P S Screen size that cuts off the sides of the image to allow playing of Wide (16:9) software on a connected 4:3 TV. Parental level Setting that makes it possible to control the types of scenes that can be played by the DVD player. This setting helps to keep children from viewing adult material. Pickup Laser device that reads the data from a disc for playback.
SHARP CORPORATION Osaka, Japan Printed in Japan Impreso en Japón Tryckt i Japan TINS-3709GEZZ T2315-A