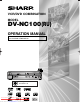
VCR/DVD COMBINATION MODEL DV-NC100 (RU) OPERATION MANUAL Please read this Operation Manual carefully before using your VCR/DVD COMBINATION. DV-NC100 OPERATE OPEN/CLOSE PAL PULL OPEN REW FF STOP/ EJECT OUTPUT PLAY REC TIMER CH VCR DVD STOP PLAY (TRACKING) 5 The region number for this VCR/DVD is 5. Downloaded From DvDPlayer-Manual.
SAFETY INFORMATION Power Cord Protection NOTE: To avoid any malfunctions of the VCR/DVD, and to protect against electric shock, fire or personal injury, please observe the following. • Hold the plug firmly when connecting or disconnecting the AC power cord. • Keep the AC power cord away from heating appliances. • Never put any heavy object on the AC power cord. • Do not attempt to repair or reconstruct the AC power cord in any way.
SAFETY INFORMATION Location and Handling NOTES: • Do not cover or place the VCR/DVD in enclosed spaces to prevent excessive temperature build up. • Do not place the VCR/DVD in direct sunlight, or near heat sources. • Keep the VCR/DVD away from strong magnetic objects. • Do not place any object containing water or other liquids on the VCR/DVD. In the event that liquid should enter the cabinet, unplug the VCR/DVD immediately and contact the retailer or service centre approved by SHARP immediately.
FEATURES ¡Search DVD Chapter search / Title search / Track search / Time search ¡Dolby Digital sound ¡Repeat This VCR/DVD can handle Dolby Digital surround sound having 5.1 channels when connected to a Dolby Digital decoder. Chapter / Title / Track / Group / All / A-B ¡Zoom ¡Marker ¡Still/fast/slow/step playback ¡Rapid Play The part designated by user can be called back. Playback in slightly faster/ slower speed while keeping the sound quality as in the normal playback.
INTRODUCTION Supplied Accessories • Remote control • Two R-6 batteries • Operation Manual • Round coaxial cable • Audio cable • Video cable • SCART output adaptor Manufactured under license from Dolby Laboratories. “Dolby” and the double-D symbol are trademarks of Dolby Laboratories. “DTS” and “DTS Digital Out” are trademarks of Digital Theater Systems, Inc. TABLE OF CONTENTS ■ SAFETY INFORMATION. . . . . . . . . . . . . . . . . . . . . . . . 2 ■ FEATURES . . . . . . . . . . . . . . . . . . . . . . . .
ABOUT THE DISCS Playable Discs The following discs can be played back on this VCR/DVD. ¡DVD video ¡DVD-RW/R* ¡DVD+RW/R* ¡Audio CD ¡Kodak Picture CD ¡CD-RW/R* ¡MP3* ¡Video CD ¡JPEG* * Depending on the types or the writing method of the medium some discs cannot be played. For DVD+RW/R, only discs recorded in the Video mode can be played back.
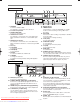
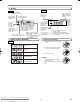
FUNCTIONAL OVERVIEW FRONT PANEL 2 1 4 5 3 6 DV-NC100 OPERATE OPEN/CLOSE PAL PULL OPEN REW FF STOP/ EJECT OUTPUT PLAY REC TIMER CH VCR DVD STOP PLAY (TRACKING) 20 19 18 17 16 15 14 13 12 10 11 9 8 7 12. Remote Sensor 13. TIMER indicator The indicator is on when the VCR/DVD is in standby mode for a timer recording or during a One Touch Recording. 14. REC (VCR) Press once to start recording or repeatedly to start One Touch Recording. The indicator is on during recording. 15.
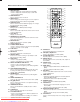
FUNCTIONAL OVERVIEW REMOTE CONTROL 1 1. DISPLAY Button • Press to display the current playback mode.(DVD) • Press to display the current time, tape counter and channel number.(VCR) 2. OPERATE Button Press to turn the power on and off. 3. ANGLE Button Press to change the camera angle to see the sequence being played back from a different angle.(DVD) 4. SUBTITLE Button Press to select a desired subtitle language or to change the Panel Display settings. (DVD) 5.
FUNCTIONAL OVERVIEW Display VCR DVD Lights up when the A-B repeat function is on. Lights up when the ALL repeat function is on. Lights up when the timer recording or an OTR recording has been set. Lights up when a tape is inserted. Lights up when the repeat function is on. REC GROUP Lights up when the inserted disc comes to a pause. Lights up when playing back in slow mode. (DVD or Video CD) DVD Lights up during playback when the repeat function is on.
SETTING UP YOUR VCR/DVD COMBINATION CAUTION: • Be sure to turn off the VCR/DVD and equipment to be connected before connecting. • Read through the operation manual for the equipment to be connected. • Be sure to keep the VCR/DVD connection cables separate from the TV antenna cable when you install the VCR/DVD, because it may cause electrical interference when you are watching television programmes. • DTS audio cannot be produced with an analogue connection.
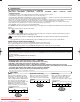
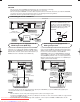
SETTING UP YOUR VCR/DVD COMBINATION Connecting to Audio Equipment Connecting the VCR/DVD to audio equipment provides normal stereo sound, plus powerful stereo sound enhanced by Dolby Digital 5.1 channel surround sound, DTS and MPEG Audio. Playing 2 channel audio C Analogue audio connection DVD To AUDIO OUT jacks DIGITAL AUDIO OUT AERIAL ANALOG AUDIO OUT S-VIDEO OUT (White) L VCR AV2 (DECODER) DVD/VCR AV1 (TV) RF OUT R (Red) Amplifier of stereo system, etc.
SETTING UP YOUR VCR/DVD COMBINATION Playing Dolby Digital (5.1 channel), DTS or MPEG audio Connecting an amplifier with a Dolby Digital, DTS, or MPEG Audio digital surround processor to your VCR/DVD’s coaxial digital jack provides richer and more powerful audio play. C Digital connection to a processor or amplifier with a coaxial digital input jack You can make this connection using a coaxial digital cable.
VCR/DVD SET UP Setting the Clock This VCR/DVD incorporates a 24-hour clock. The clock must be set for the Timer Recording function to operate correctly. 1 Press VCR, then MENU. 2 Press K or L to select INITIAL, then press B. 3 Press K or L to select CLOCK, then press B. 4 Press K or L until the relevant year appears, then press B. 5 Press K or L until the relevant month appears, then press B. 6 Press K or L until the relevant day appears, then press B.
VCR/DVD SET UP To Skip a Preset Channel Channel Reprogramming The channels you can no longer receive or seldom watch can be set to be skipped when you access channels with o/p p). CH (o 1 Press VCR, then MENU. 2 Press K or L to select INITIAL, then press B. 3 Press K or L to select CH TUNING, then press B. 4 Press K or L to select MANUAL, then press B. 5 Press K or L to select POSITION, then press B. 6 Press the numerical buttons, K or L to select relevant position number, then press B.
VCR OPERATION Recording • Reception of stereo broadcasts: Viewing and Recording the Same Programme 1 Insert a cassette tape with its erase-prevention tab in place. (If necessary, rewind or fast forward the tape to the point at which you want to begin recording.) 2 Press the numerical buttons or CH (o o/p p) to select the channel to be recorded. 3 Press TAPE SPEED/SYSTEM to select the tape speed (SP/LP). 4 Press REC/OTR to begin recording. • The REC indicator on the display comes on.
VCR OPERATION Auto Repeat Playback Timer Recording The VCR/DVD has an auto repeat function that allows you to repeat a tape indefinitely without touching PLAY. 1 Insert a pre-recorded tape and press VCR, then MENU. 2 Press K or L to select SET UP, then press B. 3 Press K or L to select AUTO REPEAT. 4 Press B so that ON appears next to AUTO REPEAT on the TV screen. When in Stop mode, Auto Repeat mode will start automatically. If the on-screen menu still remains, press MENU to exit, then press PLAY.
VCR OPERATION To correct timer programmes If you want to correct an automatic timer after you finished setting programme, 1 Repeat steps 1 to 3 in the “Timer Recording” section. 2 Select the setting you want to change using s or B. 3 Enter the correct numbers using K or L, then press B. 4 Press MENU to exit. 5 Press TIMER ON/OFF to return to timer stand-by mode. To cancel or check the start/end time 1 Repeat steps 1 to 2 in the “Timer Recording”. 2 Select a programme number you want to check using K or L.
VCR OPERATION Copying a Video Tape Video Cassette Tape You can make copies of videotapes made by friends or relatives for your own enjoyment. WARNING: Unauthorised recordings of copyrighted video tapes may be an infringement of copyright laws. Connect the recording VCR/DVD (this unit), playing VCR (another VCR) and your TV as outline in the following diagram. [Source (Playing) VCR ] (another VCR) This VCR/DVD will operate with any cassette that bears the VHS mark.
PLAYING A DISC Basic Playback DVD CD General Features MP3 DVD-RW VCD DVDs or Video CDs may contain menus to navigate the disc and access special features. Enter an appropriate number or JPEG use Arrow ( K / L / s / B) to highlight your selection in the DVD main menu and press ENTER to confirm. NOTE: • Unless stated, all operations described are based on remote control use. VR mode Getting started • Turn on the power of the TV, amplifier and any other components which are connected to the VCR/DVD.
PLAYING A DISC Resume Title Menu DVD 1 Press TITLE. • The title menu will appear. 2 If the feature is not available, symbol may appear on the TV screen. 3 Press Arrow ( K / L / s / B) to select an item, and ENTER to confirm selection. • Playback will begin at the selected Title. To call up a menu screen during playback • Press MENU to call up the DVD main menu. • Press TITLE to call up the title menu.
PLAYING A DISC Track Search Fast Forward / Reverse Search DVD CD MP3 DVD-RW VCD CD MP3 VR mode 1 During playback, press FWD g or REV h repeatedly to select the required forward or reverse speed. • For DVDs, fast forward or reverse search speed is different depending on the disc. Approximate speed is 1 (x2), 2 (x8), 3 (x50), and 4 (x100). • For Video CDs, fast forward or reverse search speed is different depending on the disc. Approximate speed is 1 (x2), 2 (x8), 3 (x30).
PLAYING A DISC Repeat Programme (CD) • REPEAT are available only during playback. CD DVD To activate the repeat function, press REPEAT during playback. • The repeat mode changes as described below every time you press the button. CHAPTER (current chapter repeat) TITLE (current title repeat) OFF (repeat off) DVD-RW VR mode TITLE CHAPTER ALL OFF (current chapter repeat) (current title repeat) (entire disc repeat) (repeat off) NOTES: • Repeat Title/Chapter is not available with some scenes.
PLAYING A DISC MP3/JPEG Playback MP3 JPEG When a CD with MP3 or JPEG files is inserted in the VCR/DVD and MENU is pressed, the FILE LIST will appear on display. The number of tracks is also displayed on the front panel. 1 Press K or L to select the desired group (folder) or track. • If a group (folder) is selected, press B or ENTER to go on to the track selection screen. Press K or L to choose a track, then folder name 1 JPEG folder name 2 press PLAY or ENTER.
PLAYING A DISC Slide Show Mode Audio Language JPEG You can switch to the slide show mode during playback. 1 Press MODE during playback. • The slide show mode screen will appear. • The slide show mode cannot be switched when it is stopped, or from the file list screen or the Picture CD menu screen. 2 Press ENTER. • The slide show mode will change. CUT IN/OUT: The entire image appears in one time. FADE IN/OUT: The image appears gradually and then disappears. 3 Press MODE to exit.
PLAYING A DISC Subtitle Language Changing the On-Screen Display DVD DVD DVD-RW DVD-RW VR mode VR mode The VCR/DVD allows you to select a language for subtitle during DVD disc (if available) playback. 1 Press SUBTITLE during playback. 2 Press SUBTITLE repeatedly to select your desired subtitle language. • The selected language will be displayed on the display bar at the top of the screen. 3 To turn off subtitles, press SUBTITLE repeatedly until OFF appears.
PLAYING A DISC Marker Setup Screen DVD CD Virtual Surround DVD-RW VCD VR mode without PBC function Use markers to memorise your favourite places on a disc. 1 Press MARKER during playback. • The display screen and Markers will appear on the TV screen. 2 Press s or B to select a Marker (1 ~ 10), and ensure that “- : - - : - -” appears in the display. 3 When it reaches the desired point, press ENTER. • Selected number will turn to and the point will be marked.
DVD SETUP Audio Setting Parental Control Choose appropriate settings for best sound reproduction dependent on your externally connected equipment. These settings only affect DVD playback. Parental Control prevents disc being viewed that exceed the set limit, unless a password is used. This feature allows you to prevent discs with unsuitable scenes from being played by your children. 1 Press SETUP in STOP mode. 2 Press s or B to select (CUSTOM), then press ENTER. • On screen menu will appear.
DVD SETUP Display Setting Language Setting You can change certain aspects of the DVD display screens, on-screen messages and the display panel on the front of the VCR/DVD. 1 Press SETUP in STOP mode. 2 Press s or B to select (CUSTOM), then press ENTER. • On screen menu will appear. 3 Press s or B to select (DISPLAY), then ENTER to confirm. 4 Press K or L to select the below items, then press ENTER. DISPLAY TV ASPECT STILL MODE ANGLE ICON VIDEO OUT Language options are not available with some discs.
DVD SETUP Language Code List Language Code A-B Abkhazian Afar Afrikaans Albanian Amharic Arabic Armenian Assamese Aymara Azerbaijani Bashkir Basque Bengali;Bangla Bhutani Bihari Bislama Breton Bulgarian Burmese Byelorussian C-E Cambodian Catalan Chinese [CHI] Corsican Croatian Czech Danish [DAN] Dutch [DUT] English [ENG] Esperanto Estonian F-H Faroese Fiji Finnish [FIN] French [FRE] Frisian 4748 4747 4752 6563 4759 4764 5471 4765 4771 4772 4847 5167 4860 5072 4854 4855 4864 4853 5971 4851 5759 4947 7254
TROUBLESHOOTING GUIDE If the VCR/DVD does not perform properly when operated as instructed in this Operation Manual, check the VCR/DVD, consulting the following checklist. Problem No power No picture Solution –Check if the AC power cord is properly connected. –Check if the TV is switched on. –Check if the cable is connected to the correct device. (See “Connecting to a TV or a stereo TV”) Distorted picture –Sometimes a small amount of picture distortion may appear. This is not a malfunction.
SPECIFICATIONS PRODUCT TYPE DVD Player with Video Cassette recorder NUMBER OF VIDEO HEADS 4 VIDEO SIGNAL STANDARD PAL/MESECAM colour system AUDIO RECORDING SYSTEM 1 Stationary head for liner audio 2 Rotary heads for Hi-Fi stereo CHANNEL COVERAGE E2 - E69 TIMER BACKUP 60 minutes DISCS (PLAYBACK COMPATIBILITY) DVD Video / Audio CD / Video CD / CD-RW / R DVD-RW / R, DVD+RW / R FREQUENCY RESPONSE DVD (linear sound) : 20 Hz to 20 kHz (sample rate: 48 kHz) 20 Hz to 44 kHz (sample rate: 96 kHz) CD : 20 Hz to 20 kH
SHARP CORPORATION Downloaded From DvDPlayer-Manual.