
Specifications


11EN
Recording Disc Playback EditingBefore you start Connections Getting started
Changing the
Setup menu
Others
Note
• This is an example screen only
for explanation. Displayed
items are depending on the
disc you inserted.
1 Required Setting:
To set up the required setting.
2 Playback:
To set up the unit to play discs as
you prefer.
3 Display:
To set up the OSD screen and the
front display of the unit as you
prefer.
4 Recording:
To set up the unit to record on
discs as you prefer.
5 Clock:
To set up the clock of the unit as
you need.
6 Channel:
To adjust the channel setting of
the unit as you prefer.
7 Disc / CD Playback Mode:
When a DVD-Video
(commercially available), a
brand new DVD-R disc or a
DVD-RW/-R disc with DivX® files
is inserted into the unit, you
cannot select “Disc”.
“CD Playback Mode” is available
only when an Audio CD, Video CD
or a CD-RW/-R disc with MP3 or
JPEG files is inserted into the unit.
You cannot select “CD Playback
Mode” when CD-RW/-R disc with
DivX® files is inserted into the unit.
2 Finalise:
Allows you to finalise a disc
containing recorded titles.
3 Disc Protect (VR mode only):
Allows you to protect a disc
from accidental editing or
recording.
4 Random Play:
To activate the random
playback feature.
5 Program Play
(Audio CD / Video CD without
PBC function):
To activate the programmed
playback feature.
6 PBC (Video CD only):
Turn the PBC function “ON” or
“OFF”.
7 Slide Show
(JPEG / KODAK PICTURE CD
files only):
Select the display time of the
slide show mode.
Setup
Playback
Display
Recording
Clock
Channel
Disc
Required Setting
1
2
3
4
5
6
7
1
2
3
4
5
6
7
Disc
Finalise
Disc Protect OFF ON
Format
2
3
11
2
3
CD Playback Mode
Program Play
Random Play
Slide Show 5 sec.
PBC (Video CD only) ON
4
5
4
5
5
7
6
5
Disc
Finalise
Format
1
2
1
2
<DVD-RW / DVD-R (Video mode)>
<DVD-RW (VR mode)>
<CD / Video CD / MP3 / JPEG /
KODAK PICTURE CD>
Before you start
Functional overview (cont’d)
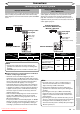
Setup menus
Press [SETUP] to display the Setup menu, then press [ENTER] to display each menu, using [Cursor K / L].
These menus provide entries to all main functions of the unit.
Guide to On-Screen Displays
With a disc inserted into the unit,
press [DISPLAY] to display the
On-Screen Display. The menu
shows information about what is
recorded on the disc.
DVD-R1 1 0:00:00
SP 1:35
P08
Video mode
14
5
2
5
2
3
6
3
1 Disc type and format mode
In some descriptions in this
manual, only one type of disc is
indicated as an example.
2 Position number of the
programme
3 Recording mode and
remaining time
4 Title number, chapter
number and the time lapse of
disc playback
5 Each icon means:
: Search
: Audio
: Subtitle
: Angle (except VR mode)
: Repeat
: Marker
: Noise Reduction
: Zoom
: Surround
6 Status of the current disc
DISPLAY menu
1 Format (DVD-RW only):
Allows you to erase all of the
recorded content on the disc.
The disc will be completely
blank.
• Erased content cannot be
called back.
• A DVD-RW disc formatted
with this unit cannot be
used on other DVD recorders
without any recording using
this unit.
• If you want to use a disc only
formatted with this unit on
another DVD recorder, you
have to re-format the disc on
that recorder.
Downloaded From Disc-Player.com Sharp Manuals