
Specifications


36 EN
Recording
DV dubbing (cont’d)
Note
• The unit does not send out the output signal to DV camcorder.
• For the proper operation, connect DV camcorder to the unit
directly. Do not connect this unit and the DV camcorder via any
other unit.
• Do not connect more than one DV camcorder.
• The unit can only accept DV camcorder. Other DV equipment such as
Set-top Box, or D-VHS VCR cannot be recognised.
• Date / time and cassette memory data will not be recorded.
• Pictures with a copy-guard signal cannot be recorded.
• A DV terminal is a terminal that can use the transmission mode
conforming to the IEEE 1394 standards called “Fire Wire”. It serves
as the interface that connects the PC and peripheral equipment
such as “i.Link” (registered trademark of SONY). It enables digital
dubbing between DV devices with little degradation.
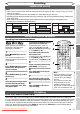
DVD-RW1 1 0:00:00
SP 1:35
AB-1234
0:00:00
DV
Video mode
DV Audio Stereo1
Start Rec
Control DVD
DVD-RW1 1 0:00:00
SP 1:35
AB-1234
0:22:54
DV
Video mode
2
3
1
4
5
7 6
When the DV camcorder
is in Playback mode...
When the DV camcorder
is not in Playback mode...
The menu changes according
to what mode of DV Camcorder.
Switch the mode on the
DV Camcorder to Playback mode
for the dubbing information.
DVC is slow forwarding.
(standard speed)
DVC is in stop mode.
DVC is in playback.
DVC is in pause mode.
DVC is fast forwarding.
(standard speed)
DVC is fast forwarding.
(faster than above)
DVC is fast forwarding.
(faster than above)
DVC is slow forwarding.
(faster than above)
DVC is slow forwarding.
(faster than above)
DVC is fast forwarding.
(in stop mode)
DVC is fast reversing.
(in stop mode)
DVC is in reverse playback.
DVC is fast reversing.
(standard speed)
DVC is fast reversing.
(faster than above)
DVC is fast reversing.
(faster than above)
DVC is in slow reverse
playback.
DVC is in recording.
DVC is in recording
pause mode.
1 DV icon
2 Indicator of active device
• When the “Control” is
highlighted, press [ENTER]
to display the item selection.
Select the device you wish to
operate using [Cursor K / L],
then press [ENTER] to activate.
• Select “DVD” to control this unit.
• Select “DVC” to control your
DV camcorder.
3 Recording audio mode
• Other than the DV camcorder
is in stop mode, the “DV
Audio” can be selected. Press
[ENTER] to display the item
selection and then using
[Cursor K / L] to select the
audio you wish to output.
Press [ENTER] again to
activate.
• Select “Stereo1” to dub the
stereo sound.
• Select “Stereo2” to dub the
sound with postrecording
sound.
• Select “Mix” to dub the
Stereo1 and Stereo2.
4 Indicator of dubbing function
• When the unit is ready for
dubbing, “Start Rec” will
appear.
• When the unit is in dubbing,
“Pause Rec” will appear.
5 Channel position
• When you select “AV5” by
using [PROG. K / L], “DV” will
appear.
6 Product name of your DV camcorder
• If the unit cannot recognise the input signal from the DV
camcorder or the unknown product, “No Device” will appear
instead.
• If the unit receives the input signal from the DV camcorder but
the unknown product, “
****
” will appear instead.
7 Status of the current operation and the time counter
• Depending on the DVC's mechanism, the unit's counter and
icons may not be displayed the same as DVC shows.
Each icon means:
The following instructions are described with the operations using the remote control of this unit.
Downloaded From Disc-Player.com Sharp Manuals