
Specifications


9EN
Recording Disc Playback EditingBefore you start Connections Getting started
Changing the
Setup menu
Others
Before you start
Functional overview (cont’d)
ZOOM
DISPLAY
SETUP
TOP MENU
MENU/LIST
REC MODE
REC/OTR
PAUSESKIP SKIP
PLAY
CM SKIP
AUDIO
OPEN/CLOSE
FWD
REV
CLEAR
1
2
3
4
5
6
7
8
9
SPACE
0
A
HG
ENTER
PROG.
RETURN
.@/:
ABC
DEF
GHI
JKL
MNO
PQRS
TUV
WXYZ
B
C
{
B
K
L
h
g
F
STOP
RAPID PLAY
NB034
TIMER
PROG
.
OPERATE
DVD RECORDER
9
1 13*
15
17
18
16
20
22
21*
24
23
25
14
3
4
5
11
12
10
2
6
7
8
19
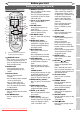
Remote Control
*
…
You can also turn on the unit
by pressing these buttons.
6 MENU/LIST button
• Press to display the Disc menu
during playback.
• Press to change the Original
and Playlist on the TV screen.
(VR mode only)
7 Cursor K / L / s / B buttons
• Press to select items or
settings.
8 REV E button
• During playback, press to
reverse fast.
• When playback is paused,
press to reverse slowly.
9 REC MODE button
• Press to switch the recording
mode.
10 RAPID PLAY button
• During playback, press to
playback in a slightly faster/
slower speed with keeping
the audio quality.
11 REC/OTR button
• Press once to start a basic
recording.
• Press repeatedly to start the
One-touch Timer Recording.
12 SKIP H button
• During playback, press to skip
to the previous chapter or
track.
• When playback is paused,
press to play reverse step by
step.
SKIP G button
• During playback, press to skip
to the next chapter or track.
• When playback is paused,
press to advance step by step.
13 OPEN/CLOSE A button*
• Press to open or close the disc
tray.
14 TIMER PROG. button
• Press to display the timer
programme setting menu.
15 PROG. K / L buttons
• Press to change the channel
up or down.
16 AUDIO button
• When receiving a bilingual
broadcast, press to change the
audio out setting to “Main”,
“Sub”, and “Main / Sub”.
1
OPERATE button
• Press to turn on or off the unit.
• If timer programming is set,
press to switch the unit to the
timer-standby mode.
2 ZOOM button
• During playback, press to
enlarge the picture on the
screen.
3 Number buttons
• Press to select channel
numbers.
• Press to select a title / chapter
/ track on the display.
• Press to enter values for
settings in the Setup menu.
• Press to enter the characters
in edit function.
4 DISPLAY button
• Press to display the On-Screen
Display.
5 TOP MENU button
• Press to display the Title
menu.
• Press to change the bilingual
audio source of an external
equipment to “Main”, “Sub”,
or “Main/Sub”. (Available only
when the “External Input
Audio” in the DVD setup
menu is set to “Bilingual” in
advance.)
• Press to display the audio
menu during playback.
• Press to select the sound
mode.
17 SETUP button
• Press to display the Setup
menu in stop mode.
18 CLEAR button
• Press to clear the password
once entered.
• Press to cancel the
programming for a disc.
• Press to clear the selecting
marker number in the marker
setup mode.
• Press to clear the programme
once entered in the Timer
Programming list.
19 ENTER button
• Press to confirm or select
menu items.
20 RETURN / button
• Press to return to the
previously displayed menu
screen.
• Press and hold it for more
than 5 seconds to protect any
operations both the unit and
the remote control.
21 PLAY B button*
• Press to start or resume
playback.
22 FWD D button
• During playback, press to
forward fast.
• When playback is paused,
press to forward slowly.
23 PAUSE F button
• Press to pause playback or
recording.
24 CM SKIP button
• During playback, press to skip
30 seconds.
(See page 48.)
25 STOP C button
• Press to stop playing back or
recording.
Downloaded From Disc-Player.com Sharp Manuals