
User manual


101
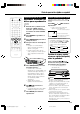
Problem Suggested Solution
Can not control your TV using this remote
control
Unable to Record, Timer Record or
Automatically Record from an External Input
Nothing is Recorded Following Recording
Unable to Record onto a DVD-RW Disc in
the Video Mode
Images from a Camcorder Connected to the
DV IN/OUT terminal are not Displayed, are
Displayed without Sound or the Camera
does not Operate Properly
A Camcorder Connected to the DV IN/OUT
terminal cannot be Controlled with this
Product
Images are Distorted (Appear Improperly)
during External Input or Broadcasts with
Poor Reception
There is no On-screen Display during
Playback
• Check that you entered the correct code for your TV
• Place a disc for recording (DVD-R or DVD-RW) in the recorder and after
confirming that disc identification (loading) has been completed, perform the
respective procedures for recording, timer recording or automatically
recording from an external input.
• There is nothing recorded when a channel has been recorded that is not
broadcasting (or for which broadcasting has ended). There may also be
nothing recorded when a channel with poor reception has been recorded.
• Use a Ver 1.1 disc or later. (The version is usually indicated on the back of
the disc jacket).
• Recorded material protected with a copy guard cannot be viewed.
• Check the connections.
• Turn the power OFF and then turn it back ON again.
• Reconnect the DV cable.
• Try setting “DV LINK” to “OFF”.
• Switch “DV AUDIO IN”.
• Set “DV LINK” to “ON”.
• Some types of camcorders may not be able to be controlled.
• Switch “3D Y/C” to “OFF”.
• Check whether or not “DUBBING” is set to “ON”. When this is set to ON, the
on-screen display is forcibly set to OFF during playback.
NOTE
• This recorder is equipped with a microprocessor. Its performance could be adversely affected by external electrical noise
or interference. If this should happen, unplug the product and plug it in again after a few minutes.
• Press RESET with a toothpick or other narrow rod-like object (nonmetal) when the recorder does not operate properly even
after the power has been turned off and then back on again.
• Since the clock, channel, timer recording programs and other data in memory are also reset when RESET has been
pressed, they must be set again.
• EZ Set Up function starts automatically when RESET is pressed.
Service Informatino (For the U.S.)
For the location of the nearest Sharp Authorized Service Center, or to obtain product literature, accessories, supplies or
customer assistance, please call 1-800-BE-SHARP (1-800-237-4277) or visit SHARP’s website (http://www.sharp-usa.com).
1. Do not attempt to service this product yourself. Instead, unplug it and contact a qualified service technician. (See CON-
SUMER LIMITED WARRANTY at the end of this manual.)
2. Be sure the service technician uses authorized replacement parts or their equivalents. Unauthorized parts may cause fire,
electrical shock, or other hazards.
3. Following any service or repair, be sure the service technician performs safety checks to certify that this product is in safe
operating order.
Troubleshooting
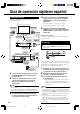
POWER
OPEN/CLOSE
CHANNEL
TIMER ON/OFF
REC
STOP
PLAY
STILL/PAUSE
SKIP
DISC
TIMER
AV
AUTO REC
STANDBY
TIMER
DISC IN
LINE IN 2
L
(
MONO
)
-AUDIO-R
VIDEO
S
-
VIDEO
DV IN/OUT
RESET
DV_RW2U#p100-104.p65 03.1.9, 7:53 PM101