ELECTRONIC CASH REGISTER CAJA REGISTRADORA ELECTRONICA MODEL MODELO INSTRUCTION MANUAL XE-A201 MANUAL DE INSTRUCCIONES
How to Use the Instruction Manual Printing a Document To print the current document, click the Print button Finding words To find a complete word or part of a word in the current document, click here. Paging through a document To go to the next page, click the > button. To go to the previous page. Using Acrobat Reader This manual is in the format of Acrobat Reader. For the details of how to Browsing with bookmarks Bookmarks can mark parts of a document for quick access.
WARNING FCC Regulations state that any unauthorized changes or modifications to this equipment not expressly approved by the manufacturer could void the user’s authority to operate this equipment. Note: This equipment has been tested and found to comply with the limits for a Class A digital device, pursuant to Part 15 of the FCC Rules. These limits are designed to provide reasonable protection against harmful interference when this equipment is operated in a commercial environment.
CONTENTS INTRODUCTION ............................................................................................................................................1 IMPORTANT ..................................................................................................................................................1 CONTENTS....................................................................................................................................................2 PARTS AND THEIR FUNCTIONS.......
BASIC FUNCTION PROGRAMMING (For Quick Start) ............................................................................27 1 Date and Time Programming ..............................................................................................................27 2 Tax Programming for Automatic Tax Calculation Function .................................................................28 Tax programming using a tax rate .........................................................................................
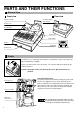
PARTS AND THEIR FUNCTIONS 1 External View Front view Operator display Rear view Customer display (Pop-up type) Printer cover Receipt paper Power cord Mode switch Drawer Keyboard Drawer lock RS-232C connector 2 Printer The printer is one station type thermal printer, and therefore it does not require any type of ink ribbon or cartridge. Lift the rear of the printer cover to remove. To re-install, hook on the pawls on the cabinet and close. Caution: The paper cutter is mounted on the cover.
3 Mode Switch and Mode Keys The mode switch can be operated by inserting one of the two supplied mode keys - manager (MA) and operator (OP) keys. These keys can be inserted or removed only in the “REG” or “OFF” position. MA OP The mode switch has these settings: OFF: This mode locks all register operations. (AC power turns off.) No change occurs to register data. OP X/Z: To take individual clerk X or Z reports, and to take flash reports.
5 Displays Operator display Customer display (Pop-up type) PLU/SUB DEPT RCPT OFF Clerk code REPEAT DC SHIFT NUMBER Amount: Appears in the far-right eight (max.) positions. When the amount is negative, the minus symbol “-” appears before the amount. Number of repeats for repetitive registrations: The number of repeats is displayed, starting at “2” and incremental with each repeat. When you have registered ten times, the display will show “0.”(2 → 3 ..... 9 → 0 → 1 → 2 ...
GETTING STARTED Please follow the procedure shown below. The batteries are not installed and the power is OFF. 1 Installing the cash register 2 Initializing the cash register Find a stable surface where the cash register is not subject to water sources or direct sunlight near an AC outlet. Unpack the cash register and make sure all accessories are included. For details of accessories, please refer to “Specifications” section.
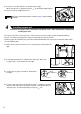
3. Insert three new “AA” batteries as illustrated at the right. When the batteries are properly installed “ ” on the display will disappear. 4. Close the battery compartment cover. Be sure to observe precautions shown on page 1 when handling batteries. 4 Installing a paper roll Precaution: The paper cutter is mounted on the printer cover. Take caution when removing and installing the cover. The register can print receipts or journals.
5. When not using the take-up spool (using as receipt paper): • Cut off the excess paper using the edge of the inner cover, and replace the printer cover. Press the F key to make sure the paper end comes out of the printer cover. If the paper end does not come out, open the printer cover, and pass the paper end between the paper cutter and the paper guide of the printer cover, and replace the cover.
• Split pricing entry This is not factory preset. You must enable this function. • Foreign currency conversion rate You must set a conversion rate to use V key. • Preset unit price for departments and PLUs • Preset amount for • Preset rates for % & You do not have to program these preset prices/amount/rates because you can enter when registration. It might be convenient to preset so you do not have to re-enter every time.
FOR THE OPERATOR OVERVIEW OF FLOW OF DAILY SALES ENTRIES Things to do before you start sales entries: • Make sure the power cord is securely inserted into the AC outlet. • Turn the mode switch to OP X/Z position, and check if time is correctly set. • Replace the drawer, if removed for safety. • Check if there is enough paper on roll. • Select receipt ON/OFF function. • Make any necessary programming for the day in PGM mode. For details, refer to BASIC SALES ENTRY, page 12.
BASIC SALES ENTRY 1 Basic Sales Entry Example On the below, basic sales entry example when selling department items by cash is shown. For operation details, please refer to each section. REG Mode switch setting OPX/Z MGR 1. Turn the mode switch to the REG position. OFF X1/Z1 Clerk assignment X2/Z2 VOID PGM 2. Enter your clerk code. (For example, clerk code is 1. Press the 1 and L key in this order.) Item entries 3. Enter the price for the first department item. (For example, for 15.
Clerk assignment Prior to any item entries, clerks must enter their clerk codes into the register. However, the code entry may not be necessary when the same clerk handles the next transaction. ■ Sign-on (in REG, MGR, VOID mode) ■ Sign-off (in REG, MGR, VOID mode) To display the signed-on clerk code Clerk code 1 to 15 L L L Receipt ON/OFF function When you use the printer to issue receipts, you can disable receipt printing in the REG mode to save paper using the receipt ON/OFF function.
3 Item Entries Single item entries Department entries For a merchandise classification, the cash register provides a maximum of 99 departments. To the departments, group attributes such as taxable status are applied on items when they are entered. • When using the department keys (for department 1 to 32) For department 1 to 16, enter a unit price and press a department key. If you use a programmed unit price, press a department key only.
Key operation example Print 1200 ( 500 D ! Department entry PLU entry Subdepartment entry ) D" 50 d 1500 d 33 d 2p 11p1200p A Repeat entries You can use this function for entering a sale of two or more of the same items. Repeat pressing a department key, d key or p key as shown on key operation example.
Key operation example Department entry PLU entry Subdepartment entry Print 3 @ 1200 ( 5 @ 500 D ! 3@) 5@D" 3 @ 50 d 1500 d 5 @ 33 d 3@2p 5@ 11p1200p A Split pricing entries This function is practical when the customer wants to purchase items normally sold in bulk. To realize this function, you must change the programmed setting. Refer to “Various Function Selection Programming 1” (job code 70) for programming details.
Single item cash sale (SICS) entry • This function is useful when a sale is for only one item and is for cash. This function is applicable only to those departments that have been set for SICS or to their associated PLUs or subdepartments. • The transaction is complete and the drawer opens as soon as you press the department key, d key or p key.
Check tendering Key operation example Print s 1000 C Cash or check sale that does not require entry Enter items and press the A key if it is a cash sale or press the C if it is a check sale. Your register will display the total sale amount. Key operation example Print 300 + 10 p A In the case of check sale Charge (credit) sale Enter items and press the charge key (c).
6 Tax Calculation Automatic tax When the register is programmed with a tax rate (or tax table) and the tax status of an individual department is set for taxable, it computes the automatic tax on any item that is entered directly into the department or indirectly via a related PLU. Example: Selling five $6.70 items (dept. 1, taxable 1) and one $7.15 item (PLU no.
Tax status shift The machine allows you to shift the programmed tax status of each department or the PLU key by pressing the T and/or U keys before those keys. After each entry is completed, the programmed tax status of each key is resumed. Example: Selling the following items for cash with their programmed tax status reversed • One $13.45 item of dept. 16 (non-taxable) as a taxable 1 item • One $7.00 item of PLU no. 25 (non-taxable) as a taxable 1 and 2 item • One $4.00 item of dept.
OPTIONAL FEATURES 1 Auxiliary Entries Discount and premium entries using the percent key The percent key is used to apply a manually entered or preset discount or premium percent rate to individual items or to a merchandise subtotal. In the default setting, you can manually enter a discount percent rate to both individual items and merchandise subtotal. For manual entry of discount or premium percent rate, enter the rate (up to 100.
Discount for the merchandise subtotal Key operation example Print 575 + 10 p m 100 - A Discount for item entries Key operation example Print 675 * A (When a discount amount of $0.75 is programmed.
Key operation example Print 1230 s 1500 + c 2 Auxiliary Payment Treatment Currency conversion The register allows payment entries in a foreign currency (only cash payment is available). Pressing the V key creates a subtotal in the foreign currency. When using a programmed currency conversion rate, press the V key after item entries, then enter the tendered amount in foreign currency if not exact amount payment, and press the A key.
Received-on Account and Paid-out Entries When you receive on account from a customer or when you pay an amount to a vendor, it is a good idea to use the r key or the R key respectively. For the received-on-account (RA) entry, enter the amount, and press the r key. For the paid-out (PO) entry, enter the amount and press the R key. Cash tendering only available for RA and PO operation.
CORRECTION 1 Correction of the Last Entry (direct void) If you make an incorrect entry relating to a department, PLU/subdepartment, percentage (% and &), discount (-) or refund, you can void this entry by pressing the v key immediately after the incorrect entry.
3 Subtotal Void You can void an entire transaction. Once subtotal void is executed, the transaction is aborted and the register issues a receipt. This function does not work when more than 30 items have been entered. Key operation example Print 1310 " " 1755 + 10 p 35 p Subtotal void s v s Correction of Incorrect Entries not Handled by the Direct or Indirect Void 4 Function Any errors found after the entry of a transaction has been completed or during an amount tendered entry cannot be voided.
FOR THE MANAGER PRIOR TO PROGRAMMING Before starting sales entries, you must first program necessary items so that the cash register suits your sales manner. In this manual, there are three sections, BASIC FUNCTION PROGRAMMING where required items must be programmed, AUXILIARY FUNCTION PROGRAMMING where you can program for more convenient use of keys on the keyboard, and ADVANCED FUNCTION PROGRAMMING where various optional programming features are provided.
Time For setting the time, enter the time in 4 digits using the 24-hour format. For example, when the time is set to 2:30 AM, enter 230; and when it is set to 2:30 PM, enter 1430. Time(max. 4 digits in 24-hour format) s Key operation example Print 1430 s Time In the display, current time is displayed in 12-hour format. For AM time, “ ” and for PM time “ ” will appear in the rightmost position with the current time.
Example: Programming the tax rate 4% as tax rate 2 with tax exempt as 12¢ Key operation example Print s9@ 2@ 4@ 12 s A • If you make an incorrect entry before pressing the third @ key in programming a tax rate, cancel it with the l key. • You do not need to enter the trailing zeros of the tax rate (after the decimal point), but you do need to enter the decimal for fractions.
s 8 T max. three digits @ @ One- or two-*1 digit number Q max. five digits @ @ @ *2 Rate max. six digits (0.0001 - 99.9999%) Minimum breakpoint max. five digits M max. four digits @ @ A Repeat until the MAX point is entered. The first figure to be entered depends upon whether the difference between a minimum breakpoint to be entered and the preceding minimum breakpoint is not less than $1.00 or more than 99¢. When the difference is not less than $1.
• If the tax is not provided for every cent, modify the tax table by setting the tax for every cent in the following manner. When setting the tax, consider the minimum breakpoint corresponding to unprovided tax to be the same as the one corresponding to the tax provided on a large amount. Sample tax table Example 8% Tax .00 .01 .02 .03 .04 .06 .09 .10 .11 .12 .14 .17 Modification of the left tax table Minimum breakpoint .01 .11 .26 .47 .68 .89 1.11 1.26 1.47 1.68 1.89 2.11 .00 .01 .02 .03 .04 .05 .06 .
AUXILIARY FUNCTION PROGRAMMING 1 Department Programming Merchandise can be classified into a maximum of 99 departments. Items sold with use of the department keys can later be printed on a report that shows the quantities sold and sales amounts classified by department. The data is useful for making purchasing decisions and other store operations. Departments can be assigned to articles whose prices were set using PLU/subdepartment function.
Example: Programming department 2 as taxable 1, SICS, negative department, entry digit limit - 7 digits, and allowing open & preset entry. (ABCDEFGH: 00011173) Key operation example Print @ "A 00011173 From left, EGH Tax status Sign(F) Preset unit price To program zero * D Unit price (max. six digits) A Dept. key *To program departments 17 through 32, press the department shift key at this point. For department 33-99: To program zero d Unit price (max. six digits) Dept.
Unit price and associated department assignment *1 D To program zero *2PLU code *3 Unit price (max. six digits) p A Associated Dept. key *1: To assign departments 17 through 32, press the department shift key at this point. When the associated department is department 33-99: *2PLU code p Associated dept. code (1 to 99) To program zero d *3 Unit price (max.
3 Miscellaneous Key Programming The cash register provides miscellaneous keys such as %, &, -, f, r, R, V, t, C, c and A. While the cash register is pre-programmed so you can use these keys, you must set a currency conversion rate to use V key. You can also program these keys for more convenient use. Please refer to the data below for programming these keys. Factory setting is indicated with parentheses. %, & f r, R V C, c and A t (Manual tax) Percent rate (0.
Amount for To program zero - Discount amount (max. six digits) Key operation example A Print A 200 Discount amount Percent rate limitation for % and & To program zero s 29 @ % & Percentage limit (0.00 -100.00%) or A To program for another percent key • Percent entries that exceed the upper limit may be overridden in the MGR mode. • 10.00% can be entered as 10 or 10P00. The P key is needed only for fractional entry.
*: Item: Selection: A Tax 4 status B Tax 3 status C Tax 2 status D Tax 1 status E +/- sign F Item % / Item _ G Subtotal % / Subtotal _ H Entry digit limit for discount key Entry: Taxable Non-taxable Taxable Non-taxable Taxable Non-taxable Taxable Non-taxable + (premium) sign - (discount) sign Allow Disallow Allow Disallow 1 0 1 0 1 0 1 0 0 1 0 1 0 1 0-7 When programming for percent keys, always enter 0 for H.
Entry digit limit for r, R and t @ Entry digit limit r, R t or A (only for manual entry) • For r R, enter 0 to 9 (digits), and for t (manual tax), enter 0 to 7 (digits). Entry digit limit is in effect for REG-mode operation but can be overridden in the MGR mode. The entry digit limit is represented by the number of allowable digits for maximum entry or total amount. When “0” is set, the operation of the corresponding key is prohibited.
4 Text Programming The register allows you to program the texts for clerk names, department item names, PLU/subdepartment item names, and so on, if necessary. There are two ways for programming text: using character keys on the keyboard or entering character codes with numeric keys on the keyboard. Using character keys on the keyboard You can enter characters according to the small figures printed in the lower right position of the key tops. For the layout, please refer to “Keyboard” section on page 5.
Alphanumeric character code table ✱ ✱ (DC): Double-size character code 40 Code Character 091 Ä 092 Ö 093 Ü 094 ^ 095 _ 096 ’ 097 a 098 b 099 c 100 d 101 e 102 f 103 g 104 h 105 i 106 j 107 k 108 l 109 m 110 n 111 o 112 p 113 q 114 r 115 s 116 t 117 u 118 v 119 w 120 x 121 y 122 z 123 { 124 | 125 } 126 ß 127 ¢ 128 !! 129 1 130 2 131 3 132 4 1/2 133 F 134 T ← 135 Code Character 136 → 137 138 139 140 141 F 142 T ↓ 143 ç 144 ° 145 ¿ 146 Ù 147 à 148 Æ 149 ø 150 Å 151 152 ¤ é 153 è 154 Pt 155 i 156 Ñ 157 ò 1
Department text * D s 1 P To keep current setting Character keys (max.12 digits) Dept. key Dept. code (1 to 99) s A d To program another dept. *To program departments 17 through 32, press the department shift key. Key operation example Print s1P ! FRUIT s A Text programmed for dept. 1 (Programming FRUIT for dept.1) PLU text (item label) To keep current setting s 2 P PLU code Character keys (max.
Key operation example Print s3P 46 @ CARD s A (Programming CARD for gross charge) List of function texts Function no. Key or function Function no.
Clerk names To keep current setting s 5 P Clerk code (1-15) @ Character keys (max. 8 digits) s A To program another clerk Key operation example Print s5P 1@ DAVID s A Logo messages The register can print programmed messages on every receipt. On the standard model, the graphic logo is printed on the receipt. If you want to print logo messages, please change the logo print format. (See page 51 for the programming details.
To print the logo message “THANK YOU” using double sized characters and centering on the third line. Key operation example Print s4P 3@ SSS W THANK S YOU W SSS sA A 6-line logo message is preprogrammed when shipped. Please start entering from the first line when you first program a logo message. Foreign currency symbol Foreign currency symbol for V key is printed with a foreign currency exchange amount. To keep the current setting s 6 P Character keys (max.
Setting consecutive numbers To begin the count from 0001 s @ 2 A number (one to four digits) that is one less than the desired starting number Key operation example s A Print s2@ 1000 s A Consecutive number 2 Electronic Journal (EJ) Programming The cash register provides the electronic journal (EJ) function. By default, a maximum of 1000 lines can be stored in memory.
Function parameters for EJ To set “00000000” s 68 * Item: Always enter 0. Always enter 0.
3 Various Function Selection Programming 1 The cash register provides various detailed functions listed below. • Function selection for miscellaneous keys • Print format • Receipt print format • Function selection for tax • Others For this programming, job code entry style is applied. You can continue programming until you press the A key for the programming described in this section. To continue programming, repeat from a job code entry.
Print format Job code: 6 * Item: A B C D E F G H Selection: Printing style Use the printer for journal printing Use the printer for receipt printing* Receipt print format Total Detailed* Time print on all receipts/journals Allow time printing* Disallow it Date print on all receipts/journals Allow date printing* Disallow it Consecutive no. print on all receipts/journals Allow consecutive no. printing* Disallow it Always enter 0.
Other programming Job code: 61 * Item: A B C D E F G H Selection: Entry: Always enter 0. (Fixed position) 0 Always enter 0. (Fixed position) 0 Minus dept. and PLU/subdept. availability Disallow to program minus dept. and PLU/subdept.
Job code: 70 * Item: A B C D E F GH Selection: Entry: Split pricing counting Quantity* 0 Package 1 Multiplication/split pricing entry availability Allow multiplication entry only* 0 Allow both of multiplication and split pricing 1 Always enter 0. (Fixed position) 0 Always enter 0.
4 Various Function Selection Programming 2 The cash register provides various options so you can use the register to suit your sales needs.
RS-232C interface (1) RS-232C terminal number To set “0” s 30 @ Terminal number (max. 6 digits) s A (2) RS-232C transmission form To set “0” s 31 @ * Item: A *A s A Selection: Transmission line form Entry: Half duplex system Full duplex system* 1 0 (3) RS-232C baud rate s 32 @ * Item: A B *AB s A Selection: Always enter 0.
Thermal printer density To set “0” s 50 @ *Printer density (00-99) s A * By default, 50 is set. To make the print darker, set a larger number, and to make the print lighter, set a smaller number.
AUTO key programming — Automatic sequencing key — If you program frequently performed transactions or report sequences for the a key, you can call those transactions and/or reports simply by pressing the a key in key operations. Delete a Transaction a A max. 25 times Programming for a; entering a PLU 2 item (programmed unit price: 1.50) and a dept. 6 item (unit price: 1.
Sample printouts 1 Programming report 1 Mode Dept. code Dept. text Dept. unit price w/sign Dept. function Minus department Tax status Logo Message Function parametrs (F-H) Discount amt. w/sign Function parametrs (F-H) Function selection for miscellaneous keys (A-H) Print format (A-H) Receipt print format(A-H) Power save mode(A-D) Logo message print format Function selection for tax (A-H) Percent rate with sign Doughnut tax exempt Function no.& its text Tax status Percent limit RS-232C terminal no.
2 Programming report 2 4 Printer density programming report Entered Value Printer density Job code A to H from the left * Job code #63, 64, 65, 67, 69, 71, 72, 76, 77, 85, 87 and 95 are fixed settings, for which you cannot change the settings. Printing density example 5 PLU programming report Training clerk specification Language selection EJ memory type Range PLU code PLU text Mode parameter Unit price 3 Auto key programming report Associated dept.
READING (X) AND RESETTING (Z) OF SALES TOTALS • Use the reading function (X) when you need to take a reading of sales information entered since the last reset. You can take this reading any number of times. It does not affect the register’s memory. • Use the resetting function (Z) when you need to clear the register’s memory. Resetting prints all sales information and clears the entire memory except for the GT1 through GT3, Training GT, reset count, and consecutive number.
2 Daily Sales Totals Full sales report • Sample report *2 Mode title*1 Reset counter Net grand total(GT2-GT3) Grand total of plus registration Grand total of minus registration Grand total of training mode registration Dept. code Sales q'ty Sales amount Manual tax total *3 Tax total Net total without tax Net total with tax Item counter and total Item percent 1 counter and total REG-mode void counter and total Subtotal void counter and total “+” dept.
Clerk reports PLU sales report • Sample report Individual clerk report • Sample report Mode title* Report title Range Mode title* Report title Clerk code Clerk name Customer counter PLU code Item label Sales q'ty and total Full clerk report The printout occurs in the same format as in the sample report of individual clerk, but all clerk’s sales data are printed in the order of clerk code number (from #1 to #15). Range sum Hourly report *: When you take Z1 report, “Z1” is printed.
EJ REPORT READING AND RESETTING The cash register provides electronic journal (EJ) function. This function is intended to record the journal data in a memory instead of journal paper, and print the data as an EJ report. The register records the journal data in REG, PGM, VOID, X1/Z2 and Z2/Z2 modes. By default, a maximum of 1000 lines are stored in the memory, and you can expand it to 2000 lines. For details of EJ programming, please refer to “Electronic Journal Programming” section (page 45).
OVERRIDE ENTRIES Programmed limit for functions (such as for maximum amounts) can be overridden by making an entry in the MGR mode. 1. 2. Turn the mode switch to the MGR position. Make an override entry. REG OPX/Z OFF On this example, the register has been programmed not to allow discounts entries over $1.00. Key operation example REG-mode entries MGR X1/Z1 X2/Z2 VOID PGM Print 1500 # 250 - ...Error l Turn the mode switch to the MGR position. 250 Return the mode switch to the REG position.
OPERATOR MAINTENANCE 1 In case of Power Failure When power is lost, the machine retains its memory contents and all information on sales entries. • When power failure is encountered in register idle state or during an entry, the machine returns to normal operation after power recovery. • When power failure is encountered during a printing cycle, the register prints “========” and then carries out the correct printing procedure after power recovery. (See the sample print.
4 Replacing the Batteries This cash register displays a low battery symbol ( ) when the batteries are low, and displays a no battery symbol ( ) when batteries are extremely low or batteries are not installed. When the low battery symbol is displayed, replace the batteries with new ones as soon as possible. The existing batteries will be dead in about two days. When the no battery symbol is displayed, replace the batteries immediately.
Removing the paper roll When a red dye appears on the paper roll, it is time to replace it. Replace the paper roll with new one. If you plan on not using the register for an extended period of time, remove the paper roll, and store it in an appropriate place. Caution: The paper cutter is mounted on the cover. Be careful not to cut yourself. When the take-up spool is not used: 1. Remove the printer cover. 2. Cut the paper behind the printer and near the paper roll. 3.
Installing the paper roll Caution: The paper cutter is mounted on the cover. Be careful not to cut yourself. 1. Turn the mode switch to the REG position with the AC cord connected. 2. Remove the printer cover. 3. Check that the print head release lever is in the printing position. 4. Set the paper correctly in the paper roll cradle. 5. Insert the end of the paper into the printer until it is caught by the printer auto-feed and comes out of the printer at the top.
7 Cleaning the Print Head When the printed text is getting dark or faint, paper dust may be stuck to the print head. Clean the print head as follows: Caution: • Never touch the print head with a tool or anything hard as it may damage the head. • The paper cutter is mounted on the cover. Be careful not to cut yourself. 1. Turn the mode switch to the OFF position. 2. Remove the printer cover. 3. Remove the inner cover that protects the printer. (Press the lever located both sides and lift the cover up.) 4.
10 Before Calling for Service The malfunctions shown in the left-hand column below, labelled “Fault,” do not necessarily indicate functional faults of the machine. It is therefore advisable to refer to “Checking” shown in the right-hand column before calling for service. Fault Checking (1) The display shows symbols that do not make sense. • Has the machine been initialized properly as shown “GETTING STARTED”? (Note that initialization clears all the data and programmed settings stored in memory.
SPECIFICATIONS Model: Dimensions: Weight: Power source: Power consumption: XE-A201 13.0 (W) x 16.9 (D) x 11.0 (H) in. (330 (W) x 428 (D) x 280 (H) mm) 16.8 Ib (7.6 kg) 120V AC ± 10%, 60 Hz Stand-by 7W Operating 34.5W (max.) 32 °F to 104 °F (0 °C to 40 °C) LSI (CPU) etc.
INDICE INTRODUCCION............................................................................................................................................1 IMPORTANTE................................................................................................................................................1 INDICE ..........................................................................................................................................................2 PARTES Y SUS FUNCIONES .........
PARTES Y SUS FUNCIONES 1 Selector de modo y llaves de modo El selector de modo funciona insertando una de las dos llaves de modo suministradas: la llave del administrador (MA) y la del operador (OP). Estas llaves pueden insertarse o sacarse sólo cuando el selector esté en la posición “REG” u “OFF”. El selector de modo tiene estos ajustes: OFF: Este modo bloquea todas las operaciones de la caja. (La alimentación de CA está desconectada.) No hay cambios en los datos registrados.
A201_1(Sp) 01.10.31 4:38 PM Page 4 PARA EMPEZAR Siga el procedimiento mostrado a continuación. Las pilas no están instaladas y la alimentación está desconectada. 1. Inicialice la caja registradora Para que la caja registradora pueda funcionar correctamente, deberá inicializarla antes de ponerla en funcionamiento por primera vez. Siga el procedimiento siguiente. 1. Inserte la llave de administrador (MA) en el selector de modo y gírelo a la posición REG. 2. Enchufe la clavija a la toma de corriente de CA.
PARA EL OPERADOR REGISTRO BASICO DE VENTAS 1 Ejemplo de registro básico de ventas A continuación se muestra un ejemplo de registro básico de ventas de artículos de sección en metálico. Para los detalles de la operación, consulte cada sección respectiva. REG Ajuste del selector de modo OPX/Z MGR 1. Gire el selector de modo a la posición REG. OFF X1/Z1 Asignación de dependientes X2/Z2 VOID PGM 2. Introduzca su código de dependiente. (Por ejemplo, si el código de dependiente es el 1.
Función ON/OFF (de emisión/no emisión) de recibos Cuando emplea la impresora para emitir recibos, podrá inhabilitar la impresión de recibos en el modo REG. Pulse la tecla R en la posición OP X/Z. Esta tecla cambia el estado de impresión de recibos de ON a OFF. Para emitir un recibo cuando la función de recibo ON/OFF está desactivada (OFF): Si el cliente quiere el recibo después de haber finalizado la transacción con la función de recibo ON/OFF desactivada (OFF), pulse la tecla R.
• Cuando se emplea la tecla de registro de código de sección Cuando utilice un precio unitario programado d Código de sección (1 a 99) Precio unitario *1 (máx. 7 dígitos) d (En caso de que sólo esté permitido el registro de precio preajustado.) *1 Menos que los importes de límite superior programado Cuando se introduce cero, sólo se añade la cantidad de ventas. Registros de PLU/subsecciones La caja registradora ya está programada para el modo PLU y cero para el precio unitario.
Registros de venta en metálico de un solo artículo (SICS) • Esta función es útil cuando se vende solamente un artículo en metálico. Esta función es aplicable sólo a las secciones que se han ajustado para SICS o a sus PLU o subsecciones asociadas. • Se completa la transacción y el cajón se abre tan pronto como pulse la tecla de sección, la tecla d o la tecla p.
6 Cálculo de los impuestos Impuestos automáticos Cuando se ha programado una tasa de impuestos (o tabla de impuestos) en la caja registradora y el estado de impuestos para una sección individual está ajustado a imponible, la caja calcula los impuestos automáticos para cualquier artículo que se introduzca directamente en la sección o indirectamente mediante una PLU relacionada. Impuestos manuales La máquina le permite introducir manualmente los impuestos después de haber terminado el registro de artículos.
Cálculo porcentual para el subtotal de mercancías Ejemplo de operación de teclas ~ m 10 % A Cálculo porcentual para registros de artículos Ejemplo de operación de teclas 800 + 7 P 5 % A Registros de descuento y recargo empleando la tecla de descuento La tecla de descuento se emplea para aplicar un importe de descuento o recargo manualmente introducido o preajustado a artículos individuales o a un subtotal de mercancías.
• Pulse la tecla l después de pulsar la tecla V para cancelar el pago en una divisa. • Si se programa, se imprime un símbolo de moneda extranjera. Registros de recibido a cuenta y de pagado Cuando recibe un pago a cuenta o cuando usted paga a un abastecedor, es aconsejable emplear la tecla r o la tecla R respectivamente. Los pagos en metálico sólo están disponibles en la operación RA y PO. Para el registro de recibido a cuenta, introduzca el importe y pulse la tecla r.
PARA EL ADMINISTRADOR PROGRAMACION DE LAS FUNCIONES BASICAS (Para el inicio rápido) Para programar la caja registradora, ponga la llave del administrador en el selector de modo y gírela a la posición PGM. 1 Programación de la fecha y de la hora Fecha Para ajustar la fecha, introduzca la fecha con 8 dígitos empleando el formato de mes-día-año (MM/DD/AAAA), y pulse entonces la tecla s.
Ejemplo: Programación de la tasa de impuestos del 4% como tasa de impuestos 2 con exención de impuestos de 12¢ Ejemplo de operación de teclas s 9 @ 2 @ 4 @ 12 s A Tabla de impuestos (aplicable al impuesto añadido) Si se encuentra en una localidad que emplea una tabla de impuestos para el cálculo de los impuestos, podrá programar consecuentemente la caja registradora. La programación de la tabla de impuestos puede efectuarse para impuestos 1 a impuestos 4.
Este primer número que se introduce depende de si la diferencia entre un punto de división mínimo a introducirse y el punto de división mínimo anterior no son de menos de $1,00 ni de más de 99¢. Cuando la diferencia no sea de menos de $1,00, introduzca “1”, y cuando no sea de más de 99¢, introduzca “0” o no introduzca nada. Segundo número: El segundo número depende de si su tabla de impuestos debe programarse como tabla (1 a 4) de impuestos 1, 2, 3, ó 4.
Estado de impuestos (imponible 1 a 4 / no imponible) • Cuando se efectúa un registro de una sección imponible en una transacción, los impuestos se calculan automáticamente de acuerdo con la tabla o tasa de impuestos asociada. SICS (Venta en metálico de un solo artículo) • Si se efectúa primero un registro de una sección programada para SICS, la venta se finalizará como venta de pago en metálico así que se pulse la tecla de la sección.
Selección de PLU/subsección Para programar “0” *1Código de PLU p s *2A A Para programar la PLU siguiente Para programar otra PLU *1: 1 a 1.
Parámetros de función para %, & y Para programar “0” para todos los artículos *ABCDEFGH @ % & o A Para programar otra tecla *: Elemento: Selección: A Estado de impuestos 4 B Estado de impuestos 3 C Estado de impuestos 2 D Estado de impuestos 1 E Signo +/- F % de artículo / _ de artículo G % de subtotal / _ de subtotal H Límite de dígitos de entrada para la tecla de descuento Registro: Imponible No imponible Imponible No imponible Imponible No imponible Imponible No imponible Signo +
Parámetros de función para C, c y A (cuando se usa como tecla CA) Para programar “0” para todos los artículos *2 1 * ABC @ Para programar otra tecla *1:Elemento: A Impresión de pie del recibo B Registro de importe recibido C Límite de dígitos de entrada s, C c *2: Pulse la tecla o A s para ajustar la tecla CA.
Para programar la palabra “Clerk01” con la letra “C” de tamaño doble. Para que la letra “C” sea de tamaño doble Para que el tamaño de los caracteres vuelva al normal Para cambiar a letras minúsculas Para introducir números Wg W H hijk N01 Introducción de códigos de caracteres con las teclas numéricas del teclado Los números, las letras y los símbolos pueden programarse introduciendo el código de carácter y la tecla :.
Texto de función Para mantener el ajuste vigente s 3 P @ *Número de función (máx. 2 dígitos) Teclas de caracteres (máx. 8 dígitos) s A Para programar el texto de otra función * Número de función: Vea la “Lista de textos de función” mostrada a continuación.
Nombres de dependiente Para mantener el ajuste vigente Código de dependiente (1-15) s 5 P @ s A Teclas de caracteres (máx. 8 dígitos) Para programar otro dependiente Mensajes de membrete La caja registradora puede imprimir mensajes programados en cada recibo. En el modelo estándar, se imprime el membrete gráfico en el recibo. Si desea imprimir mensajes de membrete, cambie el formato de impresión de membrete. (Para los detalles de la programación, vea la página 27.
PROGRAMACION AVANZADA 1 Programación de número de caja registradora y de número consecutivo El número de caja registradora y el número consecutivo se imprimen en el recibo o en el registro diario.
* Elemento: Selección: A B C Introduzca siempre 0. Introduzca siempre 0.
Selección de función para teclas misceláneas Código de tarea: 5 * Elemento: A PO en el modo REG B RA en el modo REG C Cancelación de subtotal en el modo REG D Cancelación indirecta en el modo REG E Cancelación directa en el modo REG F Disponibilidad de la tecla de devoluciones G No venta en el modo REG H Disponibilidad de cantidades fraccionarias Selección: Registro: Habilitar la operación PO en el modo REG* Inhabilitarla Habilitar la operación RA en el modo REG* Inhabilitarla Habilitar la
Selección de función para impuestos Código de tarea: 15 * Elemento: AaF G Introduzca siempre 0. Disponibilidad de borrado de los impuestos en el modo REG H Disponibilidad de entrada de impuestos manuales en el modo REG Selección: Registro: (Posición fija) Habilitar el borrado de impuestos en el modo REG* Inhabilitarla Habilitar la entrada de impuestos manuales en el modo REG* Inhabilitarla 0 0 1 0 1 Otras programaciones Código de tarea: 61 * Elemento: A B C Introduzca siempre 0.
A201_3 FOR THE MANAGER(Sp) 01.10.31 4:40 PM Page 26 Código de tarea: 66 * Elemento: A B C D E F G H Selección: Registro: Impresión de un recibo después de la transacción Sólo el total Detalles* Impresión del importe cuando el precio Inhabilitar la impresión* unitario de PLU/subsección es cero Habilitarla Impresión del subtotal para conversión Habilitar la impresión* de déficit Inhabilitarla Introduzca siempre 0.
Formato de impresión del mensaje del membrete Podrá seleccionar el número de líneas del mensaje del membrete, y la posición en la que se imprime en el recibo o registro diario.
(5) Ajuste de tiempo vencido de RS-232C s 35 @ s A Tiempo vencido (1 a 255 seg.) Densidad de impresora térmica Para ajustar “0” s 50 @ *Densidad de impresora (00-99) s A * En el ajuste inicial se ajusta 50. Para oscurecer la impresión, ajuste un número mayor, y para que sea más clara, ajuste un número menor.
5 Lectura de programas almacenados La máquina le permitirá leer todos los programas almacenados en el modo PGM.
Elemento Posición del selector de modo OPX/Z X1/Z1 Operación de teclas X2/Z2 d Código de sección Informe rápido: (Sólo visualización) Para borrar la visualización, pulse la tecla l o gire el selector de modo a otra posición.
Lectura y reposición de los datos del registro diario electrónico (emisión de informe EJ) Podrá leer los datos del registro diario almacenados en la memoria EJ en el formato del registro diario ejecutando el procedimiento siguiente en el modo X1/Z1 u OP X/Z. Para leer todos los datos: 7: Para reponer todos los datos: @ A 7: P @ A Para leer los 10 registros últimos: 710 @ A • Para dejar de leer o reponer los datos, gire el selector de modo a la posición “MGR”.
A201_5 OPERATOR MAINTENANCE(Sp 01.10.31 4:39 PM Page 32 2 En el caso de error de impresora Si se termina el papel de la impresora, se parará la impresora, y aparecerá “PPPPPPPPPP” en el visualizador. No pueden aceptarse los registros de teclas. Instale el rollo de papel nuevo, y luego pulse la tecla l. Si se levanta el cabezal de impresión, se parará la impresora y aparecerá “H” en el extremo izquierdo del visualizador. No pueden aceptarse los registros de teclas.
5 Reemplazo del rollo de papel Utilice siempre rollos de papel especificados por SHARP. Si usa otros rollos de papel que no sean los especificados, pueden originarse atascos de papel y funcionar mal la registradora. (Forma de colocar el rollo de papel) A la impresora Correcto (Forma de cortar el extremo del papel) A la impresora Incorrecto Correcto Incorrecto Extracción del rollo de papel Cuando aparezca tinta de color rojo en el rollo de papel, será indicación de que tiene que cambiarlo.
Cuando emplee el carrete de toma (cuando se usa como papel de registro diario): • Inserte el extremo del papel en la ranura del carrete. (Pulse la tecla F para alimentar más papel si es necesario.) • Bobine el papel dos o tres vueltas en torno al eje del carrete. • Ajuste el carrete en el rodamiento, y pulse la tecla F para sacar la flojedad excesiva del papel. • Vuelva a colocar la cubierta de la impresora. 6 Extracción del papel atascado Precaución: El cortador de papel está montado en la cubierta.
8 Extracción del cajón Caja de monedas El cajón de la caja registradora es extraíble. Después de terminar la jornada laboral, extraiga el cajón. Para extraer el cajón, tire del mismo completamente hacia delante y extráigalo levantándolo. La caja de monedas de 5 denominaciones también es extraíble. 9 Abertura manual del cajón El cajón se abre automáticamente.
Tabla de códigos de error Cuando se visualicen los siguientes códigos de error, pulse la tecla l y tome la acción apropiada de acuerdo con la tabla siguiente. Código de error Estado de error Acción E01 Error de registro Haga el registro con las teclas correctas. E02 Error de operación incorrecta Haga el registro con las teclas correctas. E03 Se ha introducido un código no definido. Introduzca un código correcto. E07 La memoria está llena (en la programación de la tecla a).