
Manual
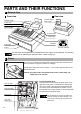
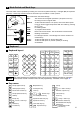


Table Of Contents
- WARNING
- CAUTION
- --- English version ---
- INTRODUCTION
- IMPORTANT
- PRECAUTION
- CONTENTS
- PARTS AND THEIR FUNCTIONS
- GETTING STARTED
- OVERVIEW OF FLOW OF DAILY SALES ENTRIES
- BASIC SALES ENTRY
- OPTIONAL FEATURES
- CORRECTION
- PRIOR TO PROGRAMMING
- BASIC FUNCTION PROGRAMMING (For Quick Start)
- AUXILIARY FUNCTION PROGRAMMING
- ADVANCED PROGRAMMING
- TRAINING MODE
- READING (X) AND RESETTING (Z) OF SALES TOTALS
- OVERRIDE ENTRIES
- CORRECTION AFTER FINALIZING A TRANSACTION (Void mode)
- OPERATOR MAINTENANCE
- 1 In case of Power Failure
- 2 In Case of Printer Error
- 3 Cautions in Handling the Printer and Recording Paper
- 4 Replacing the Paper Roll
- 5 Removing a Paper Jam
- 6 Cleaning the Print Head
- 7 Removing the Till and the Drawer
- 8 Opening the Drawer by Hand
- 9 Mounting the Spill-proof Cover
- 10 Before Calling for Service
- SPECIFICATIONS
- --- La versión española ---
- INTRODUCCION
- IMPORTANTE
- PRECAUCION
- INDICE
- PARTES Y SUS FUNCIONES
- PARA EMPEZAR
- REGISTRO BASICO DE VENTAS
- CARACTERISTICAS OPCIONALES
- CORRECCION
- PROGRAMACION DE LAS FUNCIONES BASICAS (Para el inicio rápido)
- PROGRAMACION DE FUNCIONES AUXILIARES
- 1 Programación de secciones
- 2 Programación de PLU (codificación de precios) y subsección
- 3 Programación de la tasa de comisión
- 4 Programación de teclas misceláneas
- Tasa para [%1], [%2] y [CONV]
- Importe para [(-)]
- Límite de tasa porcentual para [%1] y [%2]
- Parámetros de función para [%1], [%2] y [(-)]
- Parámetros de función para [CONV]
- Límite de dígitos de entrada para [RA], [RCPT/PO] y [TAX]
- Parámetros de función para [CHK], [CH1], [CH2] y [CA/AT/NS] (cuando se usa como tecla CA)
- 5 Programación de texto
- PROGRAMACION AVANZADA
- 1 Programación de número de caja registradora y de número consecutivo
- 2 Programación 1 de selección de diversas funciones
- 3 Programación 2 de selección de diversas funciones
- Modo de ahorro de energía
- Formato de impresión del mensaje del membrete
- Bloqueo de importe alto (HALO) para metálico en el cajón (CID) (centinela)
- Interfaz RS-232C
- Densidad de la impresora térmica
- Selección del idioma
- Especificación de dependientes de instrucción para el modo de instrucción
- Programación de la tecla AUTO — Tecla de secuencia automática
- 4 Lectura de programas almacenados
- MODO DE INSTRUCCION
- LECTURA (X) Y REPOSICION (Z) DE LOS TOTALES DE VENTAS
- REGISTROS DE ANULACION
- CORRECCION DESPUES DE FINALIZAR UNA TRANSACCION (Modo de cancelación)
- MANTENIMIENTO PARA EL OPERADOR
- 1 En caso de corte de la alimentación
- 2 En el caso de error de impresora
- 3 Precauciones al manejar la impresora
- 4 Reemplazo del rollo de papel
- 5 Extracción del papel atascado
- 6 Limpieza del cabezal de impresión
- 7 Extracción del separador de dinero y del cajón
- 8 Abertura manual del cajón
- 9 Colocación de la cubierta impermeable
- 10 Antes de solicitar el servicio de un técnico

8
Precaution: The paper cutter is mounted on the printer (receipt side). Take caution when
installing paper rolls.
The register can print receipts and journals. For the printer, you must install the paper rolls (receipt and journal
paper rolls) provided with the register.
Install the paper rolls according to the procedure shown below with the power cord connected and the mode
switch set to the PGM position:
How to cut a paper roll and set it in the paper roll cradle:
1. Cut off approximately one revolution of each paper roll. Make sure each paper end is cut as illustrated
above.
2. Set a paper roll in the paper roll cradle of the receipt side as illustrated above.
3. Insert the end of the paper roll into the paper chute until it is caught by
the printer auto-feed and comes out of the top of the printer. If the
printer does not catch the paper, feed the paper while pressing the
{
key.
4. Cut off excess paper with the paper cutter.
Correct Incorrect
To the printer
Incorrect
To the printer
Correct
Installing paper rolls
4
Preparing the cash register
To make the cash register ready for operation, remove the
retainer and set the print head release lever in print position.
1. Push the printer cover forward and detach it.
2. Remove the white retainer at the position shown at the right. Please
keep this retainer for future use when transferring the cash register.
3. Move the print head release lever to the printing position as
illustrated at the right.
3
Retainer
Print head
release lever
(printing position)