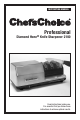
INSTRUCTION MANUAL Professional Diamond Hone® Knife Sharpener 2100 Read instructions before use. It is essential that you follow these instructions to achieve optimal results.
IMPORTANT SAFEGUARDS When using electrical appliances, basic safety precautions should always be followed including the following: 1. Read all instructions. 2. To protect against electrical hazards, do not immerse the Chef’sChoice® Model 2100 motor drive section in water or other liquids. 3. Make sure knife blades are cleaned thoroughly before they are inserted in the Model 2100 sharpener. 4.
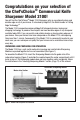
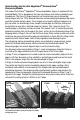
Congratulations on your selection of the Chef’sChoice® Commercial Knife Sharpener Model 2100! You will find the Chef’sChoice® Model 2100 Sharpener puts an exceptionally sharp and durable edge on all of your knives. It is backed by EdgeCraft, the World Leader in Cutting Edge Technology.® The Model 2100 incorporates advanced EdgeCraft diamond abrasive, honing and stropping technology to produce the sharpest and most durable edges of any sharpener available today.
GENERAL DESCRIPTION - MODEL 2100 SHARPENER The standard Model 2100 sharpener is equipped with the novel 3-Stage EdgeSelect® Sharpening Module that sequentially sharpens, hones and strops your knife edge to perfection. The knife is sharpened in the 1st Stage with 100% diamond-surfaced abrasives and then honed in the 2nd Stage with finer diamond particles. In the 3rd Stage the edge is stropped and polished to hair splitting sharpness.
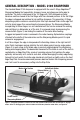
Understanding the Versatile EdgeSelect® Diamond Hone® Sharpening Module The unique Chef'sChoice® EdgeSelect® Sharpening Module (Figure 4) supplied with the standard Model 2100 is designed so that you may sharpen each knife according to your intended use. This three (3) stage sharpener has two precision conical sharpening / honing stages with fine 100% diamond abrasives and one polishing/stropping stage using proprietary flexible abrasive disks.
This unique 3-Stage design gives you an edge of remarkable sharpness and, because of the triple angle bevel it creates on each facet, you will note knives stay sharp longer. The following sections describe the general procedures for optimal sharpening in each stage and suggest how you can optimize the edge for your intended uses. Unless you do a lot of heavy duty cutting you will need to use Stage 1 only once in a while.
unnecessary and will not speed the sharpening process. Avoid cutting into the plastic stop bar of the Sharpening Module (see Figure 3). However, cutting into the stop bar will not functionally impact operations of the sharpener or damage the edge. INSTRUCTIONS Read This Before You Start To Sharpen The EdgeSelect Sharpening Module is designed to sharpen either Straight edge or Serrated edge knife blades. 1. Sharpen Serrated Blades Only in Stage 3.
Note: Each time you insert the blade you should simultaneously pull the blade toward you. Never push the blade away from you. Apply just enough downward pressure to make contact with the wheel – added pressure does not improve or speed the sharpening process. To ensure even sharpening along the entire blade length, insert the blade near its bolster or handle and pull it at a steady rate until it exits the slot.
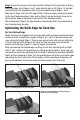
Stage 3: In general only one or two pairs of pulls in Stage 3 will be necessary to obtain a razor sharp edge. As in Stages 1 and 2, make alternate pulls in left (Figure 10) and right slots pulling the knife through the slots at the same speed used in Stages 1 and 2. More pulls in Stage 3 will refine the edge further, creating an edge particularly desirable for the finest food preparations.
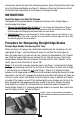
For Meats, Field Dressing Game and Highly Fibrous Materials For butchering, field dressing or cutting fibrous materials you may find it advantageous to sharpen in Stage 1, followed directly by Stage 3. This will leave sharpened microflutes along the facets near each side of the edge (Figure 12) that will assist in the cutting of such materials. The edge will be very sharp and unserrated after only one or two alternating pairs of pulls in Stage 3.
Resharpening Straight Edge Blades Resharpen straight edge knives whenever practical using Stage 3. When that fails to quickly resharpen, return to Stage 2 and make one or two pairs of alternating pulls. Then return to Stage 3 where only one to two alternating pair of pulls will be adequate to put a new razor-like edge on the knife. Use Stage 1 as a first step in resharpening only if you wish to have more “bite” along the edge or if the knife has been dulled excessively.
material from the surface of the Stage 3 disks and, hence, if used excessively, it will unnecessarily remove too much of the abrasive surface – wearing the disks out prematurely. If you clean knives regularly before sharpening you will need to clean or dress the Stage 3 disks only about once or twice a year even with daily use of the Model 2100.
B. Dishwasher: The Sharpening Module is designed to be washed safely in either domestic or commercial type dishwashers 1. Spray the wheels in each stage with liquid dishwasher detergent. 2. Put in upper shelf of dishwasher on normal wash cycle. 3. Allow Sharpening Module to dry in the dishwasher, in a position remote from the heaters. Periodically remove any metal dust that has collected in the two collection cavities that are located in the base of the sharpener, below the Sharpening Module.
7. Always pull the blades at the recommended speed and at a constant rate over the entire length of the blade. Never interrupt or stop the motion of the blade when in contact with the abrasive disks. 8. Always alternate pulls in right and left slots (of any stage used). Specialized Japanese blades are an exception and are sharpened primarily on one side of the blade. 9. The edge of the knife blade should be maintained while sharpening in a level position relative to the top of the counter or table.
NORMAL MAINTENANCE No lubrication is required for any moving parts, motor, bearings, or sharpening surfaces. There is no need for water on the abrasives. The exterior of the sharpener may be cleaned by carefully wiping with a damp cloth. Do not use detergents or abrasive cleansers. Periodically or as needed you can remove metal dust that will accumulate under the Module from repeated sharpenings.
Assembled in U.S.A. U.S. Patents 4807399, 5611726, 6012971, and other U.S. and Foreign patents pending. ©EdgeCraft 2007 www.edgecraft.