
Instruction manual


Resharpening Straight Edge Blades
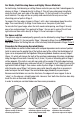
Resharpen straight edge knives whenever practical using Stage 3. When that fails to
quickly resharpen, return to Stage 2 and make one or two pairs of alternating pulls. Then
return to Stage 3 where only one to two alternating pair of pulls will be adequate to put a
new razor-like edge on the knife. Use Stage 1 as a first step in resharpening only if you
wish to have more “bite” along the edge or if the knife has been dulled excessively.
If a conventional sharpening steel is used repeatedly to tune up the edge between
resharpenings on the Chef’sChoice
®
Model 2100 you will have to resharpen first in Stage
2 following the normal sharpening procedure and then strop in Stage 3. In this case it will
take 3 or more alternating pairs of pulls in Stage 2 to achieve a uniform burr before
proceeding to Stage 3.
In view of this, if you wish to reduce sharpening time, you can consider not using the
conventional sharpening steel, and rely on Stage 3 for fast resharpening.
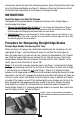
Resharpen serrated blades in Stage 3. See sections above.
Dressing of Stropping/Polishing Disks – Stage 3
The Chef’sChoice
®
EdgeSelect Sharpening Module is equipped with a build-in accessory
to manually dress the stropping disks in Stage 3. This is not a substitute for regular
cleaning of the entire sharpening module as described in a subsequent section to remove
grease or food from these disks. In the event these disks become glazed and blackened
with metallic sharpening debris, they can be dressed and reshaped by actuating the
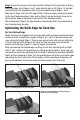
manual lever on the rear of the sharpener. This lever is located within a recess as shown
in Figure 15 on the left lower corner of the Module as you face the rear of Model 2100.
To operate the dressing tool, it is necessary first to turn the power switch “ON”. With the
sharpener running, press the lever as shown in Figure 15 gently to the right until you hear
the dressing tool contact the stropping disk. Maintain gentle pressure on the lever for 3 to 5
seconds, then press the lever gently to the left for 3 to 5 seconds. Do not dress either disk
for more than 5 seconds at any one time. This completes the dressing cycle. In order to
avoid excessive wear on the stropping disks, apply only light finger pressure on the lever.
Use this dressing accessory only if and when Stage 3 no longer appears to be sharpening
well or when it takes too many pulls to obtain a razor sharp edge. Using this tool removes
11
Figure 14. Sharpen serrated blades only in
Stage 3. (See instructions)
Figure 15. Stage 3 disks can be dressed if
necessary. Use infrequently. (See instructions)