
Instruction manual


B. Dishwasher: The Sharpening Module is designed to be washed safely in either
domestic or commercial type dishwashers
1. Spray the wheels in each stage with liquid dishwasher detergent.
2. Put in upper shelf of dishwasher on normal wash cycle.
3. Allow Sharpening Module to dry in the dishwasher, in a position remote from the heaters.
Periodically remove any metal dust that has collected in the two collection cavities that
are located in the base of the sharpener, below the Sharpening Module. With the
Sharpening Module removed, simply invert the motor housing and shake the dust loose.
Otherwise remove with a damp sponge. Because of the proximity to the electrical motor
we do not recommend the use of a water spray or compressed air to remove the loose
swarf (metal filings) from the base of the sharpener
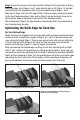
INSERTING SHARPENING MODULE
To reinsert the Sharpening Module into the main motor housing, insert the shaft coupling
end of the Sharpening Module into the guide rails at the right end of the sharpener. Then
gently push the Sharpening Module toward the motor housing until it locks in place. If it
resists snapping into the locked position: (1) Pull the module away from the motor shaft
until it fully disengages; (2) Turn the motor switch ON briefly; (3) Then turn it OFF; (4) While
the motor is still coasting to a stop, push the Sharpening Module into place. It will then
automatically snap into position when the spline coupling becomes properly self-aligned.
HOW TO GET THE MOST OUT OF YOUR
Chef’sChoice
®
Model 2100
1. There is no maintenance required other than for hygene reasons to remove and clean the
Sharpening Module as described regularly in the sink or dishwasher. It is unnecessary to clean
this module simply because the honing wheels darken – that is normal. The wheels are self
cleaning (through mild ablation) unless they become covered with fat and grease. The need for
cleaning can be minimized by wiping your knives before and after sharpening as described in
this manual. NEVER immerse the motor-drive unit in water. Periodically shake out the metal
dust under the sharpening Module as described under “Cleaning the Sharpening Module.”
2. We suggest you locate the Model 2100 in a convenient place in your work area. A few
quick passes through Stage 3 will restore your knife edge to razor sharpness. By using
Stage 3 to restore your edge it is not necessary to use a sharpening steel. You will find your
knife edge stays sharper longer than if resharpened with a conventional steel.
3. Resharpen the knife in Stage 2 only when you cannot first achieve satisfactory sharpness
with a few pulls through Stage 3.
4. This sharpener is supplied with an abbreviated set of instructions printed on an adhesive
backed plastic label. If you wish to keep these handy, remove backing and adhere to the
top surface of the motor housing. Replacement labels are available from EdgeCraft.
5. Always clean all food, fat and foreign materials from knife blade before sharpening or
resharpening.
6. Use only light downward pressure when sharpening – just enough to establish secure
contact with the abrasive disk.
13