
Instruction manual
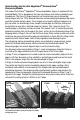


This unique 3-Stage design gives you an edge of remarkable sharpness and, because of
the triple angle bevel it creates on each facet, you will note knives stay sharp longer.
The following sections describe the general procedures for optimal sharpening in each
stage and suggest how you can optimize the edge for your intended uses.
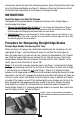
Unless you do a lot of heavy duty cutting you will need to use Stage 1 only once in a
while. One of the important advantages of using the EdgeSelect Sharpening Module is that
you can strop and polish your knives to razor sharp edges as often as needed and yet
experience little knife wear compared to older sharpening methods. Resharpening can
usually be done in Stage 3. Occasionally you will need to use Stage 2 for resharpening.
Use Stage 1 only for the heaviest duty applications (see Resharpening Section.)
The Chef'sChoice
®
Model 2100 EdgeSelect Sharpening Module is equipped with a
manually activated diamond dressing accessory that can be used if necessary to remove
any accumulated food or sharpening debris from the surface of the polishing/stropping
disks. In order to minimize the need for dressing, we strongly urge you to clean knives
each time before sharpening them. By doing so, you will be able to go months before you
need to “dress” these disks. Only when you sense a distinct decrease in polishing
efficiency will there by any need to use this convenient feature described further in a
subsequent section.
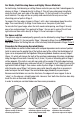
The sharpening and honing disks are spring-loaded on their drive shaft to provide an
optimum sharpening pressure that ensures rapid yet uniform sharpness along the length
of the edge and minimizes the potential for gouging the edge.
Each sharpening Stage is equipped with knife hold down springs that are positioned over
the sharpening disks to provide a spring action that holds the face of your knife securely
against the precision guide planes in the right and left slots of that stage during sharpening.
Unless you have special blades designed to be sharpened primarily on one side of the
edge (such as Japanese Kataba blades) you will want to sharpen equally in the right and
left slots of each stage you use. This will ensure the edge is symmetrical and will cut
straight at all times.
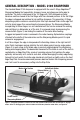
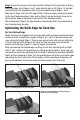
When sharpening in any stage, the knife should, on sequential strokes, be pulled
alternately through the left slot and the right slot of that Stage. Generally only one
pull in the left and one in the right slot will be adequate in each stage; with duller blades
you may need to make two pairs of pulls in a given stage (see subsequent sections for
more detail). Always operate the sharpener from the front side. Hold the blade horizontal
and level, slide it down between the plastic spring and the guide plane and pull it toward
you at a uniform rate as it contacts the sharpening or stropping disk. You will be able to
feel and hear the contact as it is made. Always
keep the blade moving uniformly through
each stage; do not stop the pull in mid stroke. Consistent pull speed of about 4 seconds
per stroke for an eight (8) inch blade is recommended. The time can be less for shorter
blades and more for longer blades.
Never operate the sharpener from the back side.
Use just enough downward pressure when sharpening to ensure uniform and consistent
contact of the blade with the abrasive disks on each stroke. Additional pressure is
6