
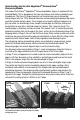
Instruction manual


Note: Each time you insert the blade you should simultaneously pull the blade toward you.
Never push the blade away from you. Apply just enough downward pressure to make contact
with the wheel – added pressure does not improve or speed the sharpening process.
To ensure even sharpening along the entire blade length, insert the blade near its bolster
or handle and pull it at a steady rate until it exits the slot. In each Stage make an equal
number of pulls, alternating in the left and right slots, in order to keep the edge facets
symmetrical. Generally in Stage 1 you will find that only one pull in each (left and right)
slot is adequate. Before proceeding to Stage 2, carefully check the edge of your knife to
be sure a burr has been formed along the sharpened edge, as described next:
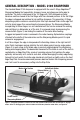
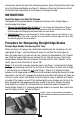
Detecting the Burr
In order to confirm that a burr (Figure 6) exists along one side of the edge, move
your forefinger carefully across the edge as shown in the Figures 6 & 7 above.
(Do not move your finger along the edge – to avoid cutting your finger). If the last pull was
in the right slot, the burr will appear only on the right side of the blade (as you hold it) and
vise versa. The burr when present feels like a rough and bent extension of the edge; the
opposite side of the edge feels very smooth by comparison. If a burr exists, proceed to
Stage 2.
If no burr exists, make one (1) additional pull in the left and right slots of Stage 1. Slower
pulls will help develop the burr. If the knife is extremely dull, additional pulls in Stage 1
may be needed to develop a burr. Confirm the presence of the burr along the entire edge
before proceeding to Stage 2.
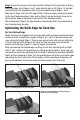
Stage 2:
Using the above procedure described for Stage 1, sharpen the blade in Stage 2.
Pull the blade once through the left
slot of Stage 2 (Figure 8) and once through the right
slot (Figure 9). For an eight (8) inch blade take about four (4) seconds for each pull. For
longer knives take about 6 seconds per pull and about 2-3 seconds for shorter blades.
Check for a burr along the edge. If no burr exists make additional pairs of pulls in Stage 2
until a burr develops and before proceeding to Stage 3.
8
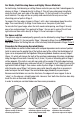
Move fingers
across and
away from edge
Figure 6. Develop a distinct burr along knife edge
before stropping in Stage 3.
Figure 7. Burr can be detected by sliding fingers
across and away from the edge.
Caution! See text.