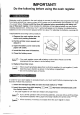
IMPORTANT! Do the following before using the cash register. Batteries must be installed in the cash register to prevent the data and user-programmed settings from being erased from memory when the AC power cord is accidentally disconnected or in case of a power failure. Please install the three AA batteries before proceeding with setup and use of this cash register. Once installed, the batteries will last approximately ona year before needing replacement.
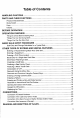
Table of Contents HANDLING CAUTIONS PARTS AND THEIR FUNCTIONS Physical Mode Switch BEFORE OPERATION .. OPERATION OVERVIEW “Things to Check Before Starting Work Things You Can Do During Work Things You Can Do After Work BASIC SALE ENTRY PROCEDURE Bale Entry and Change Calculation for a Typical Sale OTHER TYPES OF ENTRIES AND USEFUL FEATURES Entering or Repeat-Entering More Than One stem Entering a Department.
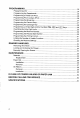
Programming VAT . Programming the Departments, Programming a Preset Unit Price Programming Price Lockups (PLU) Programming the Minus Key Programming the Percent Keys. Programming the Exchange Key Programming an Entry Digit Limit for the [Ra ], P55, and [CH] Keys. Overriding the Entry Di gt Limits . Programming the Machine Number. Programming the Receipt Start Number. Programming the Printing Limiting the Number of Usable Function Checking the Machine Settings DRAWER HANDLING Removing the Drawer.
HANDLING CAUTIONS «» Install the cash register in a location not subject to direct sunlight, unusual temperature changes, high humidity, or splashing water. « Do not aerate the cash register with wet hands. Water can cause internal component failure. « The cash register plugs into any standard wall outlet (official (nominal) voltage). Other electrical devices on the same electrical circuit can cause the cash register to malfunction. « Clean the cash register with a dry, soft cloth.
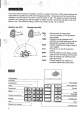
The mode switch enables the register to perform a variety of functions. Mode switch settings are made with the operator key (OP) or the manager key (MA) . These keys can be inserted into or withdrawn from the switch only when it is set to “REG" or For greater security during daily operation, the manager can set the register to “REG” and then remove the key before the clerk begins work.
The ER-A150 is equipped with a front and rear display that affords easy visibility to both customer and operator during transactions, The customer display can be popped up and rotated to clearly show prices, totals, and change due. To rotate the pop-up display simply pull upwards until it locks into place. Both the operator and customer displays have clear, easy to read fluorescent digits and a nine and seven digit capacity respectively.
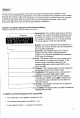
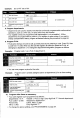
BEFORE OPERATION 1. Check that the cash register is plugged in. 2. Install paper roll. * See page 36. 3. Select the receipt on-off function. « See page 19. 4, Insert the manager key (MA) and turn the mode switch to “PG” 5. Set the date (day, month, year). * When the date is set, it will be printed on each receipt/journal and on sales reports. Example: Set the date to April 15, 1993, %! Enter job number. o (E e Enter dale.
Example: 1 Enter job number. Set a VAT rate Hyperventilate. [ 3 | Enter VAT rate. e Tormentor programming and 4 | oin. (TS| Printout 8. Program departments. « Departments are used to classify merchandise and apply programmable mathematical operations, such as a VAT rate, on frets when they are entered. « Your register comes per-programmed with departments taxable 1. All the departments are programmed as positive for addition of sales entries.
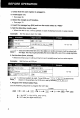
OPERATION OVERVIEW * Check that the cash register is plugged in. « Check that the low battery symbol (L) is not on, Seepage 7. + Check that there is enough paper in the paper roll. See page 36. * Check the time and date settings. i See page 8. * Program if necessary. See page 24.
BASIC SALE ENTRY PROCEDURE Make sure you have completed all the necessary programming in accordance with the i merchandise classification and pricing system of your business before using the cash i register on a day-to-day basis. See PROGRAMMING on page 24. [Sade Entry and Change Calculation for a Typical Sale 1. Turn the operator key (or manager key) to REG. REG 2. Enter the unit price, | 3. Press the appropriate department key. » , $3772) 4, Press the subtotal key. I . Xa2f22 .
OTHER TYPES OF ENTRIES AND USEFUL FEATURES REG TME "' WaR ol X121 Far this chapter, use the operator key (OP) set to REG. ml X20Za FGM\ Case 1: Entering department items by number keys. Example: Selling a department 1 item and & department totem for cash. & i Procedure H Keys to Press B Pendulous Ester price and ciepamne’rt | [ . *1+00 *7-00 Enter price and department. TE 3| *8+00 Finalize and print receipt. S “8-0 o Case 2: Entering more than one of the same department items.
Entering a Department To enter an item whose price has been assigned to a department, simply enter the department to which it has been assigned. Example: Selling an inert whose price is assigned to department 1. e | Kaye to Press il Enter reprisal fem with — Key. [ 01 %8495 *Bee % 2 Finalize and print receipt. T ! *8+95 o Entering & PLU (Price Lookup] To enter a programmed PLU, simply enter the code and press [BLDG. Example: Selling an item whose price is assigned o PLU 111.
Example: Customer gives an amount for a subtotal. Press the subtotal key. T 01 #19+00 — 02 *B-55 Enter the received amount. T Finalize and print receipt. (TR #1855 R i #2000 « . 5’9% *} 245 koS Note' * Use of the subtotal key is optional and a sale will be finalized by pressing [ALAS directly after entering the said items. Also, the change will be calculated if the amount received is entered before pressing [Tia] without pressing FET. Press (Ch ] instead of (U] at the end of the transaction.
Step | Procedure [ LG R 32-CE Crass subtotal key. oo [T 2 Enter received amount. (Z 101 (s 3 | Finalize and print receipt. Printout ot *7250 02 +50-00 *57+50 & «57-56 1 *Faff € *53.00 2 Your cash register comes per-programmed for an “Auto VAT 1-3 system”. With this system, the cash register, at finalization, calculates VAT for taxable 1, taxable 2, and taxable 3 subtotals by using the applicable percentages hat are programmed beforehand.
Case 2: Preset price reductive ion on a single item: The procedure is the same as the example above except that is pressed without entering a discount amount. The minus key's preset discount amount is applied automatically ly. Case 3: Manually entered price reduction on a subtotal. Example: Applying a discount on a subtotal. ep Priced & R 0 Enter price and department. | (Z)[5 %2500 Enter price erd department. 616 ](2] [ 02 'ég‘“g *55400 & Press subtotal key, ] ~wi0vQD*45.00 1 Enter discount.
Case 3: Example: | step Procedure Manually entered percentage reduction or premium on a subtotal. Applying & 10% premium to the subtotal of a transaction. 1 Enter PLU code. ) E 82 =30+00 2 Enter price and derangement. |~ (3 ) BTG 7] *38+95 & Press subplot ess sul Y. v3.50 3 Enter premium. i T 9 5 Finalize and print receipt. TR *42+85 0 Case 4: Preset price reduction or premium on a subtotal: The procedures is the same as the example above except that ar are pressed without entering a percentage.
Case 2: Using a manually Example: Step ! Procedure % Ratter price and department. entered rate. Keys to Press (21 e g Ever the conversion rate, BT e e eys Enter received amount, Funerary Finalize and print receipt. | [S] Selling a 20.00 DM department 2 item for US dollars. Printout U2 #20+00 “20.00 ¢ *20BU 1 x 3200+00 « ! “0e00 o Enter a refund by entering the refund amount or PLU code followed by the refund key and then the corresponding department key or the [PLUS key.
(Received on Account and Bald-Out Entries ) Example 1: Receiving an amount an account from a customer whose code number is 12345 {eight digits maximum). Enter aced number. TS AT ] 200012345 {2 moroseness | coroner o *60+ 00« Example 2: Paying an amount to a customer whose code number is 6789 (eight digits maximum). Keys to Press Printout Enter code number. B O O En i paid-out, r e *30:D0» i and i, L2y e TrT] This feature is useful when you want to make change. Example: Open the drawer with no sale.
CORRECTIONS Reg = For this chapter, use the operator key gt THE ™ meA d)T !MIE’ ~M?:m (OP) set to REG or the manager key ‘ 3 Gaza | (MA) secretory. Fuel\ Different types of corrections are possible depending on whether you use the clear key ((EL) or the void key is used 1o clear numerical entries made before further operations are performed. [E3] is sad to clear entries made that involve a programmable function of the register. The void mode, accessed with the manager key {MA), is used to correct receipts.
(Correction of the Next-To-Last or Earlier Entries (Indirect Void) | Before finalizing a transaction, any department entry, PLU entry or item refund entry that has been made can be corrected. Example: Correct price gantry. Keys 1o Press OIS Y3 Incorrect PLU entry (0] F Correct price entry. s e Colored price entry. Eyed L Enter void sequence. e o] [ Enter corset PLU. s ) Bl Finalize and print receipt. [T You incorrectly entered a PLU code a few steps back while adding up a sale.
READING AND RESETTING OF SALES TIME MGR TIME MGR o " X11Z1 o " B X121 ol Faradize mk Freezer: [ pan A PGM ¢ { TIME MGR N, o @'xw. € Maize PGM\ X222, For this chapter, use the manager key (MA) sett MGR, X1/21, or The ER-A150 allows you to print various sales reports and reset the sales information. Selection is made by using the manager (MA) key together with the key combinations given in the chart below. Reports are classified as “X17, “X2”, “Z1", “Z2", and “MGR.
Time. No. of customers Sales amount— Sample Hourly Report (Z mode) 22-04795 p—— 285795 9-06 54h *1523+60 01261186 11-55 Reset symbol — s stet no. Salas quantity 1 Bales amount— oohs 108 PLU code i 0108 {end oy 100 »680v00 01251165 + The “X” symbol is printed instead of “Z” on read (X) reports.
PROGRAMMING For this chapter, use the manager key (MA) set to PGM. Your cash register comes per-programmed for an “Auto VAT 1-3 system.” With this system, the cash register, at finalization, calculates VAT for taxable 1, taxable 2, and taxable 3 subtotals by using the corresponding percentages programmed beforehand. Now“% * It you need anther type of VAT (or tax), consult your dealer. Use the following sequence to program the VAT rate.
Parameter B: Taxable 3 Value to enter: 0 for no or 1 for yes Parameter C: Taxable 2 Value 1o enter: 0 for no or 1 for yes Parameter D: Taxable 1 Value to enter: 0 for no or 1 for yes Parameter E: Choice of normal department key use or use for single item cash sales Value to enter: 0 for normal or 1 for single item cash sale Meaning: Normal: This allows the operator 0 use the department key In the usual way.
The preset unit price function assigns a frequently purchased item to a department key and enables you to enter the price by simply pressing the department key. Other parameters programmed for that department key apply to the transaction. Assign a price as follows: To repeat '-LP Unit price, max. 6 digits —» Department key -L> Example: Assign the price of an item to department 1. Priced p Euler price and department.
{ Programming the Minus Key | “The minus key can be programmed with a limit on the number of allowable entry digits. Use the following sequence to program the minus key. Entry digit limit {1 to 7 digits) [fii] « It 0is entered you cannot enter a discount amount. The minus key can also be programmed for a preset price reduction with the following key sequence. Reduction amount (maximum 6 digits) —» —» Example: Program the minus key to have a 1.00 reduction.
Use the following sequence 1o program the parent keys: A, B,C,and D —> (%E] — (18] Example: Program percent key 1 for a reduction. Procedure Keys 10 Press ] Printout enter parameters. e i} Complete programming and o e Programming (TIRE] 0-00% 1 W * When entering parameters A to D, any leading zeros in the sequence must be omitted. Continue now 1o set the percentage rate according to the following procedure. This rate will be applied to the percent key which keeps the settings made above, Percentage rate (0.
{ Programming the Exchange Key you need the exchange function, consult your dealer. You can program the exchange rate for the exchange key ((EX ]) with this sequence: Exchange rate (0.01% to Example: Program an exchange rate of 160% as the conversion rate from the US dollar ta the German mark. 272 Procedure i Keys to Press Printout Stern exchanges rate. ML S e ooy eye | Cross the exchanges key.
-Digit Limits. You can override the entry digit limit setting, for departments, and the Bezel, (CR1, and keys by turning the made switch to MGR during a transaction. If the operator key (OP) is being used, you will have to insert the manager key (MA) to do this function. ' *+ You cannot start a transaction when the manager key is switched to MGR. Only switch to MGR alter the transaction or numeric entry has begun, You can program a machine ID number of up to three digits (0 to 999) for each register.
This feature allows you to vary the way receipts and journals are printed. When programming the format you must set the following six parameters. Parameter A: Choice of receipt or journal Value to enter: 1 for receipt or 0 for journal Meaning: Recant: Choose this when you want the cash register to print and issue receipts: journal: Choose this when you want the cash register to keep a journal without issuing receipts: Note' » If using 2 ply paper, program your register to issue receipts.
Function C: Refund in the REG mode Value to enter: 1 to disable or 0 to enable Function D: Indirect void in the REG mode | Value to enter: 1 to disable or 0 to enable Function E: Not used. Always enter 0 Function F: Not used. Always enter 0 Function G: Not used. Always enter 0 Function H: Decimal digit entry | | Value to infer: 1 to disable or 0 o enable \ | "N;e ? * Functions A, B, C and D, when set to 1, are disabled only in the REG mode.
DRAWER HANDLING To remove the drawer, pull it out over the edge of your work surface, push the drawer down, and ift up to detach. prevent burglary, it is a good idea to empty the drawer after work and leave it ote pane at the end of the day. Develop the habit of locking the drawer when not using the register for any extended period of ; time. To lock: Insert the key into the drawer lock and turn it 90 degrees anti-clockwise. ! To unlock: Insert the drawer key into the lock and turn it 90 degrees clockwise.
This cash register provides a low battery symbol (L) which appears on the far left of the display in one of the following situations: « When less than three batteries are installed in your cash register. | « When the voltage of the batteries installed in your cash register is under the required level, « When the batteries installed in your cash register are dead. { When this symbol appears, check your batteries. I no batteries are installed, install three AA batteries at price.
When colored dye appears on the edges of the paper roll, it is time to replace the roll, ' + Paper specifications: Please use paper that diameter, To prevent jamming be sure to use the quality paper specified by Sharp. Installation 1. Pull the printer cover upward and detach it, 2. Place the paper tell into the paper roll bed and make a fold in the paper two to these centimeters from the end. 3. Press [T ] and insert the folded end straight into the paper inlet.
Removal 1. Pull the printer cover upward and detach it. 2. Tum the mode switch to the “REG". 3. Press 1] o advance the paper several i lines. Remove the take-up spew! from the cradle. 4. After cutting the existing paper, remove the rest by pressing [ ]. 5. Remove the used Journal paper ROFL from the take-up spool. « Slide up the holding plate to move the spool shaft from the small hole in the plate to the forger one, + Remove the holding plate from the spool shaft.
When printing becomes faded, replace the ink ribbon with a new one specified by Sharp. Removal Nate‘? * To prevent the ink ribbon from drying or becoming dirty, do not remove it from its bag until just before using. 1. Remove the printer cover. 2. Cut off the journal paper and press remove it. 3. Detach the ink ribbon cover. 4. Remove the reel, that is not locked by the real stopper, by pulling it upwards, installation 1. Tip the reel-stopper lever toward the opposite side, 2.
IN CASE OF POWER FAILURE OR PAPER JAM — BEFORE CALLING FOR SERVICE —— The following situations occur during a power failure or paper jam. (Batteries must be correctly installed and the low battery symbol (L) off.) or during a computation process: When power returns, the register resumes operation | « Power allure occurs when the register is turned on ‘ from the point of failure.
SPECIFICATIONS Model ER-A150 Size 330 (W) x 418 (D) x 240 {(H) mm Wright Approx. 7 kg Power source Official (nominal) voltage and frequency Power consumption Stand-by: 8W, Operating: 18W {max.} i Working temperature 32 to 104°F (0 to 40°C) | Display Green fluorescent display tbe | Printer 1 station print wheel, selective type [ Printer speed Approx, 3 lines/sec Printing digits 12 digits . Paper roll Width: 57.5 Max.