IMPORTANT! Do the following before using the cash register. Batteries must be installed in the cash register to prevent the data and user-programmed settings from being erased from memory when the AC power cord is accidentally disconnected or in case of a power failure. Please install the three AA batteries before proceeding with setup and use of this cash register. Once installed, the batteries will last approximately one year before needing replacement.
TABLE OF CONTENTS HANDLING CAUTIONS s s oo e senselessness e 5 PARTS AND THEIR FUNCTIONS Physical Mode Switch Keys.. Display. BEFORE OPERATION OPERATION OVERVIEW . Things to Check Be tore Starting Work .
Correction of the Next-To-Last or Earlier Entries (Indirect Void Canceling All Previous Entries (Subtotal Void) Correction After Issuance of Receipt READING AND RESETTING OF SALES Types of RE POMS v irseeenirsierineceens Reports Chart Compulsory Gash/Check Declaration (CCD) CCD for an Individual Cashier Z Report. CCD for an All Cashier Z Report PROGRAMMING Programming VAT .. Programming the Programming a Preset Unit Price Programming Price Hookups (PLU) and Departments.
HANDLING CAUTIONS Install the cash register in a location not subject fo direct sunlight, unusual temperature changes, high humidity, or splashing water. Do not operate the cash register with wet hands, Water can cause internal component failure, The cash register plugs into any standard wail outlet (official {(nominal) voltage). Other electrical devices on the same electrical circuit can cause the cash register to malfunction. Clean the cash register with a dry, soft cloth.
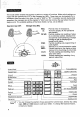
The mode switch enables the register to perform a variety of functions. Mode switch settings are made with the operator key (OP) ar the manager key (MA) . These keys can be inserted into or withdrawn from the switch only when it is set to “REG” or * . For greater security during daily operation, the manager can set the register to “REG"” and then remove the key before the clerk begins work.
The ER-A250 is equipped with a front and rear display that affords easy visibility to both customer and operator during transactions. The customer display can be popped up and rotated to clearly show prices, totals, and change due. To rotate the pop-up display simply pull upwards until it locks into place. Both the operator and customer displays have clear, easy to read fluorescent digits and & nine and seven digit capacity respectively.
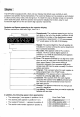
BEFORE OPERATION 1. Check that the cash register is plugged in. 2. install paper rolls. « See page 40, 3. Set the receipt on-off function. » See page 20. 4. Insert the manager key (MA) and turn the mode switch to “PG” 5., Set the date (day, month, year). « When the date Is set, it will be printed on each receipt, journal and on sales reports. Example: Set the date to 15 October, 1993 Sled) N Procedure Keys to press Knockout Enter job number.
Example: Set VAT rate of 6%. 1 Enter joi burner, Euler VAT type. ] [e WY 3 Enter VAT rate. BT 0 Koo ] el 4 programming ard | [y 8. Program departments. « Departments are used to classify merchandise and apply programmable mathematical operations, such as a VAT tale, on items when they are entered. * Your register comes per-programmed with departments 110 5 as taxable to VAT 1. All the departments are programmed as positive for addition of sales entries.
OPERATION OVERVIEW 10 Check that the cash register is plugged in. Check that the low battery symbol (L) is not on. See page 7. Check that there is enough paper in the paper rolls. See page 40. Check the time and date settings. See page 8. Program if necessary. See page 28. Enter a sale. Other sales entry operations: * Automatic VAT * Discounts * Markdowns = Premiums. = Payment by credit card or check + Refunds * Cash inf out without transaction « Entering credit card numbers, etc.
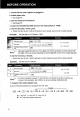
BASIC SALE ENTRY PROCEDURE Make sure you have completed all the necessary programming in accordance with the merchandise classification and pricing system of your business before using the cash register on a day-to-day basis. See PROGRAMMING on page 28. { Sale Entry and Change Calculation for a Typical Sale 1. Turn the operator key {or manager key) to REG. 2. Enter a cashier code (1 to 4) and press 7). 3. Enter the unit price, REG 4. Press the appropriate department key. Opp = NGR 5. Press the subtotal key.
OTHER TYPES OF ENTRIES AND USEFUL FEATURES For this chapter, use the operator key (OP) set to REG. {Cashier Cod Entry. The cashier aced is printed at the bottom of every receipt and journal. It Is used to identify the operator responsible for each transaction and to classify sales amounts by operator when the applicable report is printed. To use this feature, the operator must enter the cashier code (1 10 4) which was assigned to him or her, before operating the cash register.
Case 3: Example: Euler quantity, pro disparagement. e Euler PLU code. Lol Finalize and print receipt, LS Entering more than one of the same item using the multiplication key ). Selling seven department 1 terns and five items (PLU 19) for cash. 01 *45+00 01 %895 *5395 § To enter an item whose price has been assigned 1o a department, simply enter the department to which it has been assigned. Example: Selling an item whose price is assigned to department 1.
Example Entering an item which belongs to sub department 101. i Keystrokes T LR Enter price. I I [ K10t *5=00 Enter departmentalize code. 2 )3 )Fwl *5+00 % Finalize and pent receipt, *3.000 This type of entry is useful when a sale is for only one item paid by cash, such as a pack of cigarettes. It is applicable only to department keys when they are programmed for single-item cash sales or to sub departments or to Pl Us associated with such departments.
Finalizing a Credit Sale Press [ CR Instead of L] at the end of the transaction. The amount tendered cannot be entered. Example: Selling a department 3 item and a department 4 item by credit card. step ‘L (BT 1 Enter price and department. N Celsius] 3 Enter price and department. v | finalize ane print receipt fcr) LG 03 *85+50 04 %1500 *100=50 ¥ *100+5001 You can have an additional [C&] key by using one of the option keys. For details, consult your local dealer.
Example: Stilling a department 4 item, taxable 1 and a department 1 item, taxable 2, for cash. Ste pr Procedure i Py Press Printout .| Enter price and department. 04 +95400 Enter pros and department | & ][5 [1} . *5+3801 *Re250T Finalize and pant cellphone, TS, *160+008% The minus key can be used to apply a preset or manually entered discount on individual items or on a subtotal, Case 1: Manually entered price reduction on a single item. Example: Applying a discount to an item belong mg to department 3.
Case 4: Preset price reduction on a subtotal: The procedure is the same as the example above except that [_8 ] is pressed without entering a discount amount. The minus key's preset discount amount is applied automatically. ( Discounts and Premiums Using the Percent Keys | The percent keys are used 1o apply a manually entered discount or premium to individual items or to a subtotal. The signs for the percent keys must be programmed as plus (premium) or minus {discount) before starting.
The exchange function allows you to enter payment in a foreign currency. Press after entering the sale (and conversion rate} to display the subtotal in the foreign currency. The amount is not printed until payment is received In the foreign currency and is pressed. If there is a balance, it is displayed in the domestic currency, but it can be paid in either foreign or domestic currency. Change due is displayed and given in the domestic currency. Not « Conversion rate: 0.
Example: One department 3 item sold for cash is returned. Step @ Procedure w Keys fo Press janitor 1 Intel refunded amour. O | G *450.00o -2 | Finalize and print receipt. (THE i *45¢00 » [Entering and Printing a Non-Add Code Number) The non-add code entry function allows the operator 1o enter codes (up to eight digits) such as credit card numbers at any point during a transaction. Example: number is 123.
This feature is useful when you want to make change. Example: Open the drawer with no sale. Procedure Keys to Press 2T Press the 1o sale key. This function permits or prohibits receipt printing. 1t does not affect the printing on the journal paper. When the receipt on-off function is set to off, the receipt off marker displayed above “RCPT OFF" on the operator display. Use the following procedure, 1. Turn the mode switch to the “OP X/Z" position. 2. Press to change the receipt printing status {on cor off).
CORRECTIONS REG Dell For this chapter, use the operator key G (OP) set to REG or the manager key & razz (MA) sett 7). Pl Different types of corrections are possible depending on whether you use the clear key or the void key [6L 1 is used to clear numerical entries made before further operations are performed. [C3] is used to clear entries made that involve a programmable function of the register. The void mode, accessed with the manager key (MA), is used to correct receipts.
Before finalizing a transaction, any department entry, Interdepartmental entry or item refund entry that has been made can be corrected. Example: You incorrectly entered a PLU code a few steps back while adding up a sale. Correct price entry, N N | Incorrect PLU entry. C=z0e ] [Fag Correct pics entry. Correct price entry. ] o | Enter voice sequences. Oz (o) Enter correct PLU. == Finalize and print receipt. (TS 01 *11+50 R124 *8+95 02 *10+95 G4 *7e50 Hi #B095-u 1123 #1000 *39«35 § *35.
After Issuance of Receipt PARRY This function allows you to reverse the entries made on an Incorrect receipt. The entries are subtracted from each totalizator and added to a void totalizator. Procedure: 1. With the manager key (MA) tum the mode switch to 73] . Offer MaR Cpd MGR \\xflz‘ zf Xafza @ B era PGM\ FGM\ 2. Enter the same details that are on the incorrect receipt. Example: Cancel a receipt. Step : Procedure Keys to Press o dietetic g Enter dovetails of bad receipt.
READING AND RESETTING OF SALES PEM FGM\ use key For this chapter, the manager {MA) set to WGR, X1/Z1, X2/22 or OP X/Z The ER-A250 allows you to print various sales reports and reset the sales information. Selection is made by using the operator (OP) or manager (MA) key together with the key combinations given in the chart below. Reports are classified as "X1°, Sample General Report {Z mode) NP H Pah GO wp " Daie——1a1 X2", *21", “22", and “FLASH! Fragment symbol 21 .
Sample All Sample Hourly Sample PLU Cashier Report Report Report {Z mode) (2 mode) (By range, Z mode) 23010783 EBe10.93 Dag 2310293 . 21 71 Re wet symbol 27 o Ashier aced] I Dative 18:00 Pl ey 2001 8400 o Sales amount——— 873+ 71500 Check tote ~ *Deed% 19100 ORZO Check change — v-G0Fe e 600D © Cal in drawer — #90Be 5430 187758 *53+70 2¢ 20:060 kook 1300 @ *736-99 T 1240481 +E640D *440008 2t:09 ATWOOD *Qe 005 18 12400 § 41580 *119.
Use the key operations in this chart to obtain the report you need. Mode Switch OPP | X1/21 | Xa2izz MGH Setting Key entry Report Name Type of report available General Xanadu [Xanadu For X: For Z: [ [fms] Department X only (19 | Press the appropriate department key All PLU items Xanadu For X: {FLU] Ford: [ For X: PLU start PLU by range 2% Xanadu PLU end No. = [PLUS For Z: PLU start No.—» [ & |— Plunder No.
Before printing an individual cashier Z report or an all cashier Z report in the Z mode, the operator must enter the cash and check amount in the drawer. Afterward the manager can compare the amount entered with the one printed out on the report. This feature is provided o prevent dishonesty or mistakes by employees. CCD for an Individual Cashier Z Report Use the following sequence in the OP X/Z mode issue the Z report for an individual cashier.
PROGRAMMING REG 0P ’— MGH For this chapter, use the manager key (MA) set to PGM. i § e PGM Your cash register comes per-programmed for an *Auto VAT 1-3 system.” With this system, the cash register, at finalization, calculates VAT for taxable, taxable 2, and taxable 3 subtotals by using the corresponding percentages programmed beforehand, \Note = If you need another type of VAT (or tax), consult your denier. Use the following sequence to program the VAT rate.
Parameter B: Value to enter. Parameter C: Value to enter: Parameter D: Value 1o enter: Parameter E: Value to enter: Meaning: Parameter F. Value to enter: Parameter G: Value to enter: Meaning: Taxable 3 0 for no or 1 fortes Taxable 2 O forenoon 1 for yes Taxable 1 0 for no or 1 for yes Choice of normal department key use or use for single item cash sales 0 for normal or 1 for single inert cash sale Normal: This allows the operator to use the department key in the usual way.
The preset unit price function assigns a frequently purchased item to a department key and enables you to enter the price by simply pressing the department key. Other parameters programmed for that department key apply to the transaction. Assign a price as follows: Yo repeat —Y-> Unit price, max. 6 digits ~» Department key J—P 1] Example: Assign the price of an item to department 1. Step procedure i Keystone Press : i1z CIT Y Mentor prior and department. 017 601 i Temperate programming and | 7rz) 8495 .
Example: Assign PLU code 110 to department 1 and to an item costing 8.95. | Procedure Keys 1o Press ttys | Enter PLU code. T (Bl ot nine g PowerPC [Eisner] +8+95 *BS § Enter apartment, (s Complete programming and *Beebe print, [YEAHS ]No 72 « When entering a PLU code, any lading zeros in the code must be omitted. = To program a sub department, simply omit the entry of the price.
Example: Program the minus key to have an entry amount limit of 80.00 (8x10%) and a 1.00 reduction. Step | Procedure ] Keys to Press Printout Enter amount limit. Complements programming and | s 93 print. (LA 0200 ~ Enter reduction amount. TLelo]lle] 1a ng Com plats programming and print. LS * In the example, pies 2 can be skipped. "« Single item price reductions which exceed the pics of the item are prohibited. The percent keys perform percentage reductions and increases.
Con tire now 1o set the percentage rate according 1o the following procedure. This rate will be applied 1o the percent key which keeps the settings made above. Percentage rate (0.01% to 99.99%) With these procedures you are now able o program the percent keys according to your needs. Example 1: Program [ %1] for a discount percentage rate of 10%. Ere iPro‘cui‘dfiré Key 1o Press o 1| Elmer percentage. L of ere] (= — 1 o frogmen 3 2| an dpi oo s] Example 2: Program [ %2 ] for a percentage increase of 10%.
Example: Program the AUTO| key to enter the PLU 3 item and an inert that belongs fa department 2. Step 2 -T-0 00 , Keys to Press ] el G Press the auto key. AT Enter key rapscallions Romaine el TS dmm Completes programming and print; TS You can set the maximum amount for the [BA ] [FQ and Keys to between zero and to limit there use or make them inoperative. Use the following sequence to program these keys: Yo repeat —LDAX‘IOB {A: 0-9, B: 0-8) [(AA] [FOCH] or [CH] —J—PM Paraplegia: Set limit of 1000.
Example: Set the machine number Enter job number. s Enter machine number, T3 2] gl Complete programming and . g Printout 012K0024 I » To clear the machine number do not enter anything for the machine number. * If you input an incorrect number, press ¥ and start again. A receipt number is printed on all transaction receipts, and on every X and Z printout. The number is incremented each time a receipt is issued. Use the sequence in the following example 10 set the start number.
Use the following sequence to set the print format: A,B,C,D,Eand Example: Set the format for limited journal, detailed after transaction receipt, and feed line. Step { Procedure Keys to Press ‘ TG J Enter jots number. Enter parameters. jemmy 113000 template programming and | e Notarize) « When entering parameters A 1o F, any leading zeros in the sequence must be omitted. When using the cash register you can disable any of the functions listed below.
Checking the Machine Settings To obtain a printout that shows the cash register settings made in this chapter, do the following, 1. To see the PLU se tings: Press {PLu] to obtain a printout for all PLU settings. To specify a range of PLU selling, use this sequence: Start no. (1 to 200) End no. (1 to 200) see department and function settings: Press 7). 3. To see Auto key settings: Enter a numeric [ 1] key and press [TtRS]. PLU Settings Printout PLU (1) or sub dpt.
DRAWER HANDLING The tray in the register is detachable. After closing your business for the day remove the tray from the drawer and keep the drawer open. This will prevent money from being stolen. To detach the drawer, pull it forward fully with the tray removed, and draw it out by limiting it up. ote? * You can get another tray (ER-48CC2) ot tray covers 5 from your dealer. For details, contact your dealer. Develop the habit of locking the drawer when not using the register for any extended period of time.
MAINTENANCE Batteries | This cash register has a low battery symbol (L) which appears on the far left of the display in one : of the following situations: i » When less than three batteries are installed in your cash register, * When the voltage of the batteries installed in your cash register is under the required level. * When the batteries installed in your cash register are dead. When this symbol! appears, check your batteries. If no batteries are installed, install three AA batteries at once.
When colored dye appears on the edges of the paper rolls, it is time to replace the rolls. Paper specifications: Please use a paper roll that diameter. To prevent jamming be sure to use the quality paper specified by Sharp. Installation . Press . Pull the rear of the printer cover upward and detach it. . Turn the mode switch to “REG". . Place both paper rolls into the paper roll beds and cut the end of each paper evenly. . Insert the ends into the paper inlets as far as they will go.
Removal 1. Pull the rear of the printer cover upward and detach it. 2. Turn the modes switch to “REG". 3. If there is any receipt paper left on the roll, tear it off between the rot and the paper inlet. Press lewd until the remaining paper has left the printer. Remove the receipt paper core, 4, Press until any remaining journal information has wound anti the makeup spool. 5. I necessary, tear off the the paper fro the last journal entry. Lift up and remove tha makeup spool. 6.
When printing becomes faded, replace the ink roller with a new one specified by Sharp. Replacement ‘. Pull the rear of the printer cover upward and detach it. 2. Locate the ink roller in front of the printer and remove it by pulling its handle. 3. install a new ink roller. 4. Replace the printer cover. @D + Be sure to use an ink roller specified by Sharp. Use of any other ink roller could cause the printer to malfunction * Install the ink roller immediately after unpacking. Do riot allow it to get dirty.
IN CASE OF POWER FAILURE OR PAPER JAM The following situations occur during a power failure or paper jam. (Batteries must be comely installed and the low battery symbol (L) off.) » Power allure occurs when the register is turned on or during a computation process: When power returns, the register resumes operation from the point of failure.
SPECIFICATIONS Model ER-A250 Size 420 (W) x 426 {D) x 258 {H) mm Weight Approx. 12.0 kg Power source Official {(nominal) voltage and frequency Power consumption Stand-by: 8W, Operating: 17W {max.} Working temperature 01o 40°C Display Green fluorescent display tube Printer 2 station inner drum type Printer speed Approx. 2.4 lines/sec Printing digits 12 digits Paper calf Width: 44.5 mm 0.5 mm Max.