
Instruction manual


ERA420 Frequently Asked Questions Page 5 of 20
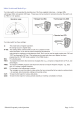
How do I prepare my ERA420 for set-up?
Take the ERA420 out of its box, remove the packing materials. Place the ERA420 on a flat stable surface,
close to a power outlet. Also insure it will not be exposed to direct sunlight, and is away from water (taps,
sinks, etc).
How do I ensure the memory battery is charged, and why should I do so?
The ERA420 uses a built-in re-chargeable battery to hold its preset, and sales data in memory when it is
switched off. If the built-in re-chargeable battery is not fully charged before you use the ERA420 your
preset and sales data might be cleared when there is no power supplied to the ERA420. The battery can be
expected to hold the memory contents of the ERA420, for about 1 month when fully charged. If the
ERA420 has not been connected to power for sometime it might clear the contents of its memory when
switched on. Please bear this in mind if you intend to store the ERA420 for long periods.
To ensure complete charging upon installation, please leave the ERA420 plugged into an AC outlet which
is switch on for 24 to 48 hours.
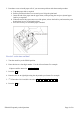
What sort of paper rolls do I use, and how do I install them?
The ERA420 uses two thermally sensitised paper rolls which are: 44.5 mm wide. The maximum diameter
of a roll should be no more than 80mm.
1. Pull the printer cover forward and detach it. The paper cutter is mounted on the printer cover, be
careful not to cut yourself.