
Specifications


INSTALLING THE PRINTER CARTRIDGES
8
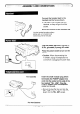
Remove the imaging cartridge from its
*+
n
*
bag, and shake it 4 or 5 times in a
,/
““”%
horizontal direction.
/’
.-’
#
“~
● This ensures that the toner is well
~
/“ /’”
distributed inside the cartridge.
/
9
Remove the white cover.
● Remove the white cover and pull out
the black rubber strip which is attached
to the white cover
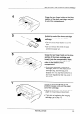
10
Grasp the handle of the imaging
cartridge so that the stamped
markings are facing upwards, and
inseti the cartridge into the printing
compartment.
11
Place your thumb on the centre of the
handle where it is marked “PUSH”,
and push the handle slightly up and in
so that the cartridge fits into place.
●
If you have removed a used imaging
cartridge, place it in the empty imaging
cartridge bag, seal the bag, and
dispose of it in a way that conforms to
any local regulations that may exist in
your area.
12
Hold the received document guide
vertically, and insert it into its
compartment so that the tabs on each
side of the guide go into the slots on
the sides of the compartment.
1-4
INSTALLATION