FO-2950M MODEL FO-2950M FACSIMILE FACSIMILE OPERATION MANUAL 1. Installation 2. Sending Documents 3. Receiving Documents 4. Making Copies 5. Making Telephone Calls 6. Answering Machine Hookup 7. Special Functions 8. Printing Lists 9. Maintenance 10.
FCC1.fm Page 1 Thursday, April 27, 2000 7:01 PM WARNING - FCC Regulations state that any unauthorized changes or modifications to this equipment not expressly approved by the manufacturer could void the user’s authority to operate this equipment. Note: This equipment has been tested and found to comply with the limits for a Class B digital device, pursuant to Part 15 of the FCC Rules.These limits are designed to provide reasonable protection against harmful interference in a residential installation.
all-fo2950.book Page 1 Monday, September 25, 2000 8:57 AM Introduction Welcome, and thank you for choosing a Sharp facsimile! The features and specifications of your new Sharp fax are shown below. Automatic dialing Rapid Key Dialing: 20 numbers Speed Dialing: 100 numbers Memory size* 2 MB (approx. 130 pages) Modem speed 14,400 bps (max.) Automatic fallback to lower speeds. Transmission time* Approx.
all-fo2950.book Page 2 Monday, September 25, 2000 8:57 AM Automatic document feeder 20 pages max. (20-lb. letter paper) Halftone (grayscale) 64 levels (PC scan: 256 levels) Paper tray capacity 200 sheets (20-lb. letter paper) Compression scheme MMR, MR, MH, Sharp (H2) Applicable telephone line Public switched telephone network Compatibility ITU-T (CCITT) G3 mode Printing resolution Horizontal: 406 lines/inch (16 lines/mm) Vertical: 391 lines/inch (15.
all-fo2950.book Page 3 Monday, September 25, 2000 8:57 AM Dimensions Width: 15.2" (386 mm) Depth: 15.7" (398 mm) Height: 6.7" (169 mm) Weight Approx. 13.8 lbs. (6.3 kg) As a part of our policy of continuous improvement, SHARP reserves the right to make design and specification changes for product improvement without prior notice. The performance specification figures indicated are nominal values of production units. There may be some deviations from these values in individual units.
all-fo2950.book Page 4 Monday, September 25, 2000 8:57 AM - Liquid has been spilled into the machine or the machine has been exposed to rain or water. - The machine produces odors, smoke, or unusual noises. - The power cord is frayed or damaged. - The machine has been dropped or the housing damaged. • Do not allow anything to rest on the power cord, and do not install the machine where people may walk on the power cord. • Never insert objects of any kind into slots or openings on the machine.
all-fo2950.book Page 5 Monday, September 25, 2000 8:57 AM Table of Contents Introduction 1 Important safety information . . . . . . . . . . . . . . . . . . . . . . . . . . . . . . . . 3 Table of Contents 5 A Look at the Operation Panel 7 1. Installation Unpacking Checklist . . . . . . . . . . . . . . . . . . . . . . . . . . . . . . . . . . . . . Connections . . . . . . . . . . . . . . . . . . . . . . . . . . . . . . . . . . . . . . . . . . . Installing the Toner Cartridge . . . . . . . . . . . .
all-fo2950.book Page 6 Monday, September 25, 2000 8:57 AM Table of Contents 6. Answering Machine Hookup 81 Connecting an Answering Machine . . . . . . . . . . . . . . . . . . . . . . . . . 81 Optional A.M. Mode Settings . . . . . . . . . . . . . . . . . . . . . . . . . . . . . . 84 7. Special Functions 86 Broadcasting . . . . . . . . . . . . . . . . . . . . . . . . . . . . . . . . . . . . . . . . . . . 86 Distinctive Ring (Requires Subscription to Service) . . . . . . . . . . . . .
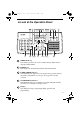
all-fo2950.book Page 7 Monday, September 25, 2000 8:57 AM A Look at the Operation Panel 1 2 3 4 5 6 7 8 9 10 11 12 13 TEL FAX A.M.
all-fo2950.book Page 8 Monday, September 25, 2000 8:57 AM 6 Panel release Grasp this release and pull toward you to open the operation panel. 7 PC IN USE light This blinks when data is being sent to or from the computer connected to the fax machine. 8 LINE IN USE light This lights when the fax machine is using the telephone line. 9 RECEPTION MODE key Press this key to select the reception mode. An arrow in the display will point to the currently selected reception mode.
Page 9 Monday, September 25, 2000 8:57 AM 16 REDUCTION/ENLARGEMENT key Press this key to select an enlargement or reduction setting when making a copy of a document. 17 STOP key Press this key to cancel an operation before it is completed. 18 START key Press this key to begin transmission when using Speed Dialing, Direct Keypad Dialing, or Normal Dialing. 19 COPY/HELP key When a document is in the feeder, press this key to make a copy of a document.
all-fo2950.book Page 10 Monday, September 25, 2000 8:57 AM 1. Installation Unpacking Checklist Before setting up, make sure you have all of the following items. Original document support Handset If any are missing, contact your dealer or retailer.
Page 11 Monday, September 25, 2000 8:57 AM Connections Connections Points to keep in mind when setting up Do not place the machine and the drum cartridge in direct sunlight. Do not place the machine near heaters or air conditioners. Keep dust away from the machine. Keep the area around the machine clear. About condensation If the machine is moved from a cold to a warm place, it is possible that condensation may form on the scanning glass, preventing proper scanning of documents for transmission.
all-fo2950.book Page 12 Monday, September 25, 2000 8:57 AM Connections Connecting the Handset Connect the handset as shown and place it on the handset rest. ♦ The ends of the handset cord are identical, so they will go into either jack. Make sure the handset cord goes into the jack marked with a handset symbol on the side of the machine! Use the handset to make ordinary phone calls, or to transmit and receive faxes manually.
Page 13 Monday, September 25, 2000 8:57 AM Connections Connecting the power cord Plug the power cord into a 120 V, 60 Hz, grounded AC (3-prong) outlet. Caution! Do not plug the power cord into any other kind of outlet. This will damage the machine and is not covered under the warranty. The machine does not have a power on/off switch, so the power is turned on and off by simply plugging in or unplugging the power cord.
all-fo2950.book Page 14 Monday, September 25, 2000 8:57 AM Connections Connecting the telephone line cord Insert one end of the line cord into the jack on the left of the machine marked TEL. LINE. Insert the other end into a standard (RJ11C) single-line wall telephone jack. Be sure to insert the line into the TEL. LINE jack. Do not insert it into the TEL. SET jack. Note: Your fax is set for tone dialing. If you are on a pulse dial line, you must set your fax for pulse dialing.
Page 15 Monday, September 25, 2000 8:57 AM Connections Attaching the paper tray and document supports Attach the paper tray. Attach the received document tray. Attach the original document support. ♦ Make sure the front side of the support faces you (the support should curve slightly toward you). 15 1. Installation all-fo2950.
all-fo2950.book Page 16 Monday, September 25, 2000 8:57 AM Connections Extension phone (optional) If desired, you can connect an extension phone to the TEL. SET jack on the fax. ♦ To connect an answering machine to your fax, see Chapter 6, Answering Machine Hookup. 16 1 Remove the seal covering the TEL. SET jack. 2 Connect the extension phone line to the TEL. SET jack.
Page 17 Monday, September 25, 2000 8:57 AM Installing the Toner Cartridge Installing the Toner Cartridge The laser printer in your fax machine uses a toner cartridge and a drum cartridge. The drum cartridge comes pre-installed, and the toner cartridge must be installed. The starter toner cartridge included with your fax can print approximately 1,875 letter-size pages at 4% page coverage. When replacing the toner cartridge, use a Sharp FO-29ND toner cartridge.
all-fo2950.book Page 18 Monday, September 25, 2000 8:57 AM Installing the Toner Cartridge 2 The drum cartridge has been installed at the factory. Gently pull the paper tab to remove the black sheet of protective paper from the cartridge. • Be careful not to tear the paper nor leave any pieces of paper in the machine. 3 Remove the new toner cartridge from its packaging. Shake the cartridge side to side four or five times to distribute the toner evenly within the cartridge.
Page 19 Monday, September 25, 2000 8:57 AM Installing the Toner Cartridge 4 Hold the toner cartridge by the handle with the stamped markings on the cartridge facing upwards, and insert the cartridge into the print compartment. 5 Place your thumb on the center of the handle where it is marked PUSH, and push the handle down and in so that the cartridge fits into place. 6 Close the print compartment cover, pressing down firmly on each side to make sure it is completely closed. 19 1.
all-fo2950.book Page 20 Monday, September 25, 2000 8:57 AM Installing the Toner Cartridge 7 Reset the toner counter by pressing the following keys: Display shows: FUNCTION 9 CLR TONER COUNT PRESS START KEY START 8 Reset the drum counter by pressing the following keys: • Note: This setting is only necessary after you have replaced the drum cartridge (not after replacing the toner cartridge).
Page 21 Monday, September 25, 2000 8:57 AM Loading Printing Paper Loading Printing Paper You can load up to 200 sheets of letter, A4 or legal paper (max. 20 lbs.) in the paper tray. Caution! Do not use the blank side of paper that has already been printed on. 1 If you are going to load legal size paper, pull out the paper tray extension. 2 Fan the paper, and then tap the edge against a flat surface to even the stack. 3 Pull the paper release lever toward you. 21 1. Installation all-fo2950.
all-fo2950.book Page 22 Monday, September 25, 2000 8:57 AM Loading Printing Paper 4 Insert the stack of paper firmly into the tray, print side up. • Make sure that the stack is not higher than the marked line. Loading too much paper may cause paper jams and misfeeds. • If paper remains in the tray, take it out and combine it into a single stack with the new paper before adding the new paper. Important: Be sure to load the paper so that printing takes place on the print side of the paper.
Page 23 Monday, September 25, 2000 8:57 AM Loading Printing Paper 7 The fax has been set at the factory to scale the size of received faxes to letter size paper. If you have loaded legal paper, you must change the paper size setting to legal. Press these keys: FUNCTION 4 The display will show: PAPER SIZE SET 1=LETTER, 2=LEGAL PAPER SIZE SET 3=A4 Press 1 to select LETTER or 2 to select LEGAL. (You can also press 3 to select A4.
all-fo2950.book Page 24 Monday, September 25, 2000 8:57 AM Setting Up the Multifunction Interface Setting Up the Multifunction Interface To enable the multifunction features of your fax, connect it to your computer and install the Multifunction software. Connecting the parallel cable Connect the fax machine to your computer with a parallel cable. ♦ If you do not already have a parallel cable, you can purchase one from your dealer or any computer store. ♦ Make sure the cable is IEEE 1284-compliant.
Page 25 Monday, September 25, 2000 8:57 AM Setting Up the Multifunction Interface 2 Connect one end of the cable to the port on the Sharp Laser Multifunction. Snap the clips on each side of the port onto the cable connector to secure it. 3 Connect the other end of the cable to the parallel port on the back of your computer. Note: There is normally no need to change the parallel port setting in your computer's setup (BIOS) program.
all-fo2950.book Page 26 Monday, September 25, 2000 8:57 AM Setting Up the Multifunction Interface Installing the Multifunction software Minimum system requirements Processor: Pentium 90 MHz or higher Operating system: Windows 95/98, Windows NT 4.0 (Service Pack 3 or later), English version Physical RAM: Windows 95/98: 16 MB Windows NT 4.0: 32 MB Free hard-disk space: Windows 95/98: 30 MB Windows NT 4.0: 35MB ♦ The Sharp Laser Multifunction software cannot be installed by Plug and Play.
Page 27 Monday, September 25, 2000 8:57 AM Setting Up the Multifunction Interface Online Operation Guide Detailed instructions for using the Sharp Laser Multifunction software can be found in the Online Guide on the CD. To open the guide, follow these steps: 1. Insert the Sharp Laser Multifunction CD into your CD-ROM drive. (If the Sharp Laser Multifunction Setup window appears, click Cancel and then Exit Setup to close the window.) 2.
all-fo2950.book Page 28 Monday, September 25, 2000 8:57 AM Entering Your Name and Fax Number Entering Your Name and Fax Number Before you can begin using your fax machine, you must enter your name and fax (telephone) number. You also need to set the date and time. Once you enter this information, it will automatically appear at the top of each fax page you send. Important! The law requires that your name, telephone/fax number, and the date and time appear on each fax message you send.
Page 29 Monday, September 25, 2000 8:57 AM Entering Your Name and Fax Number 2 Press the # key twice. (Or the UP key twice.) The display will show: OWN NUMBER SET PRESS START KEY 3 Note: When scrolling through the settings, you can press the UP key in place of the # key, and the DOWN key in place of the * key. Press the START key. START The display will show: ENTER FAX # 4 Enter your fax number by pressing the number keys (max. of 20 digits).
all-fo2950.book Page 30 Monday, September 25, 2000 8:57 AM Entering Your Name and Fax Number 6 Enter your name by pressing number keys for each letter as shown in the chart below. Up to 24 characters can be entered. Example: SHARP = 77777 444 22 7777 SPEAKER SPACE = J= T= A= K= U= B= L= V= M= W= N= X= O= Y= P= Z= C= D= E= F= G= 77 Q= H= R= I= S= ♦ To enter two letters in succession that require the same key, press the SPEAKER key after entering the first letter.
Page 31 Monday, September 25, 2000 8:57 AM Entering Your Name and Fax Number 7 Press the START key. START The display will show: SECURITY SELECT 1=ON, 2=OFF 8 Press the STOP key to return to the date and time display. STOP 31 1. Installation all-fo2950.
all-fo2950.book Page 32 Monday, September 25, 2000 8:57 AM Setting the Date and Time Setting the Date and Time The date and time appear in the display and are printed at the top of every page you fax. Set the date and time by pressing the keys on the operation panel as shown below.
Page 33 Monday, September 25, 2000 8:57 AM Setting the Date and Time 3 Press the START key. START • The currently set date will appear in the display. 4 Enter a two-digit number for the month (“01” for January, “02” for February, “12” for December, etc.). 0 Example: January • To correct a mistake, press the SPEED DIAL key to move the cursor back to the mistake and then enter the correct number. 5 1 Enter a two-digit number for the day (“01” to “31”).
all-fo2950.book Page 34 Monday, September 25, 2000 8:57 AM Setting the Date and Time 9 Press the START key to start the clock. START The display will show: DAY LIGHT SAVING 1=YES, 2=NO 10 Press the STOP key to return to the date and time display. STOP Daylight Saving Time If desired, you can set the clock to move forward and backward automatically at the beginning and end of Daylight Saving Time.
Page 35 Monday, September 25, 2000 8:57 AM Setting the Reception Mode Setting the Reception Mode Your fax machine has three modes for receiving incoming calls and faxes: TEL mode: Select this mode when you want to receive both phone calls and faxes on the line connected to the fax machine. All calls, including faxes, must be answered by picking up the fax machine's handset or an extension phone connected to the same line. FAX mode: Select this mode when you only want to receive faxes on your line.
all-fo2950.book Page 36 Monday, September 25, 2000 8:57 AM Setting the Reception Mode Selecting the receiving unit If you have connected the fax machine to a computer and installed the Multifunction software, you can choose whether to have incoming faxes received to the fax machine or the computer. ♦ The initial setting is FAX (reception to the fax machine).
Page 37 Monday, September 25, 2000 8:57 AM Setting the Reception Mode 4 If you selected reception to the computer but also want to receive voice calls, set the reception mode of the fax machine to TEL. RECEPTION MODE TEL FAX A.M. • You must answer all calls using the fax’s handset. The Multifunction Desktop will receive a fax only if the sending machine issues a fax tone. (Make sure that Fax Receive is selected in the Fax menu of the Multifunction Desktop.
all-fo2950.book Page 38 Monday, September 25, 2000 8:57 AM Volume Adjustment Volume Adjustment You can adjust the volume of the speaker, handset, and ringer using the UP and DOWN keys. DOWN key 1 2 3 4 5 6 7 8 9 UP key 0 Speaker 1 Press the SPEAKER key. 2 Press the UP or DOWN key.
Page 39 Monday, September 25, 2000 8:57 AM Volume Adjustment 3 When the display shows the desired volume level, press the SPEAKER key to turn off the speaker. SPEAKER Handset 1 Lift the handset. 2 Press the UP or DOWN key. Display: UP DOWN or JAN-29 01:44 RECEIVER : HIGH JAN-29 01:44 RECEIVER : MIDDLE JAN-29 01:44 RECEIVER : LOW 3 When the display shows the desired volume level, replace the handset. • Note: The handset volume reverts to medium each time you hang up. 39 1.
all-fo2950.book Page 40 Monday, September 25, 2000 8:57 AM Volume Adjustment Ringer 1 Press the UP or DOWN key. (Make sure the SPEAKER key has not been pressed.) UP DOWN or • The ringer will ring once at the selected level, and then the date and time will reappear in the display. Display: JAN-29 01:44 RINGER : HIGH JAN-29 01:44 RINGER : MIDDLE JAN-29 01:44 RINGER : LOW RINGER : OFF OK ? OK:PRESS START 2 40 If you selected RINGER : OFF OK?, press the START key.
Page 41 Monday, September 25, 2000 8:57 AM Volume Adjustment Beep length Your fax machine normally signals the end of transmission, reception, or copying with a 3-second beep. If desired, you can change the duration of the beep to 1 second or turn the beep off. 1 Press these keys: FUNCTION 4 The display will alternately show: BEEP LENGTH 1=3 SEC, 2=1 SEC BEEP LENGTH 3=NO BEEP 2 Press 1 for 3 seconds, 2 for 1 second, or 3 for no beep.
all-fo2950.book Page 42 Monday, September 25, 2000 8:57 AM 2. Sending Documents Transmittable Documents Size and weight The size and weight of documents that you can load in the document feeder depend on whether you load one page at a time or several pages at once. Loading one page at a time: Minimum size 8.5" (216 mm) 5.8" (148 mm) Maximum size 5.5" (140 mm) Minimum weight 39.4" (1.0 m) Maximum weight 14 lbs. (52 g/m² ) 42 lbs. (157 g/m²) Loading several pages at once: Minimum size 5.
all-fo2950.book Page 43 Monday, September 25, 2000 8:57 AM Transmittable Documents 0.2"(5 mm) 0.16"(4 mm) 2. Sending Documents Note: Letters or graphics on the edges of a document will not be scanned. Letters in the shaded area will not be scanned. 0.16"(4 mm) 0.2"(5 mm) Other restrictions ♦ The scanner cannot recognize yellow, greenish yellow, or light blue ink. ♦ Ink, glue, and correcting fluid on documents must be dry before they pass through the document feeder.
all-fo2950.book Page 44 Monday, September 25, 2000 8:57 AM Loading the Document Loading the Document Up to 20 pages can be placed in the feeder at one time. The pages will automatically feed into the machine starting from the bottom page. ♦ If you need to send or copy more than 20 pages, place the additional pages gently and carefully in the feeder just before the last page is scanned. Do not try to force them in, as this may cause double-feeding or jamming.
all-fo2950.book Page 45 Monday, September 25, 2000 8:57 AM Loading the Document Adjust the resolution and/or contrast settings (if desired) as explained in the section Resolution and Contrast on the following pages, then dial the receiving machine as explained in Sending a Fax by Normal Dialing which appears later in this section. RESOLUTION 2. Sending Documents 3 Removing a document from the feeder If you need to remove a document from the feeder, open the operation panel.
all-fo2950.book Page 46 Monday, September 25, 2000 8:57 AM Loading the Document 46 2 Remove the document. 3 Close the operation panel, making sure it clicks into place.
all-fo2950.book Page 47 Monday, September 25, 2000 8:57 AM Adjusting the Resolution and Contrast If desired, you can adjust the resolution and contrast before sending a document. The default resolution setting is STANDARD and the default contrast setting is AUTO. You must adjust the settings each time you don’t want to use the default settings. Note: The resolution and contrast settings are only effective for sending and copying a document. They are not effective for receiving a document.
all-fo2950.book Page 48 Monday, September 25, 2000 8:57 AM Adjusting the Resolution and Contrast 1 Load the document(s). • The document must be loaded before the resolution and contrast can be adjusted. 2 Press the RESOLUTION key one or more times until the desired resolution and contrast settings appear in the display. • The first time you scroll through the list of resolution settings, the contrast setting AUTO will appear next to each resolution setting.
all-fo2950.book Page 49 Monday, September 25, 2000 8:57 AM Adjusting the Resolution and Contrast If desired, you can change the default resolution for faxing documents to FINE. Follow the steps below. 1 Press these keys: FUNCTION The display will show: 4 FINE PRIORITY 1=YES, 2=NO 2 3 Press 1 (YES) to set the default resolution to FINE, or 2 (NO) to set it to STANDARD. Press the STOP key to return to the date and time display. YES 1 NO or 2 STOP 49 2.
all-fo2950.book Page 50 Monday, September 25, 2000 8:57 AM Sending a Fax by Normal Dialing Sending a Fax by Normal Dialing With Normal Dialing, you pick up the handset (or press the SPEAKER key) and dial by pressing the number keys. ♦ If a person answers, you can talk with them through the handset before sending the fax. (If you pressed the SPEAKER key, you must pick up the handset to talk.) ♦ Normal Dialing allows you to listen to the line and make sure the other fax machine is responding.
all-fo2950.book Page 51 Monday, September 25, 2000 8:57 AM 4 Wait for the connection. Depending on the setting of the receiving machine, you will either hear a facsimile reception tone or the other person will answer. 2. Sending Documents Sending a Fax by Normal Dialing Beep • If the other party answers, ask them to press their Start key (if you pressed the SPEAKER key, pick up the handset to speak with them). This causes the receiving machine to issue a reception tone.
all-fo2950.book Page 52 Monday, September 25, 2000 8:57 AM Sending a Fax by Automatic Dialing Sending a Fax by Automatic Dialing You can dial a fax or telephone number by simply pressing a Rapid Key, or by pressing the SPEED DIAL key and entering a two-digit number. To use a Rapid Key or Speed Dial number, you must first program the full fax number in the Rapid Key or Speed Dial number. It is usually convenient to program your most frequently dialed numbers in Rapid Keys.
all-fo2950.book Page 53 Monday, September 25, 2000 8:57 AM Sending a Fax by Automatic Dialing 1 Press these keys: FUNCTION 2. Sending Documents Storing fax and telephone numbers for Automatic Dialing 3 The display will show: FAX/TEL # MODE 1=SET,2=CLEAR 2 Press the 1 key to select SET. 1 The display will show: FAX/TEL # SET SPEED # OR RAPID 3 To store a number in a Rapid Key, press the desired Rapid Key.
all-fo2950.book Page 54 Monday, September 25, 2000 8:57 AM Sending a Fax by Automatic Dialing 5 Press the START key. 6 Enter the name of the party by pressing the number keys as shown below. (If you don’t want to enter a name, go directly to Step 7.) START SPACE = J= T= A= K= U= B= L= V= M= W= N= X= O= Y= P= Z= C= D= E= F= G= Q= H= R= I= S= Example: SHARP = 77777 444 22 7777 SPEAKER 77 ♦ To clear a mistake, press the SPEED DIAL key.
all-fo2950.book Page 55 Monday, September 25, 2000 8:57 AM Sending a Fax by Automatic Dialing 9 Press 1 if the number programmed is an area code or access code to be used for Chain Dialing (see Chain Dialing for area and access codes below). Press 2 (or START) if the number is a regular fax or voice number. Return to Step 3 to store another number, or press the STOP key to return to the date and time display. ON 1 OFF 2.
all-fo2950.book Page 56 Monday, September 25, 2000 8:57 AM Sending a Fax by Automatic Dialing 2 Press 2 to select CLEAR. 3 Press the Rapid Key or enter the Speed Dial number (press the number keys) that you want to clear. 4 Press the START key. 5 Return to Step 3 to clear another number, or press the STOP key to return to the date and time display.
all-fo2950.book Page 57 Monday, September 25, 2000 8:57 AM Sending a Fax by Automatic Dialing Dual Access 2. Sending Documents The fax machine features full dual access, which means that you can load a document and dial by automatic dialing even when the fax machine is occupied with another operation. After you dial, your document will be immediately scanned into memory and then transmitted once all previously set operations have been completed.
all-fo2950.book Page 58 Monday, September 25, 2000 8:57 AM Sending a Fax by Automatic Dialing If you do not press the START key or the STOP key within one minute, the transmission will be canceled and the pages already scanned cleared from memory. You will need to retransmit all pages of the document. Rapid Key Dialing If the number you want to dial has been programmed in a Rapid Key, you can dial it by pressing the Rapid Key. 1 Load the document(s). • SEND READY appears in the display.
all-fo2950.book Page 59 Monday, September 25, 2000 8:57 AM Sending a Fax by Automatic Dialing If the number you want to dial has been programmed in a Speed Dial number, you can dial it by pressing the SPEED DIAL key and then entering the Speed Dial number. 1 Load the document(s). • SEND READY appears in the display. • Set the resolution and/or contrast if desired. RESOLUTION 2 Press the SPEED DIAL key and then enter the Speed Dial number by pressing the numeric keys.
all-fo2950.book Page 60 Monday, September 25, 2000 8:57 AM Sending a Fax by Automatic Dialing Direct Keypad Dialing You can also enter a full number with the number keys and then press the START key to begin dialing. You can use this method to dial a full number when you don’t need to speak to the other party before faxing. 1 Load the document(s). (Note: If desired, you can load the document after dialing in Step 2, below.) • SEND READY will appear in the display.
all-fo2950.book Page 61 Monday, September 25, 2000 8:57 AM Sending a Fax by Automatic Dialing If you don’t remember the Rapid Key or Speed Dial number in which you have programmed a particular fax number or E-mail recipient, you can search for the number by following the steps below. Once you have found the number, you can dial and transmit the loaded document by simply pressing the START key. (Note: To search for an E-mail recipient, your fax must be connected to your computer.
all-fo2950.book Page 62 Monday, September 25, 2000 8:57 AM Sending a Fax by Automatic Dialing 5 Press the # key or the * key to scroll through the names (numbers if you pressed 0). Stop when the desired name appears in the display. or • If no names have been stored that begin with the entered letter, you will scroll from the next name, in alphabetical order, in the list. If no names/numbers have been stored at all, NO DATA will appear. 6 Press the START key. START • The document is transmitted.
all-fo2950.book Page 63 Monday, September 25, 2000 8:57 AM Sending a Fax by Automatic Dialing Enter a 2-digit number from 01 to 15 for the number of minutes of the interval. 0 3 2. Sending Documents 2 Example: 3 minutes 3 Press the STOP key to return to the date and time display. STOP Recall times for automatic dialing If desired, you can change the maximum number of automatic redialing attemps made when the line is busy.
all-fo2950.book Page 64 Monday, September 25, 2000 8:57 AM Sending a Fax by Automatic Dialing Checking and cancelling transmission jobs To display information on currently set transmission (and polling) jobs, follow the steps below. You can also cancel a job with this procedure. 1 Press these keys. • The display will show ACTION STATUS and the number of transmission jobs, and then information on the first job. 2 Press the UP key or the DOWN key to scroll through the list of jobs.
all-fo2950.book Page 65 Monday, September 25, 2000 8:57 AM Sending a Fax by Automatic Dialing Error Correction Mode 1 Press these keys: FUNCTION 2. Sending Documents The fax machine is set to automatically correct any distortions in a transmission due to noise on the telephone line before printing at the receiving end. This function is called Error Correction Mode (ECM). ECM is effective for both transmissions and receptions, and is only effective when the other fax machine also has ECM.
all-fo2950.book Page 66 Monday, September 25, 2000 8:57 AM Sending a Fax by Automatic Dialing Quick Online When you transmit a document, the fax machine normally dials the receiving party and begins transmitting while scanning is still in progress. This function is called Quick Online. If desired, you can turn off Quick Online and have the fax machine wait until all pages have been scanned before dialing.
all-fo2950.book Page 67 Monday, September 25, 2000 8:57 AM 3. Receiving Documents Using FAX Mode RECEPTION MODE TEL 3. Receiving Documents To select FAX mode, press the RECEPTION MODE key until the arrow in the display points to FAX. FAX A.M. When the reception mode is set to FAX, the fax machine will automatically answer all calls on four rings and receive incoming faxes.
all-fo2950.book Page 68 Monday, September 25, 2000 8:57 AM Using FAX Mode Changing the number of rings If desired, you can change the number of rings on which the fax machine answers incoming calls in FAX mode. Any number from 1 to 5 can be selected. 1 Press these keys: FUNCTION 4 The display will show: NUMBER OF RINGS ENTER (1-5) (4) 2 Enter the desired number of rings (any number from 1 to 5).
all-fo2950.book Page 69 Monday, September 25, 2000 8:57 AM Using TEL Reception Mode Using TEL Reception Mode RECEPTION MODE TEL 3. Receiving Documents To select TEL mode, press the RECEPTION MODE key until the arrow in the display points to TEL. FAX A.M. When the reception mode is set to TEL, you must answer all calls by picking up the fax machine’s handset or an extension phone connected to the same line. Answering with the fax’s handset 1 When the fax machine rings, pick up the handset.
all-fo2950.book Page 70 Monday, September 25, 2000 8:57 AM Using TEL Reception Mode 3 If the other party first speaks with you and then wants to send a fax, press the START key after speaking. (Press your START key before the sender presses their Start key.) • When RECEIVING appears in the display, hang up. START RECEIVING Answering with an extension phone 1 Answer the extension phone when it rings.
all-fo2950.book Page 71 Monday, September 25, 2000 8:57 AM Using TEL Reception Mode 3 If the fax doesn't respond, or if the other party first talks to you and then wants to send a fax, press 5, *, and * on the extension phone (only on a tone dial phone). This signals the fax to begin reception. Hang up. 3. Receiving Documents 5 Comments: ♦ Your fax will not accept the signal to begin reception (5**) if a document is loaded in its feeder.
all-fo2950.book Page 72 Monday, September 25, 2000 8:57 AM Using TEL Reception Mode 3 Press the STOP key to return to the date and time display. STOP Turning off detection of the Tel/Fax Remote Number If you don't intend to ever activate fax reception from an extension phone, you can turn off detection of the above TEL/FAX REMOTE NUMBER.
all-fo2950.book Page 73 Monday, September 25, 2000 8:57 AM Using TEL Reception Mode Fax Signal Receive 1 Press these keys: FUNCTION 3. Receiving Documents Your fax will automatically begin reception if you hear a soft fax tone after answering a call on your fax or an extension phone. If you use a computer fax modem to send documents on the same line, you must turn this function off in order to prevent your fax from mistakenly attempting to receive documents from the computer fax modem.
all-fo2950.book Page 74 Monday, September 25, 2000 8:57 AM Using TEL Reception Mode Reception Ratio The fax has been set at the factory to automatically reduce the size of received documents to fit the size of the printing paper. This ensures that data on the edges of the document are not cut off. If desired, you can turn this function off and have received documents printed at full size. ♦ If a document is too long to fit on the printing paper, the remainder will be printed on a second page.
all-fo2950.book Page 75 Monday, September 25, 2000 8:57 AM Substitute Reception to Memory Substitute Reception to Memory When you have received a document in memory, CAN’T PRINT DATA will appear in the display, alternating with a message indicating the problem. When you correct the problem, the stored documents will automatically print out. If you received documents in memory because the fax ran out of paper, be sure to add paper which is the same size as the paper previously used.
all-fo2950.book Page 76 Monday, September 25, 2000 8:57 AM 4. Making Copies Your fax can also be used to make copies. Single and multiple copies (up to 99 per original) can be made, enabling your fax to double as a convenience office copier. 1 Load the document(s) face down. (Maximum of 20 pages.) • SEND READY appears in the display.
all-fo2950.book Page 77 Monday, September 25, 2000 8:57 AM Making Copies REDUCTION/ ENLARGEMENT 4. Making Copies • REDUCE/ENLARGE: If you want to reduce or enlarge the copy, press the REDUCTION/ ENLARGEMENT key until the desired percentage appears in the display (you can also scroll through the percentages with the UP and DOWN keys). The selections are as follows: 100% (no reduction/enlargement) AUTO (auto reduction to fit the size of the printing paper.
all-fo2950.book Page 78 Monday, September 25, 2000 8:57 AM Making Copies Copy Cut-off When making a copy of a document that is longer than the printing paper, use the copy cut-off setting to select whether the remaining part of the document will be cut off or printed on a second page. The initial setting is YES (cut off the remainder). To change the setting, follow the steps below.
all-fo2950.book Page 79 Monday, September 25, 2000 8:57 AM 5. Making Telephone Calls Your fax machine can be used like a regular telephone to make and receive voice calls. ♦ To make or receive a voice call, the power must be on. 2 Pick up the handset or press the SPEAKER key. Listen for the dial tone. SPEAKER or Dial the number using one of the following methods: • Normal Dialing: Enter the full telephone number with the numeric keys. • Rapid Key Dialing: Press the appropriate Rapid Key.
all-fo2950.book Page 80 Monday, September 25, 2000 8:57 AM Making Telephone Calls Comments: ♦ While the handset of the fax is lifted (off hook), an extension phone connected directly to the fax cannot be used to speak with the other party. ♦ The fax may interrupt a voice call received on an extension phone if the reception mode is set to A.M. and there is a period of silence during the conversation.
all-fo2950.book Page 81 Monday, September 25, 2000 8:57 AM 6. Answering Machine Hookup Connecting an Answering Machine If desired, you can connect an answering machine to your fax machine's TEL. SET jack. This will allow you to receive both voice messages and faxes when you are out. 1 Remove the seal covering the TEL. SET jack. 2 Connect the answering machine's telephone line jack to the TEL. SET jack. 6.
all-fo2950.book Page 82 Monday, September 25, 2000 8:57 AM Connecting an Answering Machine Changing the outgoing message The outgoing message (OGM) of your answering machine should be changed to inform callers who want to send a fax to press their Start key. For example, your message might go as follows: “Hello. You've reached the ABC company. No one is available to take your call right now. Please leave a message after the beep or press your facsimile Start key to send a fax. Thank you for calling.
all-fo2950.book Page 83 Monday, September 25, 2000 8:57 AM Connecting an Answering Machine 2 Set your answering machine to auto answer. ♦ Your answering machine must be set to answer on a maximum of two rings. If not, you may not be able to receive faxes sent by automatic dialing. ♦ If your answering machine has a toll saver function, make sure that it will answer by the fourth ring.
all-fo2950.book Page 84 Monday, September 25, 2000 8:57 AM Optional A.M. Mode Settings Optional A.M. Mode Settings If necessary, you can use the following settings to improve the response of the answering machine hookup to incoming calls. Quiet Detect Time The fax machine is set to take over the line and begin reception if it detects 4 seconds of silence after the answering machine answers. If needed, you can change this setting to any number of seconds from 1 to 10.
all-fo2950.book Page 85 Monday, September 25, 2000 8:57 AM Optional A.M. Mode Settings 3 Press the STOP key to return to the date and time display. STOP Fax when Answering machine Fails When this function is turned on, your fax will answer the call after 5 rings if the answering machine for some reason fails to answer before that time. This ensures that you will receive fax messages even if the answering machine’s tape fills up or the answering machine is not turned on.
all-fo2950.book Page 86 Monday, September 25, 2000 8:57 AM 7. Special Functions Broadcasting The Broadcasting function allows you to send the same document to as many as 30 different locations with just one operation. First load the document, then enter the numbers of the receiving machines. The document will be automatically transmitted to each location. ♦ You can only use Rapid Keys or Speed Dial numbers to dial the numbers of the receiving machines. 1 Load the document (s).
all-fo2950.book Page 87 Monday, September 25, 2000 8:57 AM Broadcasting 4 Press the START key. START The display will show: SET RESOLUTION PRESS RESO. KEY • If desired, adjust the resolution and/ or contrast. Press the START key. Transmission begins. START • A Transaction Report is automatically printed out after Broadcasting is completed. Check the “Note” column of the report to see if any of the locations are marked “Busy” or have a communication error code.
all-fo2950.book Page 88 Monday, September 25, 2000 8:57 AM Broadcasting Broadcasting using a Group Key If the fax machines to which you want to broadcast have all been programmed into one Group Key (see Storing numbers in Group Keys which follows), you can perform the broadcasting operation using the following simplified procedure: 1 Load the document(s). • SEND READY will appear in the display. • If desired, adjust the resolution and/ or contrast. RESOLUTION 2 Press the appropriate Group Key.
all-fo2950.book Page 89 Monday, September 25, 2000 8:57 AM Broadcasting Storing numbers in Group Keys Group Keys allow you to dial a group of fax numbers by simply pressing the appropriate Group Key once. To store a group of numbers in a Group Key, follow the steps below. Rapid Keys 17/G1 through 20/G4 can be used as Group Keys. Note that one key cannot be simultaneously programmed as both a Group Key and a Rapid Key. ♦ Up to 30 numbers can be stored in one Group Key.
all-fo2950.book Page 90 Monday, September 25, 2000 8:57 AM Broadcasting 4 Enter fax numbers using one or both of the following methods: • Press one or more Rapid Keys. 02 01 03 • Enter one or more Speed Dial numbers with the numeric keys. 0 1 2 4 (Example) 90 5 Press the START key. 6 Return to Step 3 to program another Group Key, or press the STOP key repeatedly until you return to the date and time display.
all-fo2950.book Page 91 Monday, September 25, 2000 8:57 AM Distinctive Ring Distinctive Ring (Requires Subscription to Service) Important: ♦ To use distinctive ring, you must subscribe to a distinctive ring service from your local phone company. ♦ Your fax machine may not be compatible with some distinctive ring services. Distinctive ring is a service offered by some local telephone companies whereby they assign an additional second number to your regular single line.
all-fo2950.book Page 92 Monday, September 25, 2000 8:57 AM Distinctive Ring 3 Press a number from 1 to 3 to select the ring pattern below that matches your second number’s ring pattern. Or, press 4 to have your fax automatically answer your normal telephone number. Press 5 to turn off the distinctive ring function.
all-fo2950.book Page 93 Monday, September 25, 2000 8:57 AM Distinctive Ring 7. Special Functions ♦ When using distinctive ring, you must set the reception mode of your fax machine to FAX. When your designated fax number is dialed, your fax will automatically answer and begin reception after two rings. Note that other devices on the same line will also ring until your fax answers. If one of your other numbers is dialed, the fax will ring; however, it will not answer.
all-fo2950.book Page 94 Monday, September 25, 2000 8:57 AM Cover Sheet Cover Sheet You can have the fax generate a cover sheet and send it as the last page of each of your fax transmissions. You can select a message. For the recipient's name to appear, you must dial using a Speed Dial or Rapid Key number with the name programmed. Your name and number must be programmed as explained in Chapter 1. Follow the steps below to turn on the cover sheet function.
all-fo2950.book Page 95 Monday, September 25, 2000 8:57 AM Cover Sheet 2 Press 1 (YES) to turn on the cover sheet function, or 2 (NO) to turn it off. YES 1 The display will briefly show your selection, and then: NO or 2 AUTO PRINT OUT 1=YES, 2=NO 3 Press the STOP key to return to the date and time display. STOP Selecting a header message (optional) When the cover sheet function is turned on, you can also select a message which will appear as a header at the top of the cover sheet.
all-fo2950.book Page 96 Monday, September 25, 2000 8:57 AM Cover Sheet 3 Select a message by entering a number from 1 to 4: 1: URGENT 2: IMPORTANT 3: CONFIDENTIAL 4: PLS. DISTRIBUTE 4 1 (Example) Dial the receiving machine and transmit the document. Note: To cancel a header message selection, press the STOP key or remove the document from the feeder.
all-fo2950.book Page 97 Monday, September 25, 2000 8:57 AM Batch Page Numbering Batch Page Numbering You can change the page numbering of the fax from simple numbering (“P.01”, “P.02”, etc.) to batch numbering, which means that a slash and the total number of pages are added after each page number (for example, “P. 01/05”, “P.02/05”, etc.). This allows the recipient to check for missing pages. 1 Load the document(s). • The document must be loaded before batch page numbering can be set.
all-fo2950.book Page 98 Monday, September 25, 2000 8:57 AM Batch Page Numbering 4 Dial the receiving machine and transmit the document. Comments: ♦ If you need to cancel a batch number entry, remove the document from the feeder or press the STOP key. ♦ If the number of pages actually transmitted does not coincide with the batch number entered, the alarm will sound and PAGE COUNT ERROR will appear in the display. PAGE E.
all-fo2950.book Page 99 Monday, September 25, 2000 8:57 AM Blocking Reception of Unwanted Faxes Blocking Reception of Unwanted Faxes The Anti Junk Fax function allows you to block reception of faxes from parties which you specify. This saves paper by not printing out unwanted “junk” faxes. To use this function, follow the steps below to turn it on, and then enter the fax numbers from which you do not want to receive faxes as indicated in the procedure that follows.
all-fo2950.book Page 100 Monday, September 25, 2000 8:57 AM Blocking Reception of Unwanted Faxes 1 Press these keys: FUNCTION 3 The display will show: STORE JUNK FAX # 1=SET, 2=CLEAR 2 3 Press 1 to enter a number in the Anti Junk Number List, or 2 to clear a number from the list. SET 1 Entering: Enter a 1-digit number from 1 to 5 with the numeric keys. This number identifies the fax number that you will enter in the next step.
all-fo2950.book Page 101 Monday, September 25, 2000 8:57 AM Polling (Requesting a Fax Transmission) Polling (Requesting a Fax Transmission) Polling allows you to call another fax machine and have it send a document to your machine without operator assistance. In other words, the receiving fax machine, not the transmitting fax machine, initiates the transmission. You can use your fax machine to both poll and be polled by others.
all-fo2950.book Page 102 Monday, September 25, 2000 8:57 AM Polling (Requesting a Fax Transmission) Requesting transmission 1 Dial the fax machine you want to poll using one of the following methods: • Pick up the handset (or press the SPEAKER key) and dial the full number. Wait for the fax answerback tone. ABC 1 GHI DEF 2 3 JKL 4 PQRS MNO 5 TUV 7 6 WXYZ 8 0 • Pick up the handset (or press the SPEAKER key) and press the Rapid Dial Key. Wait for the fax answerback tone.
all-fo2950.book Page 103 Monday, September 25, 2000 8:57 AM Polling (Requesting a Fax Transmission) Being polled (Memory polling) To let another fax machine poll your fax machine, you must first store the document in memory using the following procedure. Transmission will take place when the other fax machine calls your fax machine and activates polling. You can choose whether to allow polling only once, or an unlimited number of times.
all-fo2950.book Page 104 Monday, September 25, 2000 8:57 AM Polling (Requesting a Fax Transmission) 4 Press 1 to select SET. 5 Press 1 to allow polling only once, or 2 to allow polling an unlimited number of times. 6 1 ONCE 1 REPEAT 2 or Press the START key. START • The document is scanned into memory and your fax goes on polling standby.
all-fo2950.book Page 105 Monday, September 25, 2000 8:57 AM Polling (Requesting a Fax Transmission) Polling security Polling Security allows you to prevent unauthorized polling of your machine. When this function is turned on, polling will only take place when the fax number of the polling fax machine has been entered in your machine's list of permitted fax numbers (called "passcode numbers"). The number of the polling fax must also be correctly programmed into itself for identification.
all-fo2950.book Page 106 Monday, September 25, 2000 8:57 AM Polling (Requesting a Fax Transmission) Storing and clearing fax numbers for polling permission You can store up to 10 fax numbers in your machine's list of permitted numbers. 1 Press these keys: FUNCTION 3 The display will show: PASSCODE # MODE 1=SET, 2=CLEAR 2 3 4 Press 1 to store a number, or 2 to clear a number. SET 1 Storing: Enter a 2-digit number from 01 to 10.
all-fo2950.book Page 107 Monday, September 25, 2000 8:57 AM Timer Operations Timer Operations The Timer function allows you to set up a transmission or polling operation to be performed automatically at a time you specify. Up to three operations can be set at any one time, and the times they will be performed can be specified up to one week in advance. ♦ You can use this function to take advantage of lower off-peak telephone rates without having to be there when the operation is performed.
all-fo2950.book Page 108 Monday, September 25, 2000 8:57 AM Timer Operations 5 6 7 Enter the time at which you want the operation to take place (2 digits for the hour and 2 digits for the minute). Press the * key to select A.M. or the # key to select P.M. 0 A.M. 9 Press a Rapid Key or enter a Speed Dial number for the receiving fax machine. • If this is a polling operation, go to Step 12. 10 108 Press the START key. P.M.
all-fo2950.book Page 109 Monday, September 25, 2000 8:57 AM Timer Operations 11 Adjust the resolution and/or contrast if desired (skip to the next step if you don't want to change settings). 12 Press the START key. RESOLUTION START • If this is a transmission, the document is scanned into memory. To cancel a timer operation If you need to cancel a timer operation after it has been set, follow the steps below.
all-fo2950.book Page 110 Monday, September 25, 2000 8:57 AM 8. Printing Lists You can print lists showing settings and information entered in the fax machine. You can also print out reports on recent activity and individual operations after they are completed. The lists and reports are described on the following pages. To print a list, follow the steps below. 1 Press the FUNCTION key and 2.
all-fo2950.book Page 111 Monday, September 25, 2000 8:57 AM 8. Printing Lists Printing Lists Explanation of headings SENDER/ RECEIVER The name or fax number of the other machine involved in the transaction. If that machine does not have an ID function, the communication mode will appear (for example, “G3”). START The time at which transmission/reception started. TX/RX TIME Total time taken for transmission/reception. PAGES Number of pages transmitted/received.
all-fo2950.book Page 112 Monday, September 25, 2000 8:57 AM Printing Lists CANCEL - The transaction was cancelled because the STOP key was pressed, no document was in the feeder, or the other machine requested transmission using a function which your fax machine does not have. If you were attempting to fax, make sure a document is in the feeder. If you were receiving, contact the faxing party to see how they are trying to send to you.
all-fo2950.book Page 113 Monday, September 25, 2000 8:57 AM 8. Printing Lists Printing Lists Timer List This list shows the timer operations that are currently set, and whether the Memory Polling function is turned on. Telephone Number List This list shows the fax numbers that have been programmed for automatic dialing.
all-fo2950.book Page 114 Monday, September 25, 2000 8:57 AM Printing Lists Option Setting List This list shows the current status of the option settings. Junk Fax Number List This list shows the numbers that are blocked by the Anti Junk function.
all-fo2950.book Page 115 Monday, September 25, 2000 8:57 AM 8. Printing Lists Printing Lists Group List This list shows the fax numbers that have been programmed into each Group Key. Transaction Report This report is printed out automatically after an operation is completed to allow you to check the result. Your fax machine is set at the factory to print out the report only when an error occurs. ♦ The same headings appear in the Transaction Report as in the Activity Report.
all-fo2950.book Page 116 Monday, September 25, 2000 8:57 AM Printing Lists 2 3 116 Press a number from 1 to 5 to select the condition for printing. 1 ALWAYS PRINT A report will be printed after each transmission, reception, or error. 2 ERR/TIMER/MEM A report will be printed after an error, timer operation, or memory transmission. 3 SEND ONLY A report will be printed after each transmission. 4 NEVER PRINT A report will never be printed.
all-fo2950.book Page 117 Monday, September 25, 2000 8:57 AM Scanning glass and rollers Clean the scanning glass and rollers frequently to ensure that your transmitted images and copies are of the highest quality. Open the operation panel (grasp the panel release and pull up), and wipe the scanning glass, rollers and white backplate with a soft cloth. ♦ Make sure that all dirt and stains (such as correcting fluid) are removed, as dirts and stains will cause vertical lines on transmitted images and copies.
all-fo2950.book Page 118 Monday, September 25, 2000 8:57 AM Maintenance Replacing the toner cartridge When the toner cartridge nears empty (about 100 pages can still be printed), the TONER EMPTY indicator on the operation panel will blink. When the toner cartridge is empty, the toner cartridge indicator will light steadily and REPLACE TONER will appear in the display. Printing will no longer be possible.
all-fo2950.book Page 119 Monday, September 25, 2000 8:57 AM Maintenance Install the new toner cartridge and reset the toner counter. (Refer to Installing the Toner Cartridge in Chapter 1.) 9. Maintenance 3 Replacing the drum cartridge To maintain excellent printing quality, we recommend that you replace the drum cartridge about 20,000 pages have been printed.
all-fo2950.book Page 120 Monday, September 25, 2000 8:57 AM Maintenance 2 Grasp the finger hold on the toner cartridge handle where it is marked PUSH, and pull the handle out. Rehold the handle and pull the toner cartridge out of the compartment. • Place the toner cartridge on a sheet of paper on a level surface. 3 Grasp the tabs on the drum cartridge handle and gently pull the cartridge out of the machine. 4 Remove the new drum cartridge from its packaging.
all-fo2950.book Page 121 Monday, September 25, 2000 8:57 AM 5 Insert the drum cartridge into the print compartment, aligning the guides on the cartridge with the runners on the sides of the compartment. 6 Gently pull the paper tab to remove the black sheet of protective paper from the drum cartridge. 9. Maintenance Maintenance • Be careful not the tear the paper or leave any pieces of paper in the machine. 7 Replace the toner cartridge and reset the drum counter.
all-fo2950.book Page 122 Monday, September 25, 2000 8:57 AM Maintenance Cleaning the drum cartridge If you find that characters or parts of an image are missing from your printed pages, the drum in the drum cartridge may need cleaning. Follow the steps below to clean the drum. 1 Grasp the print compartment cover at both sides as shown, and pull up to open the cover. • Caution! The fusing unit inside the print compartment becomes very hot during operation.
all-fo2950.book Page 123 Monday, September 25, 2000 8:57 AM 4 Take a sheet of clean paper and roll it into a tube. Roll it tightly so that the diameter of the holes at each end is less than the thickness of your little finger. 5 Gently wipe the surface of the drum with the rolled-up paper to remove any particles of toner caked on the drum. 9. Maintenance Maintenance • Do not let the drum surface come into contact with anything other than the rolled-up paper.
all-fo2950.book Page 124 Monday, September 25, 2000 8:57 AM 10. Troubleshooting Problems and Solutions Line error Problem LINE ERROR appears in the display. Solution Try the transaction again. If the error persists, check the following: • Check the connection. The cord from the TEL. LINE jack to the wall jack should be no longer than six feet. • Make sure there are no modem devices sharing the same telephone line. • Check with the other party to make sure their fax machine is functioning properly.
all-fo2950.book Page 125 Monday, September 25, 2000 8:57 AM Problems and Solutions Dialing and transmission problems Solution No dial tone when you pick up the handset or press the SPEAKER key. • Make sure the handset cord is connected to the correct jack. See Connecting the handset in Connections in Chapter 1. Dialing is not possible. • Make sure the power cord is properly plugged into a power outlet. • Make sure that the telephone line is properly connected to both the TEL.
all-fo2950.book Page 126 Monday, September 25, 2000 8:57 AM Problems and Solutions Reception and copying problems Problem Solution The fax machine doesn't receive documents automatically. • Make sure that the reception mode is set to FAX. If you subscribe to a distinctive ring service, make sure that the Distinctive Ring function is set to the correct ring pattern. If you do not subscribe to a distinctive ring service, make sure that Distinctive Ring is set to OFF SETTING.
all-fo2950.book Page 127 Monday, September 25, 2000 8:57 AM Problems and Solutions • Any dirt or material on the scanning glass will cause spots to appear on copies and transmitted faxes. Clean the scanning glass as explained in Chapter 9. Dots appear at regular intervals on received documents and copies. • The drum cartridge may be damaged. Replace the drum cartridge. 10. Troubleshooting The quality of copies is poor and/or black spots appear.
all-fo2950.book Page 128 Monday, September 25, 2000 8:57 AM General problems Problem Nothing appears in the display. Solution • Make sure the power cord is properly plugged into a power outlet. • Connect another electrical appliance to the outlet to see if it has power. The machine does not respond when you press any of its keys. • If a beep sound is not made when you press the keys, open the printer compartment cover and use pencil or pen to press the RESET button. (See the following page.
all-fo2950.book Page 129 Monday, September 25, 2000 8:57 AM Problems and Solutions Using the RESET key If the fax machine stops responding when you press any of the operation panel keys, you must reset it. This can be done as follows: Grasp the print compartment cover at both sides as shown, and pull up to open the cover. 10. Troubleshooting 1 • Caution! The fusing unit inside the print compartment becomes very hot during operation.
all-fo2950.book Page 130 Monday, September 25, 2000 8:57 AM Messages and Signals Messages and Signals Display messages CAN’T PRINT DATA A fax has been received to memory because printing is not possible. This message will alternate with a message that indicates the problem. The fax will print out automatically when the problem is resolved. CHECK PAPER SIZE The paper size setting is incorrect. Change the paper size setting as described in Loading Printing Paper in Chapter 1.
all-fo2950.book Page 131 Monday, September 25, 2000 8:57 AM Messages and Signals The memory is full. This may occur during fax reception if too much data is received before the pages can be printed out. If faxes have been received to memory because printing is not possible (an additional message will indicate the problem), resolve the problem so that printing can continue (see Substitue Reception to Memory in Chapter 3).
all-fo2950.book Page 132 Monday, September 25, 2000 8:57 AM Messages and Signals SIZE ERROR The paper size setting is longer than the paper loaded in the tray. Change the paper size setting as explained in Loading Printing Paper in Chapter 1. This message also appears if paper smaller than letter size has been loaded. In this case, change the paper to letter, legal, or A4 size paper. TOTAL PAGE(S) 1 Number of pages transmitted, received, or copied.
all-fo2950.book Page 133 Monday, September 25, 2000 8:57 AM Clearing Paper Jams Clearing Paper Jams Clearing a jammed document Important: Do not try to remove a document without opening the operation panel. This may damage the feeder mechanism. 1 Open the operation panel by grasping the panel release and pulling up. 2 Remove the document. 3 Close the operation panel, making sure it clicks into place. 133 10.
all-fo2950.book Page 134 Monday, September 25, 2000 8:57 AM Clearing Paper Jams Clearing jammed printing paper 1 If most of the jammed page is protruding from the back of the fax, pull the paper release lever toward you and try pulling the page out. 2 If the jammed page comes out, take out the rest of the paper in the tray, straighten the stack, put it back in the paper tray, and push down the paper release lever. • If you are unable to clear the jam in this way, continue with the following steps.
all-fo2950.book Page 135 Monday, September 25, 2000 8:57 AM Clearing Paper Jams 4 Grasp the finger hold on the toner cartridge handle where it is marked PUSH, and pull the handle out. Rehold the handle and pull the toner cartridge out of the compartment. 5 Grasp the tabs on the drum cartridge handle and gently pull the cartridge out of the machine.
all-fo2950.book Page 136 Monday, September 25, 2000 8:57 AM Clearing Paper Jams 7 Gently pull the jammed paper out of the machine. • If needed, turn the wheel on the right side of the fusing unit to eject the paper from the machine. • Caution! Do not use excessive force to pull the jammed paper out. If the paper tears and a piece remains inside the machine, a service call may be necessary to remove the remaining piece. Fusing unit Wheel 8 Replace the drum cartridge.
all-fo2950.book Page 137 Monday, September 25, 2000 8:57 AM FCC Regulatory Information FCC Regulatory Information This equipment complies with FCC rules, Part 68. On this equipment is a label that contains, among other information, the FCC Registration Number and Ringer Equivalence Number (REN) for this equipment. If requested, this information must be provided to your telephone company. An FCC compliant telephone cord and modular plug is provided with this equipment.
all-fo2950.book Page 138 Monday, September 25, 2000 8:57 AM S H A R P Date Revised : Date Issued : July. 16. 1999 MATERIAL SAFETY DATA SHEET (1/2) MSDS No. P-00102 Section 1. Product Identification Product: FO-2950/FO29ND,FO-29DC,FO-29DCCN (Black Toner) Section 2. Supplier’s Name and Address Sharp Corporation 22-22 Nagaike-cho, Abeno-ku, Osaka, Japan Local suppliers are listed below. Please contact the nearest supplier for additional information. (Country) U.S.
all-fo2950.book Page 139 Monday, September 25, 2000 8:57 AM S H A R P Date Revised : Date Issued : July. 16. 1999 MATERIAL SAFETY DATA SHEET (2/2) MSDS No. P-00102 Section 5. Health Hazard Data Emergency and First Aid Procedures : Inhalation ; Remove to fresh air. If effects occur, consult medical personnel. Eye ; In case of contact, immediately flush eyes with water for 15 minutes. Section 6.
all-fo2950.book Page 140 Monday, September 25, 2000 8:57 AM Quick Reference Guide Entering Your Name and Number Setting the Date and Time 1. Press: 1. Press: FUNCTION 3 FUNCTION Display shows: DATE & TIME SET PRESS START KEY Display shows: OWN NUMBER SET PRESS START KEY 2. Press: 3 2. Press: START START 3. Enter two digits for the month (01 to 12). 3. Enter your fax number (max. of 20 digits) by pressing the number keys. 4. Enter two digits for the day (01 to 31). • To insert 5.
all-fo2950.book Page 141 Monday, September 25, 2000 8:57 AM Quick Reference Guide Sending Faxes Receiving Faxes Press the RECEPTION MODE key until the arrow in the display points to the desired reception mode. Place your document (up to 20 pages) face down in the document feeder. TEL FAX FEB 01 10:30 M:00% STAND-BY RECEPTION MODE A.M. TEL FAX Normal Dialing 1. Lift the handset or press FEB 01 10:30 M:00% STAND-BY SPEAKER TEL FAX FEB 01 10:30 M:00% STAND-BY 2. Dial the fax number. 3.
all-fo2950.book Page 142 Monday, September 25, 2000 8:57 AM Guía de referencia rápida Introducción de su nombre y número Ajuste de la fecha y hora 1. Pulse: 1. Pulse: FUNCTION El visor muestra: 3 FUNCTION El visor muestra: OWN NUMBER SET PRESS START KEY 2. Pulse: 3 DATE & TIME SET PRESS START KEY START START 2. Pulse: 3. Introduzca su número de telefax (20 dígitos como máx.) mediante pulsación de las teclas numéricas. • Pulse la tecla # para introducir un espacio libre.
all-fo2950.book Page 143 Monday, September 25, 2000 8:57 AM Guía de referencia rápida Transmisión de mensajes telefax Coloque el original (hasta 20 páginas) cara abajo en el alimentador de documentos. Recepción de mensajes telefax Pulse Usted la tecla RECEPTION MODE hasta que la flecha en el display indique el modo de recepción deseado. TEL FAX FEB 01 10:30 M:00% STAND-BY RECEPTION MODE Marcación normal TEL FAX FEB 01 10:30 M:00% STAND-BY SPEAKER 1. Levante el auricular o pulse: 3.
all-fo2950.book Page 144 Monday, September 25, 2000 8:57 AM Index A A.M.
all-fo2950.
all-fo2950.
all-fo2950.
all-fo2950.
Warranty.fm Page 27 Thursday, April 27, 2000 7:01 PM NOTICE BE SURE TO ASK YOUR AUTHORIZED SHARP DEALER ABOUT THE WARRANTY THAT YOUR SELLING DEALER EXTENDS TO YOU. In order to assure you, the end-user, of warranty protection, Sharp extends a limited warranty to each of its authorized dealers and, in turn, requires each of its authorized dealers to extend its own warranty to you on terms that are no less favorable than those given to the dealer by Sharp.
back.fm Page 27 Thursday, April 27, 2000 7:01 PM SHARP DOCUMENT NETWORK SYSTEM OF AMERICA Sharp Plaza, Mahwah, New Jersey 07430-2135 SHARP CORPORATION FOR YOUR RECORDS Please record the model number and serial number below, for easy reference, in case of loss or theft. These numbers are located on the rear side of the unit.Space is also provided for other relevant information.