MODEL FO-NS2 Please keep this manual as the information mentioned below is very important. NETWORK SCANNER EXPANSION KIT FO-NS2 APPLICATION NUMBER NIC SERIAL NUMBER PRODUCT KEY OPERATION MANUAL Sharpdesk Serial Numbers (5 Licenses) 1. Setting the IP Address 2. Printing out the Network Settings 3. Mail Server and DNS Server Settings 4. Storing Network Scanning Destinations 5. Scan to E-mail Setup 6. Scan to E-mail Using the E-mail Key 7. Sending an Image Using a Rapid Key or Speed Dial Number 8.
allbook.book Page 1 Wednesday, May 28, 2003 12:53 PM For detailed information on the software in the CD-ROM, please view the user's guides (PDF format) that are included on the CD-ROM. The explanations of screens and procedures in this manual are for Windows 98. The screens may vary depending on your Windows version and configuration.
allbook.book Page 1 Wednesday, May 28, 2003 12:53 PM SOFTWARE LICENSE PLEASE READ THIS LICENSE CAREFULLY BEFORE USING THE SOFTWARE. BY USING THE SOFTWARE, YOU ARE AGREEING TO BE BOUND BY THE TERMS OF THIS LICENSE. 1. License. The application, demonstration, system and other software accompanying this License, whether on disk, in read only memory, or on any other media (the "Software") and related documentation are licensed to you by SHARP.
allbook.book Page 2 Wednesday, May 28, 2003 12:53 PM ANY IMPLIED WARRANTIES ON THE DISKS, INCLUDING THE IMPLIED WARRANTIES OF MERCHANTABILITY AND FITNESS FOR A PARTICULAR PURPOSE, ARE LIMITED IN DURATION TO NINETY (90) DAYS FROM THE DATE OF DELIVERY. THIS WARRANTY GIVES YOU SPECIFIC LEGAL RIGHTS, AND YOU MAY ALSO HAVE OTHER RIGHTS WHICH VARY FROM JURISDICTION TO JURISDICTION. 7. Disclaimer of Warranty on Software. You expressly acknowledge and agree that use of the Software is at your sole risk.
allbook.book Page 1 Wednesday, May 28, 2003 12:53 PM Table of Contents 1. Setting the IP Address 6 Initializing the network interface board . . . . . . . . . . . . . . . . . . . . . . . . 8 2. Printing out the Network Settings 3. Mail Server and DNS Server Settings Accessing the Web page in the machine . . . . . . . . . . . . . . . . . . . . . Mail server and DNS server . . . . . . . . . . . . . . . . . . . . . . . . . . . . . . . Setting Passwords . . . . . . . . . . . . . . . . . . . . . . . . . .
allbook.book Page 2 Wednesday, May 28, 2003 12:53 PM Table of Contents 8. Installing the Network Scanner Software 28 Software Programs . . . . . . . . . . . . . . . . . . . . . . . . . . . . . . . . . . . . . . 28 User's Guides for Software Programs. . . . . . . . . . . . . . . . . . . . . . . . 29 Installing the software programs . . . . . . . . . . . . . . . . . . . . . . . . . . . . 30 Setting up Network Scanner Tool . . . . . . . . . . . . . . . . . . . . . . . . . . . 31 Uninstalling a program .
allbook.book Page 3 Wednesday, May 28, 2003 12:53 PM Specifications Maximum original size 11"x19" (279 mm x483 mm) Optical resolution 203 dpi Resolution Standard: 203 x 98 dpi Fine/Halftone: 203 x 196 dpi Super fine: 203 x 391 dpi Ultra fine: 406 x 391 dpi Output modes 1 bit/pixel File format File types: PDF, TIFF Compression modes: G3, G4, None Scan destinations E-mail, FTP servers, computer desktops Management system Uses built-in Web server Web browser Internet Explorer 4.
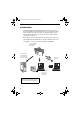
allbook.book Page 4 Wednesday, May 28, 2003 12:53 PM Introduction The FO-NS2 Network Scanner Expansion Kit allows you to scan a document and directly transmit the image to an e-mail address (Scan to E-mail), FTP server (Scan to FTP), or computer desktop on your network (Scan to Desktop). To use this option, the machine must be connected to a network.
allbook.book Page 5 Wednesday, May 28, 2003 12:53 PM Steps required for setup The following steps are necessary to use the network scanner option. The steps must be completed in the order shown. 1. Your dealer must install the FO-LN1 network interface kit and the FO-NS2 network scanner kit, and enter the network scanner product key. The machine must be connected to the network. 2.
allbook.book Page 6 Wednesday, May 28, 2003 12:53 PM 1. Setting the IP Address Once your dealer has installed the network scanner option and the machine is connected to the network, the network administrator or administrator of the machine should use the following procedure to set the IP address of the machine.
allbook.book Page 7 Wednesday, May 28, 2003 12:53 PM Setting the IP Address 5 If the machine will receive an IP address automatically from a DHCP server, make sure that “YES” is selected (this will enable DHCP). If the machine will be assigned a permanent IP address, press or to select “NO”. 6 Press START/ ENTER . • If you enabled DHCP by selecting “YES” in the previous step, this completes the setting.
allbook.book Page 8 Wednesday, May 28, 2003 12:53 PM Setting the IP Address 11 Wait while the machine writes the setting to the NIC board (“DO NOT POWER DOWN” will appear in the display). When the display changes to “OK”, turn off the power of the machine and then turn it back on to make the new settings take effect.
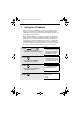
allbook.book Page 9 Wednesday, May 28, 2003 12:53 PM 2. Printing out the Network Settings You can print lists showing the current network settings and network interface board settings. ♦ To check the IP address of the machine, select PRINT NETWORK SETTINGS in Step 3 below. 1 Press • 2 Display: MENU and then . MENU MODE 5:PROGRAM/GROUP MODE Make sure that NETWORK 6:SERIAL POLLING MODE SETTING is selected in the display. 7:MEMORY POLL MODE 8:NETWORK SETTING Press START/ ENTER and then .
allbook.book Page 10 Wednesday, May 28, 2003 12:53 PM 3. Mail Server and DNS Server Settings Settings for your E-mail server and DNS server must be configured in order to use the network scanner function. To configure the settings, access the machine's Web page from a computer that is connected to the same network as the machine. The Web page can be displayed with your Web browser (Internet Explorer 4.0 or later, or Netscape Navigator 4.0 or later).
allbook.book Page 11 Wednesday, May 28, 2003 12:53 PM Mail Server and DNS Server Settings Setting Passwords Passwords can be set to restrict Web page access and protect settings. An administrator password and a user password can be set. When the Web page is accessed with the administrator password, all settings can be configured.
allbook.book Page 12 Wednesday, May 28, 2003 12:53 PM 4. Storing Network Scanning Destinations Network scanning destinations can be stored in Rapid Keys and Speed Dial numbers. The Rapid Keys and Speed Dial numbers can be in a personal book or in the COMMON book. ♦ Scan to E-mail can be performed by manually entering the destination e-mail address at the time of transmission, or by using a Rapid Key or Speed Dial number.
allbook.book Page 13 Wednesday, May 28, 2003 12:53 PM Storing Network Scanning Destinations Storing destinations in the Web page To store a destination, click the desired destination type (E-mail, FTP, or Fax) under Destination Management in the Web page menu. In the Destination Management page, enter the destination name and select a personal address book or the COMMON book.
allbook.book Page 14 Wednesday, May 28, 2003 12:53 PM Storing Network Scanning Destinations For detailed information on setting up, editing, and deleting destinations, click Help at the bottom of the Web page menu frame. Scan to FTP (Hyperlink) When using Scan to FTP to send an image to an FTP server, you can also have notifications automatically sent by e-mail to selected recipients informing them that the image has been posted on the server.
allbook.book Page 15 Wednesday, May 28, 2003 12:53 PM Storing Network Scanning Destinations Information on using Scan to Desktop Unlike the case where a scanner is directly connected to your computer, scanning using Scan to Desktop cannot be directly initiated from a scanning application in your computer. Instead, scanning is begun by pressing the Rapid Key or Speed Dial number on the machine that contains your computer as a Scan to Desktop destination.
allbook.book Page 16 Wednesday, May 28, 2003 12:53 PM 5. Scan to E-mail Setup To use the Scan to E-mail function, the subject and sender information (name and e-mail address) that appear when an image is sent to an email recipient must be entered, and the file format for the scanned image must be selected. (Note: The file format set in this procedure does not apply to Scan to E-mail using a Rapid Key or Speed Dial number.
allbook.book Page 17 Wednesday, May 28, 2003 12:53 PM Scan to E-mail Setup 5 Enter the e-mail subject by pressing the letter entry keys (max. of 60 characters). (Make sure the Rapid Key overlay is flipped down.
allbook.book Page 18 Wednesday, May 28, 2003 12:53 PM Scan to E-mail Setup 10 Press the letter keys to enter your e-mail address (see Step 5). 11 Press START/ ENTER . • Make sure that FILE FORMAT is selected. SCAN TO E-MAIL SET-UP 1:E-MAIL SUBJECT 2:E-MAIL SENDER 3:FILE FORMAT 12 Press 13 Press or to select the desired combination of file format (TIFF or PDF) and compression method (G3, G4, or NO COMPRESSION).
allbook.book Page 19 Wednesday, May 28, 2003 12:53 PM 6. Scan to E-mail Using the E-mail Key Use the e-mail key when you wish to manually enter the e-mail address of a recipient for Scan to E-mail. The scanned image will be sent as an e-mail attachment. A message can also be included as explained in Steps 5 and 6. Important: To use Scan to E-mail, the setup procedures outlined on page 4 must be completed.
allbook.book Page 20 Wednesday, May 28, 2003 12:53 PM Scan to E-mail Using the E-mail Key 4 Press 5 If you wish to enter a message, your name, or your return e-mail address, or select the file format for the document, press . (If you wish to use the default settings you entered on page 16 and do not need to enter a message, go directly to Step 8.) START/ ENTER . 1:START SCANNING 2:FROM XXX 3:FILE FORMAT XXX 4:MESSAGE NO MESSAGE Your preset sender and file format appear in “XXX”.
allbook.book Page 21 Wednesday, May 28, 2003 12:53 PM 7. Sending an Image Using a Rapid Key or Speed Dial Number Sending an image using a Rapid Key Use this procedure to scan a document and send the image to an Email, FTP, or Desktop destination that has been stored in a Rapid Key. Important: To use this procedure, the setup procedures outlined on page 4 must be completed.
allbook.book Page 22 Wednesday, May 28, 2003 12:53 PM Sending an Image Using a Rapid Key or Speed Dial Number 3 If the destination is an e-mail destination and you wish to enter a message, or change the sender name or e-mail address, or select the file format for the document, WITHIN 5 SECONDS press after pressing the Rapid Key in Step 2. (After 5 seconds, the document will be scanned and transmitted using the settings that were stored in the Rapid Key.
allbook.book Page 23 Wednesday, May 28, 2003 12:53 PM Sending an Image Using a Rapid Key or Speed Dial Number Sending an image using a Speed Dial number Use this procedure to scan a document and send the image to an Email, FTP, or Desktop destination that has been stored in a Speed Dial number. Important: To use this procedure, the setup procedures outlined on page 4 must be completed.
allbook.book Page 24 Wednesday, May 28, 2003 12:53 PM Sending an Image Using a Rapid Key or Speed Dial Number 3 If the destination is an e-mail destination and you wish to enter a message, your name, or your return e-mail address, or select the file format for the document, press . (If the destination is an FTP or Desktop destination, or if you wish to use the e-mail settings that were stored in the Speed Dial number and do not need to enter a message, go directly to Step 6.
allbook.book Page 25 Wednesday, May 28, 2003 12:53 PM Sending an Image Using a Rapid Key or Speed Dial Number Storing an e-mail address in a Rapid Key or Speed Dial number This section explains how to store e-mail addresses in Rapid Keys and Speed Dial numbers using the operation panel of the machine. This will allow you to send documents to e-mail recipients without having to manually enter the e-mail address each time.
allbook.book Page 26 Wednesday, May 28, 2003 12:53 PM Sending an Image Using a Rapid Key or Speed Dial Number 5 To program a Rapid Key number, press the Rapid Key that you wish to use. (To select Rapid Keys 40 through 59, flip up the Rapid Key overlay.) DESTINATION SET SELECT DESTINATION TYPE 1=FAX 2=E-MAIL To program a Speed Dial number, SPEED DIAL press and then enter the number that you wish to use (“1” to “100” on the FO-DC500, or “1” to “200” on the FO-DC600).
allbook.book Page 27 Wednesday, May 28, 2003 12:53 PM Sending an Image Using a Rapid Key or Speed Dial Number 10 Enter the name of the party by pressing the letter entry keys (max. of 20 characters). (Make sure the Rapid Key overlay is flipped down.) 11 Press 12 Press or to select the file format (TIFF or PDF) and compression method (G3, G4, or NO COMPRESSION) for the document that will be sent as an e-mail attachment. (Note: You can override this setting during the transmission procedure.
allbook.book Page 28 Wednesday, May 28, 2003 12:53 PM 8. Installing the Network Scanner Software To use the Scan to Desktop function, the following two software programs must be installed in your computer (the destination computer for Scan to Desktop). The programs are installed from the CD-ROM that comes with the network scanner expansion kit. ♦ Sharpdesk (Desktop Document Management Software) ♦ Network Scanner Tool Note: Sharpdesk can be installed and used in 5 computers.
allbook.book Page 29 Wednesday, May 28, 2003 12:53 PM Installing the Network Scanner Software ♦ Saved in a folder. ♦ Passed to an application set in the Network Scanner Tool. ♦ Sent as e-mail. ♦ Saved in Sharpdesk. User's Guides for Software Programs The Manual folder in the CD-ROM contains the Sharpdesk Installation Guide, Sharpdesk User's Guide, and Network Scanner Tool User's Guide. The guides are in PDF format. Acrobat Reader Version 4.05 or later is needed to view the user's guides.
allbook.book Page 30 Wednesday, May 28, 2003 12:53 PM Installing the Network Scanner Software Installing the software programs Note the following when installing the software programs from the CD-ROM: ♦ Be sure to check the system requirements for installation of each of the software programs in the user's guides and on the information screen during installation. ♦ For detailed instructions for installing and setting up the programs, see the Sharpdesk Installation Guide on the CD-ROM.
allbook.book Page 31 Wednesday, May 28, 2003 12:53 PM Installing the Network Scanner Software • If you select Typical in the installation type screen, Network Scanner Tool will also be installed. If you only wish to install Network Scanner Tool, select Custom in the installation type screen and then check only Network Scanner Tool. • Sharpdesk Imaging is installed together with Sharpdesk. If Imaging for Windows was previously installed, Sharpdesk Imaging will overwrite Imaging for Windows.
allbook.book Page 32 Wednesday, May 28, 2003 12:53 PM Installing the Network Scanner Software 2 Enter any name you wish for the Process Definition Prefix and any letter for Initial, and click Next. Click Help for detailed information. • The name of your computer initially appears in the Prefix box. If you wish to change the prefix, enter a name in 6 characters. • Enter any letter for the Initial (the initial is not used on the FODC500/600, however, an entry is necessary).
allbook.book Page 33 Wednesday, May 28, 2003 12:53 PM Installing the Network Scanner Software - Convert By OCR (name displayed: Sharp-OCR) Converts a scanned file to an editable document. - Send Email (name displayed: Sharp-Email) Launches your default e-mail application so the file can be e-mailed. - Sharpdesk Desktop (name displayed: Sharp-Desk), Launches the Sharpdesk application (this is the default).
allbook.book Page 34 Wednesday, May 28, 2003 12:53 PM Installing the Network Scanner Software 5 When the completion message appears, click Finish. The "Search Setup Wizard" will appear next. Follow the on-screen instructions to create an index database. For more information, see the Sharpdesk Installation Guide and Sharpdesk User's Guide. Uninstalling a program You can uninstall the software with “Add/Remove Programs” in the Windows Control Panel, or with the Sharpdesk Uninstaller.
allbook.book Page 35 Wednesday, May 28, 2003 12:53 PM 9. Troubleshooting Problem: The recipient can not open the image data. Check: Does the recipient have a software program (viewer) that is compatible with the format of the file sent? Solution: Try sending the image using a different file format (TIFF or PDF) and/or compression method (uncompressed, G3 and G4). Problem: Data sent does not reach the recipient.
allbook.book Page 36 Wednesday, May 28, 2003 12:53 PM Troubleshooting Problem: Takes a long time to send an image. Check: A large file size can greatly increase the amount of time required for transmission. Solution: Reduce the file size (decrease the number of scanned pages, use a lower resolution setting, or use a higher compression level such as G4). Problem: Cannot connect to the network. Check: The Network Interface Board (NIC) has failed or is not properly connected.
allbook.
allbook.book Page 1 Wednesday, May 28, 2003 12:53 PM (Australia Only) WARRANTY Facsimile Products Congratulations on Your Purchase! This Sharp product is warranted against manufacturing defects for a period of twelve (12) months from the date of original purchase.
allbook.book Page 1 Wednesday, May 28, 2003 12:53 PM SHARP ELECTRONICS CORPORATION Sharp Plaza, Mahwah, New Jersey 07430-1163 1-800-BE-SHARP http://www.sharpusa.com SHARP ELECTRONICS OF CANADA LTD. 335 Britannia Road East, Mississauga, Ontario L4Z 1W9 http://www.sharp.ca SHARP CORPORATION OF AUSTRALIA PTY.LTD. A.C.N. 003 039 405 1 Huntingwood Drive, Huntingwood, Blacktown, N.S.W.